1. 概觀
本文檔的目標是為編寫測試的程式設計人員、擴展作者和引擎作者,以及建構工具和 IDE 供應商提供全面的參考文檔。
本文檔也提供 PDF 下載。
1.1. 什麼是 JUnit 5?
與先前版本的 JUnit 不同,JUnit 5 由三個不同子專案的幾個不同模組組成。
JUnit 5 = JUnit Platform + JUnit Jupiter + JUnit Vintage
JUnit Platform 作為在 JVM 上啟動測試框架的基礎。它也為開發在平台上運行的測試框架定義了 TestEngine API。此外,該平台還提供了一個 命令列啟動器,用於從命令列啟動平台,以及 JUnit Platform Suite 引擎,用於在平台上使用一個或多個測試引擎運行自訂測試套件。流行的 IDE 也對 JUnit Platform 提供一流的支援(請參閱 IntelliJ IDEA、Eclipse、NetBeans 和 Visual Studio Code)和建構工具(請參閱 Gradle、Maven 和 Ant)。
JUnit Jupiter 是 程式設計模型 與 擴展模型 的組合,用於在 JUnit 5 中編寫測試和擴展。Jupiter 子專案提供了一個 TestEngine,用於在平台上運行基於 Jupiter 的測試。
JUnit Vintage 提供了一個 TestEngine,用於在平台上運行基於 JUnit 3 和 JUnit 4 的測試。它需要 JUnit 4.12 或更高版本存在於類別路徑或模組路徑上。
1.3. 取得協助
在 Stack Overflow 上詢問與 JUnit 5 相關的問題,或在 Gitter 上與社群聊天。
1.4. 開始使用
1.4.3. 範例專案
要查看您可以複製和實驗的專案的完整工作範例,junit5-samples 儲存庫是一個很好的起點。junit5-samples 儲存庫託管了基於 JUnit Jupiter、JUnit Vintage 和其他測試框架的範例專案集合。您會在範例專案中找到適當的建構腳本(例如,build.gradle、pom.xml 等)。以下連結重點介紹了您可以選擇的一些組合。
-
對於 Gradle 和 Java,請查看
junit5-jupiter-starter-gradle專案。 -
對於 Gradle 和 Kotlin,請查看
junit5-jupiter-starter-gradle-kotlin專案。 -
對於 Gradle 和 Groovy,請查看
junit5-jupiter-starter-gradle-groovy專案。 -
對於 Maven,請查看
junit5-jupiter-starter-maven專案。 -
對於 Ant,請查看
junit5-jupiter-starter-ant專案。
2. 編寫測試
以下範例簡要介紹了在 JUnit Jupiter 中編寫測試的最低要求。本章後續章節將提供有關所有可用功能的更多詳細資訊。
import static org.junit.jupiter.api.Assertions.assertEquals;

import example.util.Calculator;

import org.junit.jupiter.api.Test;

class MyFirstJUnitJupiterTests {

    private final Calculator calculator = new Calculator();

    @Test
    void addition() {
        assertEquals(2, calculator.add(1, 1));
    }

}
2.1. 註解
JUnit Jupiter 支援以下註解,用於組態測試和擴展框架。
除非另有說明,否則所有核心註解都位於 junit-jupiter-api 模組中的 org.junit.jupiter.api 套件中。
| 註解 | 描述 |
|---|---|
|
表示方法是測試方法。與 JUnit 4 的 |
|
表示方法是參數化測試。除非方法被覆寫,否則它們會被繼承。 |
|
表示方法是重複測試的測試模板。除非方法被覆寫,否則它們會被繼承。 |
|
表示方法是動態測試的測試工廠。除非方法被覆寫,否則它們會被繼承。 |
|
|
|
用於在註解的測試類別中為 |
|
用於為註解的測試類別組態測試方法執行順序;類似於 JUnit 4 的 |
|
用於為註解的測試類別組態測試實例生命週期。此類註解會被繼承。 |
|
宣告用於測試類別或測試方法的自訂顯示名稱。此類註解不會被繼承。 |
|
宣告用於測試類別的自訂顯示名稱產生器。此類註解會被繼承。 |
|
表示被此註解標註的方法應在當前類別中每個 |
|
表示被此註解標註的方法應在當前類別中每個 |
|
表示被此註解標註的方法應在當前類別中所有 |
|
表示被此註解標註的方法應在當前類別中所有 |
|
表示被此註解標註的類別是一個非靜態的巢狀測試類別。在 Java 8 到 Java 15 中,除非使用「per-class」測試實例生命週期,否則 |
|
用於宣告用於篩選測試的標籤,可以在類別或方法層級使用;類似於 TestNG 中的測試群組或 JUnit 4 中的 Categories。此類註解在類別層級會被繼承,但在方法層級則不會。 |
|
用於停用測試類別或測試方法;類似於 JUnit 4 的 |
|
表示被此註解標註的欄位代表一個資源,該資源將在測試執行後被自動關閉。 |
|
用於在測試、測試工廠、測試範本或生命週期方法的執行時間超過給定時長時使其失敗。此類註解會被繼承。 |
|
用於透過欄位注入或參數注入,在測試類別建構子、生命週期方法或測試方法中提供臨時目錄;位於 |
|
用於宣告式地註冊擴充功能。此類註解會被繼承。 |
|
用於透過欄位程式化地註冊擴充功能。此類欄位會被繼承。 |
| 某些註解目前可能處於實驗性階段。請查閱實驗性 API 中的表格以了解詳細資訊。 |
2.1.1. 元註解與組合註解
JUnit Jupiter 註解可以用作元註解。這表示您可以定義自己的組合註解,它將自動繼承其元註解的語意。
例如,您可以建立一個名為 @Fast 的自訂組合註解,而不是在整個程式碼庫中複製和貼上 @Tag("fast")(請參閱標籤與篩選)。然後,@Fast 可以用作 @Tag("fast") 的直接替換。
import java.lang.annotation.ElementType;
import java.lang.annotation.Retention;
import java.lang.annotation.RetentionPolicy;
import java.lang.annotation.Target;

import org.junit.jupiter.api.Tag;

@Target({ ElementType.TYPE, ElementType.METHOD })
@Retention(RetentionPolicy.RUNTIME)
@Tag("fast")
public @interface Fast {
}
以下 @Test 方法示範了 @Fast 註解的用法。
@Fast
@Test
void myFastTest() {
    // ...
}
您甚至可以更進一步,引入一個自訂的 @FastTest 註解,它可以作為 @Tag("fast") 和 @Test 的直接替換。
import java.lang.annotation.ElementType;
import java.lang.annotation.Retention;
import java.lang.annotation.RetentionPolicy;
import java.lang.annotation.Target;

import org.junit.jupiter.api.Tag;
import org.junit.jupiter.api.Test;

@Target(ElementType.METHOD)
@Retention(RetentionPolicy.RUNTIME)
@Tag("fast")
@Test
public @interface FastTest {
}
JUnit 會自動將以下內容識別為標記為 "fast" 的 @Test 方法。
@FastTest
void myFastTest() {
    // ...
}2.3. 測試類別與方法
測試方法和生命週期方法可以在當前測試類別中本地宣告、從父類別繼承,或從介面繼承(請參閱測試介面與預設方法)。此外,測試方法和生命週期方法不得為 abstract,且不得傳回值(@TestFactory 方法除外,它們需要傳回值)。
|
類別和方法可見性
測試類別、測試方法和生命週期方法不一定需要是 一般建議省略測試類別、測試方法和生命週期方法的 |
|
欄位和方法繼承
測試類別中的欄位會被繼承。例如,來自父類別的 測試方法和生命週期方法會被繼承,除非它們根據 Java 語言的可見性規則被覆寫。例如,來自父類別的 另請參閱:欄位與方法搜尋語意 |
import static org.junit.jupiter.api.Assertions.fail;
import static org.junit.jupiter.api.Assumptions.assumeTrue;

import org.junit.jupiter.api.AfterAll;
import org.junit.jupiter.api.AfterEach;
import org.junit.jupiter.api.BeforeAll;
import org.junit.jupiter.api.BeforeEach;
import org.junit.jupiter.api.Disabled;
import org.junit.jupiter.api.Test;

class StandardTests {

    @BeforeAll
    static void initAll() {
    }

    @BeforeEach
    void init() {
    }

    @Test
    void succeedingTest() {
    }

    @Test
    void failingTest() {
        fail("a failing test");
    }

    @Test
    @Disabled("for demonstration purposes")
    void skippedTest() {
        // not executed
    }

    @Test
    void abortedTest() {
        assumeTrue("abc".contains("Z"));
        fail("test should have been aborted");
    }

    @AfterEach
    void tearDown() {
    }

    @AfterAll
    static void tearDownAll() {
    }

}
也可以使用 Java record 類別作為測試類別,如下例所示。
import static org.junit.jupiter.api.Assertions.assertEquals;

import example.util.Calculator;

import org.junit.jupiter.api.Test;

record MyFirstJUnitJupiterRecordTests() {

    @Test
    void addition() {
        assertEquals(2, new Calculator().add(1, 1));
    }

}
2.4. 顯示名稱
測試類別和測試方法可以透過 @DisplayName 宣告自訂顯示名稱 — 可以使用空格、特殊字元,甚至表情符號 — 這些名稱將顯示在測試報告中,並由測試執行器和 IDE 顯示。
import org.junit.jupiter.api.DisplayName;
import org.junit.jupiter.api.Test;

@DisplayName("A special test case")
class DisplayNameDemo {

    @Test
    @DisplayName("Custom test name containing spaces")
    void testWithDisplayNameContainingSpaces() {
    }

    @Test
    @DisplayName("╯°□°)╯")
    void testWithDisplayNameContainingSpecialCharacters() {
    }

    @Test
    @DisplayName("😱")
    void testWithDisplayNameContainingEmoji() {
    }

}
2.4.1. 顯示名稱產生器
JUnit Jupiter 支援自訂顯示名稱產生器,可以透過 @DisplayNameGeneration 註解進行配置。透過 @DisplayName 註解提供的值始終優先於 DisplayNameGenerator 產生的顯示名稱。
產生器可以透過實作 DisplayNameGenerator 來建立。以下是 Jupiter 中可用的一些預設產生器
| DisplayNameGenerator | 行為 |
|---|---|
|
符合自 JUnit Jupiter 5.0 版本以來一直使用的標準顯示名稱產生行為。 |
|
移除沒有參數的方法的尾隨括號。 |
|
將底線替換為空格。 |
|
透過串連測試和封閉類別的名稱來產生完整句子。 |
請注意,對於 IndicativeSentences,您可以透過使用 @IndicativeSentencesGeneration 自訂分隔符號和底層產生器,如下例所示。
import org.junit.jupiter.api.DisplayName;
import org.junit.jupiter.api.DisplayNameGeneration;
import org.junit.jupiter.api.DisplayNameGenerator;
import org.junit.jupiter.api.DisplayNameGenerator.ReplaceUnderscores;
import org.junit.jupiter.api.IndicativeSentencesGeneration;
import org.junit.jupiter.api.Nested;
import org.junit.jupiter.api.Test;
import org.junit.jupiter.params.ParameterizedTest;
import org.junit.jupiter.params.provider.ValueSource;

class DisplayNameGeneratorDemo {

    @Nested
    @DisplayNameGeneration(DisplayNameGenerator.ReplaceUnderscores.class)
    class A_year_is_not_supported {

        @Test
        void if_it_is_zero() {
        }

        @DisplayName("A negative value for year is not supported by the leap year computation.")
        @ParameterizedTest(name = "For example, year {0} is not supported.")
        @ValueSource(ints = { -1, -4 })
        void if_it_is_negative(int year) {
        }

    }

    @Nested
    @IndicativeSentencesGeneration(separator = " -> ", generator = ReplaceUnderscores.class)
    class A_year_is_a_leap_year {

        @Test
        void if_it_is_divisible_by_4_but_not_by_100() {
        }

        @ParameterizedTest(name = "Year {0} is a leap year.")
        @ValueSource(ints = { 2016, 2020, 2048 })
        void if_it_is_one_of_the_following_years(int year) {
        }

    }

}
+-- DisplayNameGeneratorDemo [OK]
+-- A year is not supported [OK]
| +-- A negative value for year is not supported by the leap year computation. [OK]
| | +-- For example, year -1 is not supported. [OK]
| | '-- For example, year -4 is not supported. [OK]
| '-- if it is zero() [OK]
'-- A year is a leap year [OK]
+-- A year is a leap year -> if it is divisible by 4 but not by 100. [OK]
'-- A year is a leap year -> if it is one of the following years. [OK]
+-- Year 2016 is a leap year. [OK]
+-- Year 2020 is a leap year. [OK]
'-- Year 2048 is a leap year. [OK]2.4.2. 設定預設顯示名稱產生器
您可以使用 junit.jupiter.displayname.generator.default 組態參數來指定您想要預設使用的 DisplayNameGenerator 的完整類別名稱。就像透過 @DisplayNameGeneration 註解配置的顯示名稱產生器一樣,提供的類別必須實作 DisplayNameGenerator 介面。預設顯示名稱產生器將用於所有測試,除非封閉測試類別或測試介面上存在 @DisplayNameGeneration 註解。透過 @DisplayName 註解提供的值始終優先於 DisplayNameGenerator 產生的顯示名稱。
例如,若要預設使用 ReplaceUnderscores 顯示名稱產生器,您應該將組態參數設定為相應的完整類別名稱(例如,在 src/test/resources/junit-platform.properties 中)
junit.jupiter.displayname.generator.default = \
    org.junit.jupiter.api.DisplayNameGenerator$ReplaceUnderscores
同樣地,您可以指定任何實作 DisplayNameGenerator 的自訂類別的完整名稱。
總之,測試類別或方法的顯示名稱根據以下優先順序規則確定
-
@DisplayName註解的值(如果存在) -
透過呼叫
@DisplayNameGeneration註解中指定的DisplayNameGenerator(如果存在) -
透過呼叫透過組態參數配置的預設
DisplayNameGenerator(如果存在) -
透過呼叫
org.junit.jupiter.api.DisplayNameGenerator.Standard
2.5. 斷言
JUnit Jupiter 帶有許多 JUnit 4 擁有的斷言方法,並新增了一些非常適合與 Java 8 lambda 一起使用的方法。所有 JUnit Jupiter 斷言都是 org.junit.jupiter.api.Assertions 類別中的 static 方法。
斷言方法可以選擇性地接受斷言訊息作為其第三個參數,它可以是 String 或 Supplier<String>。
當使用 Supplier<String>(例如,lambda 運算式)時,訊息會延遲評估。這可以提供效能優勢,尤其是在訊息建構複雜或耗時的情況下,因為它僅在斷言失敗時才被評估。
import static java.time.Duration.ofMillis;
import static java.time.Duration.ofMinutes;
import static org.junit.jupiter.api.Assertions.assertAll;
import static org.junit.jupiter.api.Assertions.assertEquals;
import static org.junit.jupiter.api.Assertions.assertNotNull;
import static org.junit.jupiter.api.Assertions.assertThrows;
import static org.junit.jupiter.api.Assertions.assertTimeout;
import static org.junit.jupiter.api.Assertions.assertTimeoutPreemptively;
import static org.junit.jupiter.api.Assertions.assertTrue;

import java.util.concurrent.CountDownLatch;

import example.domain.Person;
import example.util.Calculator;

import org.junit.jupiter.api.Tag;
import org.junit.jupiter.api.Test;

class AssertionsDemo {

    private final Calculator calculator = new Calculator();

    private final Person person = new Person("Jane", "Doe");

    @Test
    void standardAssertions() {
        assertEquals(2, calculator.add(1, 1));
        assertEquals(4, calculator.multiply(2, 2),
                "The optional failure message is now the last parameter");

        // Lazily evaluates generateFailureMessage('a','b').
        assertTrue('a' < 'b', () -> generateFailureMessage('a','b'));
    }

    @Test
    void groupedAssertions() {
        // In a grouped assertion all assertions are executed, and all
        // failures will be reported together.
        assertAll("person",
            () -> assertEquals("Jane", person.getFirstName()),
            () -> assertEquals("Doe", person.getLastName())
        );
    }

    @Test
    void dependentAssertions() {
        // Within a code block, if an assertion fails the
        // subsequent code in the same block will be skipped.
        assertAll("properties",
            () -> {
                String firstName = person.getFirstName();
                assertNotNull(firstName);

                // Executed only if the previous assertion is valid.
                assertAll("first name",
                    () -> assertTrue(firstName.startsWith("J")),
                    () -> assertTrue(firstName.endsWith("e"))
                );
            },
            () -> {
                // Grouped assertion, so processed independently
                // of results of first name assertions.
                String lastName = person.getLastName();
                assertNotNull(lastName);

                // Executed only if the previous assertion is valid.
                assertAll("last name",
                    () -> assertTrue(lastName.startsWith("D")),
                    () -> assertTrue(lastName.endsWith("e"))
                );
            }
        );
    }

    @Test
    void exceptionTesting() {
        Exception exception = assertThrows(ArithmeticException.class, () ->
            calculator.divide(1, 0));
        assertEquals("/ by zero", exception.getMessage());
    }

    @Test
    void timeoutNotExceeded() {
        // The following assertion succeeds.
        assertTimeout(ofMinutes(2), () -> {
            // Perform task that takes less than 2 minutes.
        });
    }

    @Test
    void timeoutNotExceededWithResult() {
        // The following assertion succeeds, and returns the supplied object.
        String actualResult = assertTimeout(ofMinutes(2), () -> {
            return "a result";
        });
        assertEquals("a result", actualResult);
    }

    @Test
    void timeoutNotExceededWithMethod() {
        // The following assertion invokes a method reference and returns an object.
        String actualGreeting = assertTimeout(ofMinutes(2), AssertionsDemo::greeting);
        assertEquals("Hello, World!", actualGreeting);
    }

    @Test
    void timeoutExceeded() {
        // The following assertion fails with an error message similar to:
        // execution exceeded timeout of 10 ms by 91 ms
        assertTimeout(ofMillis(10), () -> {
            // Simulate task that takes more than 10 ms.
            Thread.sleep(100);
        });
    }

    @Test
    void timeoutExceededWithPreemptiveTermination() {
        // The following assertion fails with an error message similar to:
        // execution timed out after 10 ms
        assertTimeoutPreemptively(ofMillis(10), () -> {
            // Simulate task that takes more than 10 ms.
            new CountDownLatch(1).await();
        });
    }

    private static String greeting() {
        return "Hello, World!";
    }

    private static String generateFailureMessage(char a, char b) {
        return "Assertion messages can be lazily evaluated -- "
                + "to avoid constructing complex messages unnecessarily." + (a < b);
    }
}|
使用
assertTimeoutPreemptively() 的搶佔式逾時
Spring Framework 中的事務性測試支援是這方面的一個常見範例。具體來說,Spring 的測試支援在調用測試方法之前,將事務狀態綁定到當前執行緒(透過 使用其他依賴 |
2.5.1. Kotlin 斷言支援
JUnit Jupiter 還提供了一些非常適合在 Kotlin 中使用的斷言方法。所有 JUnit Jupiter Kotlin 斷言都是 org.junit.jupiter.api 套件中的頂層函數。
import example.domain.Person
import example.util.Calculator
import org.junit.jupiter.api.Assertions.assertEquals
import org.junit.jupiter.api.Assertions.assertTrue
import org.junit.jupiter.api.Tag
import org.junit.jupiter.api.Test
import org.junit.jupiter.api.assertAll
import org.junit.jupiter.api.assertDoesNotThrow
import org.junit.jupiter.api.assertInstanceOf
import org.junit.jupiter.api.assertNotNull
import org.junit.jupiter.api.assertThrows
import org.junit.jupiter.api.assertTimeout
import org.junit.jupiter.api.assertTimeoutPreemptively
import java.time.Duration

class KotlinAssertionsDemo {
    private val person = Person("Jane", "Doe")
    private val people = setOf(person, Person("John", "Doe"))

    @Test
    fun `exception absence testing`() {
        val calculator = Calculator()
        val result =
            assertDoesNotThrow("Should not throw an exception") {
                calculator.divide(0, 1)
            }
        assertEquals(0, result)
    }

    @Test
    fun `expected exception testing`() {
        val calculator = Calculator()
        val exception =
            assertThrows<ArithmeticException> ("Should throw an exception") {
                calculator.divide(1, 0)
            }
        assertEquals("/ by zero", exception.message)
    }

    @Test
    fun `grouped assertions`() {
        assertAll(
            "Person properties",
            { assertEquals("Jane", person.firstName) },
            { assertEquals("Doe", person.lastName) }
        )
    }

    @Test
    fun `grouped assertions from a stream`() {
        assertAll(
            "People with first name starting with J",
            people
                .stream()
                .map {
                    // This mapping returns Stream<() -> Unit>
                    { assertTrue(it.firstName.startsWith("J")) }
                }
        )
    }

    @Test
    fun `grouped assertions from a collection`() {
        assertAll(
            "People with last name of Doe",
            people.map { { assertEquals("Doe", it.lastName) } }
        )
    }

    @Test
    fun `timeout not exceeded testing`() {
        val fibonacciCalculator = FibonacciCalculator()
        val result =
            assertTimeout(Duration.ofMillis(1000)) {
                fibonacciCalculator.fib(14)
            }
        assertEquals(377, result)
    }

    @Test
    fun `timeout exceeded with preemptive termination`() {
        // The following assertion fails with an error message similar to:
        // execution timed out after 10 ms
        assertTimeoutPreemptively(Duration.ofMillis(10)) {
            // Simulate task that takes more than 10 ms.
            Thread.sleep(100)
        }
    }

    @Test
    fun `assertNotNull with a smart cast`() {
        val nullablePerson: Person? = person

        assertNotNull(nullablePerson)

        // The compiler smart casts nullablePerson to a non-nullable object.
        // The safe call operator (?.) isn't required.
        assertEquals(person.firstName, nullablePerson.firstName)
        assertEquals(person.lastName, nullablePerson.lastName)
    }

    @Test
    fun `assertInstanceOf with a smart cast`() {
        val maybePerson: Any = person

        assertInstanceOf<Person>(maybePerson)

        // The compiler smart casts maybePerson to a Person object,
        // allowing to access the Person properties.
        assertEquals(person.firstName, maybePerson.firstName)
        assertEquals(person.lastName, maybePerson.lastName)
    }
}
2.5.2. 第三方斷言庫
即使 JUnit Jupiter 提供的斷言功能足以應付許多測試情境,但有時也需要更強大的功能和額外的功能,例如匹配器。在這種情況下,JUnit 團隊建議使用第三方斷言庫,例如 AssertJ、Hamcrest、Truth 等。因此,開發人員可以自由選擇使用他們選擇的斷言庫。
例如,匹配器和流暢 API 的組合可用於使斷言更具描述性和可讀性。但是,JUnit Jupiter 的 org.junit.jupiter.api.Assertions 類別不提供像 JUnit 4 的 org.junit.Assert 類別中找到的 assertThat() 方法,該方法接受 Hamcrest Matcher。相反地,鼓勵開發人員使用第三方斷言庫提供的內建匹配器支援。
以下範例示範如何在 JUnit Jupiter 測試中使用 Hamcrest 的 assertThat() 支援。只要 Hamcrest 程式庫已新增至類別路徑,您就可以靜態匯入諸如 assertThat()、is() 和 equalTo() 等方法,然後在測試中使用它們,如下方 assertWithHamcrestMatcher() 方法中的範例。
import static org.hamcrest.CoreMatchers.equalTo;
import static org.hamcrest.CoreMatchers.is;
import static org.hamcrest.MatcherAssert.assertThat;

import example.util.Calculator;

import org.junit.jupiter.api.Test;

class HamcrestAssertionsDemo {

    private final Calculator calculator = new Calculator();

    @Test
    void assertWithHamcrestMatcher() {
        assertThat(calculator.subtract(4, 1), is(equalTo(3)));
    }

}
當然,基於 JUnit 4 程式設計模型的舊版測試可以繼續使用 org.junit.Assert#assertThat。
2.6. 假設 (Assumptions)
假設通常用於在給定測試繼續執行沒有意義時——例如,如果測試依賴於目前執行環境中不存在的某些事物。
-
當假設有效時,假設方法不會拋出例外,並且測試的執行會像平常一樣繼續。
-
當假設無效時,假設方法會拋出
org.opentest4j.TestAbortedException類型的例外,以表示應中止測試,而不是標記為失敗。
JUnit Jupiter 隨附 JUnit 4 提供的假設方法的子集,並新增了一些適用於 Java 8 Lambda 運算式和方法參考的方法。
所有 JUnit Jupiter 假設都是 org.junit.jupiter.api.Assumptions 類別中的靜態方法。
import static org.junit.jupiter.api.Assertions.assertEquals;
import static org.junit.jupiter.api.Assumptions.assumeTrue;
import static org.junit.jupiter.api.Assumptions.assumingThat;

import example.util.Calculator;

import org.junit.jupiter.api.Test;

class AssumptionsDemo {

    private final Calculator calculator = new Calculator();

    @Test
    void testOnlyOnCiServer() {
        assumeTrue("CI".equals(System.getenv("ENV")));
        // remainder of test
    }

    @Test
    void testOnlyOnDeveloperWorkstation() {
        assumeTrue("DEV".equals(System.getenv("ENV")),
            () -> "Aborting test: not on developer workstation");
        // remainder of test
    }

    @Test
    void testInAllEnvironments() {
        assumingThat("CI".equals(System.getenv("ENV")),
            () -> {
                // perform these assertions only on the CI server
                assertEquals(2, calculator.divide(4, 2));
            });

        // perform these assertions in all environments
        assertEquals(42, calculator.multiply(6, 7));
    }

}
也可以使用 JUnit 4 的 org.junit.Assume 類別中的方法進行假設。具體來說,JUnit Jupiter 支援 JUnit 4 的 AssumptionViolatedException,以表示應中止測試,而不是標記為失敗。 |
2.7. 例外處理 (Exception Handling)
JUnit Jupiter 為處理測試例外提供了強大的支援。這包括用於管理因例外導致的測試失敗的內建機制、例外在實作斷言和假設中的作用,以及如何在程式碼中明確斷言非拋出條件。
2.7.1. 未捕獲的例外 (Uncaught Exceptions)
在 JUnit Jupiter 中,如果從測試方法、生命週期方法或擴充功能拋出例外,且未在該測試方法、生命週期方法或擴充功能內捕獲,框架會將測試或測試類別標記為失敗。
|
失敗的假設偏離了此一般規則。 與失敗的斷言相反,失敗的假設不會導致測試失敗;相反地,失敗的假設會導致測試中止。 請參閱 假設 (Assumptions) 以取得更多詳細資訊和範例。 |
在以下範例中,failsDueToUncaughtException() 方法拋出 ArithmeticException。由於例外未在測試方法內捕獲,JUnit Jupiter 會將測試標記為失敗。
private final Calculator calculator = new Calculator();

@Test
void failsDueToUncaughtException() {
    // The following throws an ArithmeticException due to division by
    // zero, which causes a test failure.
    calculator.divide(1, 0);
}
重要的是要注意,在測試方法中指定 throws 子句對測試結果沒有影響。JUnit Jupiter 不會將 throws 子句解讀為關於測試方法應拋出哪些例外的預期或斷言。僅當意外拋出例外或斷言失敗時,測試才會失敗。 |
2.7.2. 失敗的斷言 (Failed Assertions)
JUnit Jupiter 中的斷言是使用例外實作的。框架在 org.junit.jupiter.api.Assertions 類別中提供了一組斷言方法,當斷言失敗時,這些方法會拋出 AssertionError。此機制是 JUnit 如何處理作為例外的斷言失敗的核心方面。請參閱 斷言 (Assertions) 章節,以取得關於 JUnit Jupiter 斷言支援的更多資訊。
第三方斷言程式庫可能會選擇拋出 AssertionError 以表示斷言失敗;但是,它們也可能選擇拋出不同類型的例外來表示失敗。另請參閱:第三方斷言程式庫 (Third-party Assertion Libraries)。 |
JUnit Jupiter 本身不區分失敗的斷言 (AssertionError) 和其他類型的例外。所有未捕獲的例外都會導致測試失敗。但是,整合開發環境 (IDE) 和其他工具可能會透過檢查拋出的例外是否為 AssertionError 的實例來區分這兩種失敗類型。 |
在以下範例中,failsDueToUncaughtAssertionError() 方法拋出 AssertionError。由於例外未在測試方法內捕獲,JUnit Jupiter 會將測試標記為失敗。
private final Calculator calculator = new Calculator();

@Test
void failsDueToUncaughtAssertionError() {
    // The following incorrect assertion will cause a test failure.
    // The expected value should be 2 instead of 99.
    assertEquals(99, calculator.add(1, 1));
}
2.7.3. 斷言預期的例外 (Asserting Expected Exceptions)
JUnit Jupiter 提供了專門的斷言,用於測試在預期條件下是否拋出特定例外。assertThrows() 和 assertThrowsExactly() 斷言是用於驗證您的程式碼是否透過拋出適當的例外來正確回應錯誤條件的關鍵工具。
使用 assertThrows()
assertThrows() 方法用於驗證在執行提供的可執行區塊期間是否拋出特定類型的例外。它不僅檢查拋出例外的類型,還檢查其子類別,使其適用於更廣泛的例外處理測試。assertThrows() 斷言方法會傳回拋出的例外物件,以允許對其執行額外的斷言。
@Test
void testExpectedExceptionIsThrown() {
    // The following assertion succeeds because the code under assertion
    // throws the expected IllegalArgumentException.
    // The assertion also returns the thrown exception which can be used for
    // further assertions like asserting the exception message.
    IllegalArgumentException exception =
        assertThrows(IllegalArgumentException.class, () -> {
            throw new IllegalArgumentException("expected message");
        });
    assertEquals("expected message", exception.getMessage());

    // The following assertion also succeeds because the code under assertion
    // throws IllegalArgumentException which is a subclass of RuntimeException.
    assertThrows(RuntimeException.class, () -> {
        throw new IllegalArgumentException("expected message");
    });
}
使用 assertThrowsExactly()
當您需要斷言拋出的例外正是特定類型,不允許預期例外類型的子類別時,可以使用 assertThrowsExactly() 方法。當需要驗證精確的例外處理行為時,這非常有用。與 assertThrows() 類似,assertThrowsExactly() 斷言方法也會傳回拋出的例外物件,以允許對其執行額外的斷言。
@Test
void testExpectedExceptionIsThrown() {
    // The following assertion succeeds because the code under assertion throws
    // IllegalArgumentException which is exactly equal to the expected type.
    // The assertion also returns the thrown exception which can be used for
    // further assertions like asserting the exception message.
    IllegalArgumentException exception =
        assertThrowsExactly(IllegalArgumentException.class, () -> {
            throw new IllegalArgumentException("expected message");
        });
    assertEquals("expected message", exception.getMessage());

    // The following assertion fails because the assertion expects exactly
    // RuntimeException to be thrown, not subclasses of RuntimeException.
    assertThrowsExactly(RuntimeException.class, () -> {
        throw new IllegalArgumentException("expected message");
    });
}
2.7.4. 斷言未預期任何例外 (Asserting That no Exception is Expected)
雖然從測試方法拋出的任何例外都會導致測試失敗,但在某些使用案例中,明確斷言在測試方法內的給定程式碼區塊未拋出例外可能是有益的。當您想要驗證特定程式碼片段是否未拋出任何例外時,可以使用 assertDoesNotThrow() 斷言。
@Test
void testExceptionIsNotThrown() {
    assertDoesNotThrow(() -> {
        shouldNotThrowException();
    });
}

void shouldNotThrowException() {
}
第三方斷言程式庫通常提供類似的支援。例如,AssertJ 具有 assertThatNoException().isThrownBy(() → …)。另請參閱:第三方斷言程式庫 (Third-party Assertion Libraries)。 |
2.8. 停用測試 (Disabling Tests)
整個測試類別或個別測試方法可以透過 @Disabled 註解、透過 條件式測試執行 (Conditional Test Execution) 中討論的註解之一,或透過自訂 ExecutionCondition 停用。
當 @Disabled 應用於類別層級時,該類別中的所有測試方法也會自動停用。
如果測試方法透過 @Disabled 停用,則會阻止測試方法和方法層級生命週期回呼 (例如 @BeforeEach 方法、@AfterEach 方法和對應的擴充功能 API) 的執行。但是,這不會阻止測試類別被實例化,也不會阻止類別層級生命週期回呼 (例如 @BeforeAll 方法、@AfterAll 方法和對應的擴充功能 API) 的執行。
以下是一個 @Disabled 測試類別。
import org.junit.jupiter.api.Disabled;
import org.junit.jupiter.api.Test;

@Disabled("Disabled until bug #99 has been fixed")
class DisabledClassDemo {

    @Test
    void testWillBeSkipped() {
    }

}
以下是一個包含 @Disabled 測試方法的測試類別。
import org.junit.jupiter.api.Disabled;
import org.junit.jupiter.api.Test;

class DisabledTestsDemo {

    @Disabled("Disabled until bug #42 has been resolved")
    @Test
    void testWillBeSkipped() {
    }

    @Test
    void testWillBeExecuted() {
    }

}|
|
|
|
2.9. 條件式測試執行 (Conditional Test Execution)
JUnit Jupiter 中的 ExecutionCondition 擴充功能 API 允許開發人員根據某些條件以程式設計方式啟用或停用測試類別或測試方法。此類條件最簡單的範例是內建的 DisabledCondition,它支援 @Disabled 註解(請參閱 停用測試 (Disabling Tests))。
除了 @Disabled 之外,JUnit Jupiter 還支援 org.junit.jupiter.api.condition 套件中的其他幾個基於註解的條件,這些條件允許開發人員宣告式地啟用或停用測試類別和測試方法。如果您希望提供關於它們為何可能被停用的詳細資訊,則與這些內建條件關聯的每個註解都有一個可用的 disabledReason 屬性,用於此目的。
當註冊多個 ExecutionCondition 擴充功能時,只要其中一個條件傳回停用,測試類別或測試方法就會被停用。如果測試類別被停用,則該類別中的所有測試方法也會自動停用。如果測試方法被停用,則會阻止測試方法和方法層級生命週期回呼 (例如 @BeforeEach 方法、@AfterEach 方法和對應的擴充功能 API) 的執行。但是,這不會阻止測試類別被實例化,也不會阻止類別層級生命週期回呼 (例如 @BeforeAll 方法、@AfterAll 方法和對應的擴充功能 API) 的執行。
請參閱 ExecutionCondition 和以下章節以取得詳細資訊。
|
組合註解 (Composed Annotations)
請注意,以下章節中列出的任何條件式註解也可以用作元註解,以便建立自訂的組合註解。例如,@EnabledOnOs 示範中的 |
|
JUnit Jupiter 中的條件式註解不是 |
|
除非另有說明,否則以下章節中列出的每個條件式註解只能在給定的測試介面、測試類別或測試方法上宣告一次。如果條件式註解直接存在、間接存在或元存在於給定元素上多次,則只會使用 JUnit 發現的第一個此類註解;任何額外的宣告都會被靜默忽略。但是請注意,每個條件式註解都可以與 |
2.9.1. 作業系統和架構條件 (Operating System and Architecture Conditions)
可以透過 @EnabledOnOs 和 @DisabledOnOs 註解,在特定的作業系統、架構或兩者的組合上啟用或停用容器或測試。
@Test
@EnabledOnOs(MAC)
void onlyOnMacOs() {
    // ...
}

@TestOnMac
void testOnMac() {
    // ...
}

@Test
@EnabledOnOs({ LINUX, MAC })
void onLinuxOrMac() {
    // ...
}

@Test
@DisabledOnOs(WINDOWS)
void notOnWindows() {
    // ...
}

@Target(ElementType.METHOD)
@Retention(RetentionPolicy.RUNTIME)
@Test
@EnabledOnOs(MAC)
@interface TestOnMac {
}@Test
@EnabledOnOs(architectures = "aarch64")
void onAarch64() {
// ...
}
@Test
@DisabledOnOs(architectures = "x86_64")
void notOnX86_64() {
// ...
}
@Test
@EnabledOnOs(value = MAC, architectures = "aarch64")
void onNewMacs() {
// ...
}
@Test
@DisabledOnOs(value = MAC, architectures = "aarch64")
void notOnNewMacs() {
// ...
}2.9.2. Java Runtime Environment 條件 (Java Runtime Environment Conditions)
可以透過 @EnabledOnJre 和 @DisabledOnJre 註解,在特定版本的 Java Runtime Environment (JRE) 上啟用或停用容器或測試,或透過 @EnabledForJreRange 和 @DisabledForJreRange 註解,在特定版本範圍的 JRE 上啟用或停用容器或測試。範圍有效地預設為 JRE.JAVA_8 作為下限,JRE.OTHER 作為上限,這允許使用半開範圍。
以下列表示範了這些註解與預定義的 JRE 列舉常數的使用。
@Test
@EnabledOnJre(JAVA_17)
void onlyOnJava17() {
    // ...
}

@Test
@EnabledOnJre({ JAVA_17, JAVA_21 })
void onJava17And21() {
    // ...
}

@Test
@EnabledForJreRange(min = JAVA_9, max = JAVA_11)
void fromJava9To11() {
    // ...
}

@Test
@EnabledForJreRange(min = JAVA_9)
void onJava9AndHigher() {
    // ...
}

@Test
@EnabledForJreRange(max = JAVA_11)
void fromJava8To11() {
    // ...
}

@Test
@DisabledOnJre(JAVA_9)
void notOnJava9() {
    // ...
}

@Test
@DisabledForJreRange(min = JAVA_9, max = JAVA_11)
void notFromJava9To11() {
    // ...
}

@Test
@DisabledForJreRange(min = JAVA_9)
void notOnJava9AndHigher() {
    // ...
}

@Test
@DisabledForJreRange(max = JAVA_11)
void notFromJava8To11() {
    // ...
}
由於 JRE 中定義的列舉常數對於任何給定的 JUnit 版本都是靜態的,您可能會發現您需要配置 JRE 列舉不支援的 Java 版本。例如,截至 JUnit Jupiter 5.12,JRE 列舉將 JAVA_25 定義為最高支援的 Java 版本。但是,您可能希望針對更高版本的 Java 執行測試。為了支援此類使用案例,您可以透過 @EnabledOnJre 和 @DisabledOnJre 中的 versions 屬性,以及透過 @EnabledForJreRange 和 @DisabledForJreRange 中的 minVersion 和 maxVersion 屬性,指定任意 Java 版本。
以下列表示範了這些註解與任意 Java 版本的使用。
@Test
@EnabledOnJre(versions = 26)
void onlyOnJava26() {
    // ...
}

@Test
@EnabledOnJre(versions = { 25, 26 })
// Can also be expressed as follows.
// @EnabledOnJre(value = JAVA_25, versions = 26)
void onJava25And26() {
    // ...
}

@Test
@EnabledForJreRange(minVersion = 26)
void onJava26AndHigher() {
    // ...
}

@Test
@EnabledForJreRange(minVersion = 25, maxVersion = 27)
// Can also be expressed as follows.
// @EnabledForJreRange(min = JAVA_25, maxVersion = 27)
void fromJava25To27() {
    // ...
}

@Test
@DisabledOnJre(versions = 26)
void notOnJava26() {
    // ...
}

@Test
@DisabledOnJre(versions = { 25, 26 })
// Can also be expressed as follows.
// @DisabledOnJre(value = JAVA_25, versions = 26)
void notOnJava25And26() {
    // ...
}

@Test
@DisabledForJreRange(minVersion = 26)
void notOnJava26AndHigher() {
    // ...
}

@Test
@DisabledForJreRange(minVersion = 25, maxVersion = 27)
// Can also be expressed as follows.
// @DisabledForJreRange(min = JAVA_25, maxVersion = 27)
void notFromJava25To27() {
    // ...
}
2.9.3. 原生映像檔條件 (Native Image Conditions)
可以透過 @EnabledInNativeImage 和 @DisabledInNativeImage 註解,在 GraalVM 原生映像檔中啟用或停用容器或測試。當使用 GraalVM 原生建置工具 (Native Build Tools) 專案中的 Gradle 和 Maven 外掛程式在原生映像檔中執行測試時,通常會使用這些註解。
@Test
@EnabledInNativeImage
void onlyWithinNativeImage() {
    // ...
}

@Test
@DisabledInNativeImage
void neverWithinNativeImage() {
    // ...
}
2.9.4. 系統屬性條件 (System Property Conditions)
可以透過 @EnabledIfSystemProperty 和 @DisabledIfSystemProperty 註解,根據 named JVM 系統屬性的值啟用或停用容器或測試。透過 matches 屬性提供的值將被解讀為正則表達式。
@Test
@EnabledIfSystemProperty(named = "os.arch", matches = ".*64.*")
void onlyOn64BitArchitectures() {
    // ...
}

@Test
@DisabledIfSystemProperty(named = "ci-server", matches = "true")
void notOnCiServer() {
    // ...
}|
從 JUnit Jupiter 5.6 開始, |
2.9.5. 環境變數條件 (Environment Variable Conditions)
可以透過 @EnabledIfEnvironmentVariable 和 @DisabledIfEnvironmentVariable 註解,根據底層作業系統中 named 環境變數的值啟用或停用容器或測試。透過 matches 屬性提供的值將被解讀為正則表達式。
@Test
@EnabledIfEnvironmentVariable(named = "ENV", matches = "staging-server")
void onlyOnStagingServer() {
    // ...
}

@Test
@DisabledIfEnvironmentVariable(named = "ENV", matches = ".*development.*")
void notOnDeveloperWorkstation() {
    // ...
}|
從 JUnit Jupiter 5.6 開始, |
2.9.6. 自訂條件 (Custom Conditions)
作為實作 ExecutionCondition 的替代方案,可以透過 @EnabledIf 和 @DisabledIf 註解配置的條件方法,來啟用或停用容器或測試。條件方法必須具有 boolean 傳回類型,並且可以接受無引數或單個 ExtensionContext 引數。
以下測試類別示範了如何透過 @EnabledIf 和 @DisabledIf 配置名為 customCondition 的本機方法。
@Test
@EnabledIf("customCondition")
void enabled() {
    // ...
}

@Test
@DisabledIf("customCondition")
void disabled() {
    // ...
}

boolean customCondition() {
    return true;
}或者,條件方法可以位於測試類別之外。在這種情況下,必須透過其完整限定名稱來引用它,如下列範例所示。
package example;

import org.junit.jupiter.api.Test;
import org.junit.jupiter.api.condition.EnabledIf;

class ExternalCustomConditionDemo {

    @Test
    @EnabledIf("example.ExternalCondition#customCondition")
    void enabled() {
        // ...
    }

}

class ExternalCondition {

    static boolean customCondition() {
        return true;
    }

}|
在幾種情況下,條件方法需要是
在任何其他情況下,您可以使用靜態方法或實例方法作為條件方法。 |
|
通常情況下,您可以使用工具類別中現有的靜態方法作為自訂條件。 例如, |
2.10. 標記與篩選
import org.junit.jupiter.api.Tag;
import org.junit.jupiter.api.Test;

@Tag("fast")
@Tag("model")
class TaggingDemo {

    @Test
    @Tag("taxes")
    void testingTaxCalculation() {
    }

}| 請參閱 Meta-Annotations 和組合註解 章節,以獲取展示如何為標籤建立自訂註解的範例。 |
2.11. 測試執行順序
預設情況下,測試類別和方法將使用一種確定性但刻意不明顯的演算法來排序。這確保了測試套件的後續執行會以相同的順序執行測試類別和測試方法,從而允許可重複的建置。
| 請參閱 定義 章節以獲取測試方法和測試類別的定義。 |
2.11.1. 方法順序
雖然真正的單元測試通常不應依賴它們的執行順序,但在某些時候,強制執行特定的測試方法執行順序是必要的 — 例如,當編寫整合測試或功能測試時,測試的順序很重要,尤其是在與 @TestInstance(Lifecycle.PER_CLASS) 結合使用時。
要控制測試方法的執行順序,請使用 @TestMethodOrder 註解您的測試類別或測試介面,並指定所需的 MethodOrderer 實作。您可以實作您自己的自訂 MethodOrderer,或使用以下內建的 MethodOrderer 實作之一。
-
MethodOrderer.DisplayName:根據測試方法的顯示名稱以字母數字順序排序(請參閱 顯示名稱產生優先順序規則) -
MethodOrderer.MethodName:根據測試方法的名稱和形式參數列表以字母數字順序排序 -
MethodOrderer.OrderAnnotation:根據透過@Order註解指定的值以數值順序排序 -
MethodOrderer.Random:以偽隨機順序排序測試方法,並支援自訂種子的配置 -
MethodOrderer.Alphanumeric:根據測試方法的名稱和形式參數列表以字母數字順序排序;已棄用,建議使用MethodOrderer.MethodName,將在 6.0 版本中移除
| 另請參閱:回呼的包裝行為 |
以下範例示範如何保證測試方法按照透過 @Order 註解指定的順序執行。
import org.junit.jupiter.api.MethodOrderer.OrderAnnotation;
import org.junit.jupiter.api.Order;
import org.junit.jupiter.api.Test;
import org.junit.jupiter.api.TestMethodOrder;

@TestMethodOrder(OrderAnnotation.class)
class OrderedTestsDemo {

    @Test
    @Order(1)
    void nullValues() {
        // perform assertions against null values
    }

    @Test
    @Order(2)
    void emptyValues() {
        // perform assertions against empty values
    }

    @Test
    @Order(3)
    void validValues() {
        // perform assertions against valid values
    }

}
設定預設方法排序器
您可以使用 junit.jupiter.testmethod.order.default 配置參數 來指定您想要預設使用的 MethodOrderer 的完整類別名稱。就像透過 @TestMethodOrder 註解配置的排序器一樣,提供的類別必須實作 MethodOrderer 介面。預設排序器將用於所有測試,除非封閉的測試類別或測試介面上存在 @TestMethodOrder 註解。
例如,要預設使用 MethodOrderer.OrderAnnotation 方法排序器,您應該將配置參數設定為對應的完整類別名稱(例如,在 src/test/resources/junit-platform.properties 中)
junit.jupiter.testmethod.order.default = \
    org.junit.jupiter.api.MethodOrderer$OrderAnnotation
同樣地,您可以指定任何實作 MethodOrderer 的自訂類別的完整名稱。
2.11.2. 類別順序
雖然測試類別通常不應依賴它們的執行順序,但在某些時候,強制執行特定的測試類別執行順序是可取的。您可能希望以隨機順序執行測試類別,以確保測試類別之間沒有意外的依賴關係,或者您可能希望對測試類別進行排序以優化建置時間,如下列情境所述。
-
首先執行先前失敗的測試和更快的測試:「快速失敗」模式
-
啟用平行執行時,首先排程較長的測試:「最短測試計畫執行時間」模式
-
各種其他使用案例
要為整個測試套件全域性地配置測試類別執行順序,請使用 junit.jupiter.testclass.order.default 配置參數 來指定您想要使用的 ClassOrderer 的完整類別名稱。提供的類別必須實作 ClassOrderer 介面。
您可以實作您自己的自訂 ClassOrderer,或使用以下內建的 ClassOrderer 實作之一。
-
ClassOrderer.ClassName:根據測試類別的完整類別名稱以字母數字順序排序 -
ClassOrderer.DisplayName:根據測試類別的顯示名稱以字母數字順序排序(請參閱 顯示名稱產生優先順序規則) -
ClassOrderer.OrderAnnotation:根據透過@Order註解指定的值以數值順序排序 -
ClassOrderer.Random:以偽隨機順序排序測試類別,並支援自訂種子的配置
例如,為了讓 @Order 註解在測試類別上生效,您應該使用配置參數和對應的完整類別名稱來配置 ClassOrderer.OrderAnnotation 類別排序器(例如,在 src/test/resources/junit-platform.properties 中)
junit.jupiter.testclass.order.default = \
    org.junit.jupiter.api.ClassOrderer$OrderAnnotation
配置的 ClassOrderer 將應用於所有頂層測試類別(包括 static 巢狀測試類別)和 @Nested 測試類別。
頂層測試類別將彼此相對排序;而 @Nested 測試類別將相對於與同一個封閉類別共享的其他 @Nested 測試類別排序。 |
要為 @Nested 測試類別在本機配置測試類別執行順序,請在您想要排序的 @Nested 測試類別的封閉類別上宣告 @TestClassOrder 註解,並在 @TestClassOrder 註解中直接提供您想要使用的 ClassOrderer 實作的類別參考。配置的 ClassOrderer 將以遞迴方式應用於 @Nested 測試類別及其 @Nested 測試類別。請注意,本機 @TestClassOrder 宣告始終會覆蓋繼承的 @TestClassOrder 宣告或透過 junit.jupiter.testclass.order.default 配置參數全域性配置的 ClassOrderer。
以下範例示範如何保證 @Nested 測試類別按照透過 @Order 註解指定的順序執行。
import org.junit.jupiter.api.ClassOrderer;
import org.junit.jupiter.api.Nested;
import org.junit.jupiter.api.Order;
import org.junit.jupiter.api.Test;
import org.junit.jupiter.api.TestClassOrder;

@TestClassOrder(ClassOrderer.OrderAnnotation.class)
class OrderedNestedTestClassesDemo {

    @Nested
    @Order(1)
    class PrimaryTests {

        @Test
        void test1() {
        }
    }

    @Nested
    @Order(2)
    class SecondaryTests {

        @Test
        void test2() {
        }
    }
}
2.12. 測試實例生命週期
為了允許個別測試方法隔離執行,並避免由於可變測試實例狀態而導致的意外副作用,JUnit 在執行每個測試方法之前,會為每個測試類別建立一個新的實例(請參閱 定義)。這種「每個方法」的測試實例生命週期是 JUnit Jupiter 中的預設行為,並且與所有先前的 JUnit 版本類似。
請注意,即使在啟用「每個方法」的測試實例生命週期模式時,如果給定的測試方法透過條件(例如,@Disabled、@DisabledOnOs 等)停用,測試類別仍然會被實例化。 |
如果您希望 JUnit Jupiter 在同一個測試實例上執行所有測試方法,請使用 @TestInstance(Lifecycle.PER_CLASS) 註解您的測試類別。當使用此模式時,每個測試類別將建立一個新的測試實例。因此,如果您的測試方法依賴儲存在實例變數中的狀態,您可能需要在 @BeforeEach 或 @AfterEach 方法中重設該狀態。
與預設的「每個方法」模式相比,「每個類別」模式還有一些額外的好處。具體來說,使用「每個類別」模式,可以在非靜態方法以及介面 default 方法上宣告 @BeforeAll 和 @AfterAll。「每個類別」模式因此也使得在 @Nested 測試類別中使用 @BeforeAll 和 @AfterAll 方法成為可能。
從 Java 16 開始,@BeforeAll 和 @AfterAll 方法可以在 @Nested 測試類別中宣告為 static。 |
如果您使用 Kotlin 程式語言編寫測試,您也可能會發現切換到「每個類別」測試實例生命週期模式可以更輕鬆地實作非靜態 @BeforeAll 和 @AfterAll 生命周期方法以及 @MethodSource 工廠方法。
2.12.1. 變更預設測試實例生命週期
如果測試類別或測試介面未使用 @TestInstance 註解,JUnit Jupiter 將使用預設生命週期模式。標準預設模式是 PER_METHOD;但是,可以變更整個測試計畫執行的預設模式。要變更預設測試實例生命週期模式,請將 junit.jupiter.testinstance.lifecycle.default 配置參數設定為在 TestInstance.Lifecycle 中定義的列舉常數的名稱,忽略大小寫。這可以作為 JVM 系統屬性提供,作為傳遞給 Launcher 的 LauncherDiscoveryRequest 中的配置參數,或透過 JUnit Platform 配置檔(請參閱 配置參數 以獲取詳細資訊)。
例如,要將預設測試實例生命週期模式設定為 Lifecycle.PER_CLASS,您可以使用以下系統屬性啟動您的 JVM。
-Djunit.jupiter.testinstance.lifecycle.default=per_class
但是請注意,透過 JUnit Platform 配置檔設定預設測試實例生命週期模式是一種更穩健的解決方案,因為配置檔可以與您的專案一起檢入版本控制系統,因此可以在 IDE 和您的建置軟體中使用。
要透過 JUnit Platform 配置檔將預設測試實例生命週期模式設定為 Lifecycle.PER_CLASS,請在類別路徑的根目錄(例如,src/test/resources)中建立一個名為 junit-platform.properties 的檔案,其中包含以下內容。
junit.jupiter.testinstance.lifecycle.default = per_class
| 如果未一致地應用,變更預設測試實例生命週期模式可能會導致不可預測的結果和脆弱的建置。例如,如果建置配置將「每個類別」語意設定為預設值,但 IDE 中的測試使用「每個方法」語意執行,則可能會使偵錯在建置伺服器上發生的錯誤變得困難。因此,建議在 JUnit Platform 配置檔中變更預設值,而不是透過 JVM 系統屬性。 |
2.13. 巢狀測試
@Nested 測試為測試編寫者提供了更多表達多組測試之間關係的能力。這種巢狀測試利用 Java 的巢狀類別,並促進對測試結構的層次思考。這是一個詳細的範例,包括原始程式碼和 IDE 中執行的螢幕截圖。
import static org.junit.jupiter.api.Assertions.assertEquals;
import static org.junit.jupiter.api.Assertions.assertFalse;
import static org.junit.jupiter.api.Assertions.assertThrows;
import static org.junit.jupiter.api.Assertions.assertTrue;

import java.util.EmptyStackException;
import java.util.Stack;

import org.junit.jupiter.api.BeforeEach;
import org.junit.jupiter.api.DisplayName;
import org.junit.jupiter.api.Nested;
import org.junit.jupiter.api.Test;

@DisplayName("A stack")
class TestingAStackDemo {

    Stack<Object> stack;

    @Test
    @DisplayName("is instantiated with new Stack()")
    void isInstantiatedWithNew() {
        new Stack<>();
    }

    @Nested
    @DisplayName("when new")
    class WhenNew {

        @BeforeEach
        void createNewStack() {
            stack = new Stack<>();
        }

        @Test
        @DisplayName("is empty")
        void isEmpty() {
            assertTrue(stack.isEmpty());
        }

        @Test
        @DisplayName("throws EmptyStackException when popped")
        void throwsExceptionWhenPopped() {
            assertThrows(EmptyStackException.class, stack::pop);
        }

        @Test
        @DisplayName("throws EmptyStackException when peeked")
        void throwsExceptionWhenPeeked() {
            assertThrows(EmptyStackException.class, stack::peek);
        }

        @Nested
        @DisplayName("after pushing an element")
        class AfterPushing {

            String anElement = "an element";

            @BeforeEach
            void pushAnElement() {
                stack.push(anElement);
            }

            @Test
            @DisplayName("it is no longer empty")
            void isNotEmpty() {
                assertFalse(stack.isEmpty());
            }

            @Test
            @DisplayName("returns the element when popped and is empty")
            void returnElementWhenPopped() {
                assertEquals(anElement, stack.pop());
                assertTrue(stack.isEmpty());
            }

            @Test
            @DisplayName("returns the element when peeked but remains not empty")
            void returnElementWhenPeeked() {
                assertEquals(anElement, stack.peek());
                assertFalse(stack.isEmpty());
            }
        }
    }
}
在 IDE 中執行此範例時,GUI 中的測試執行樹狀結構將類似於以下圖像。
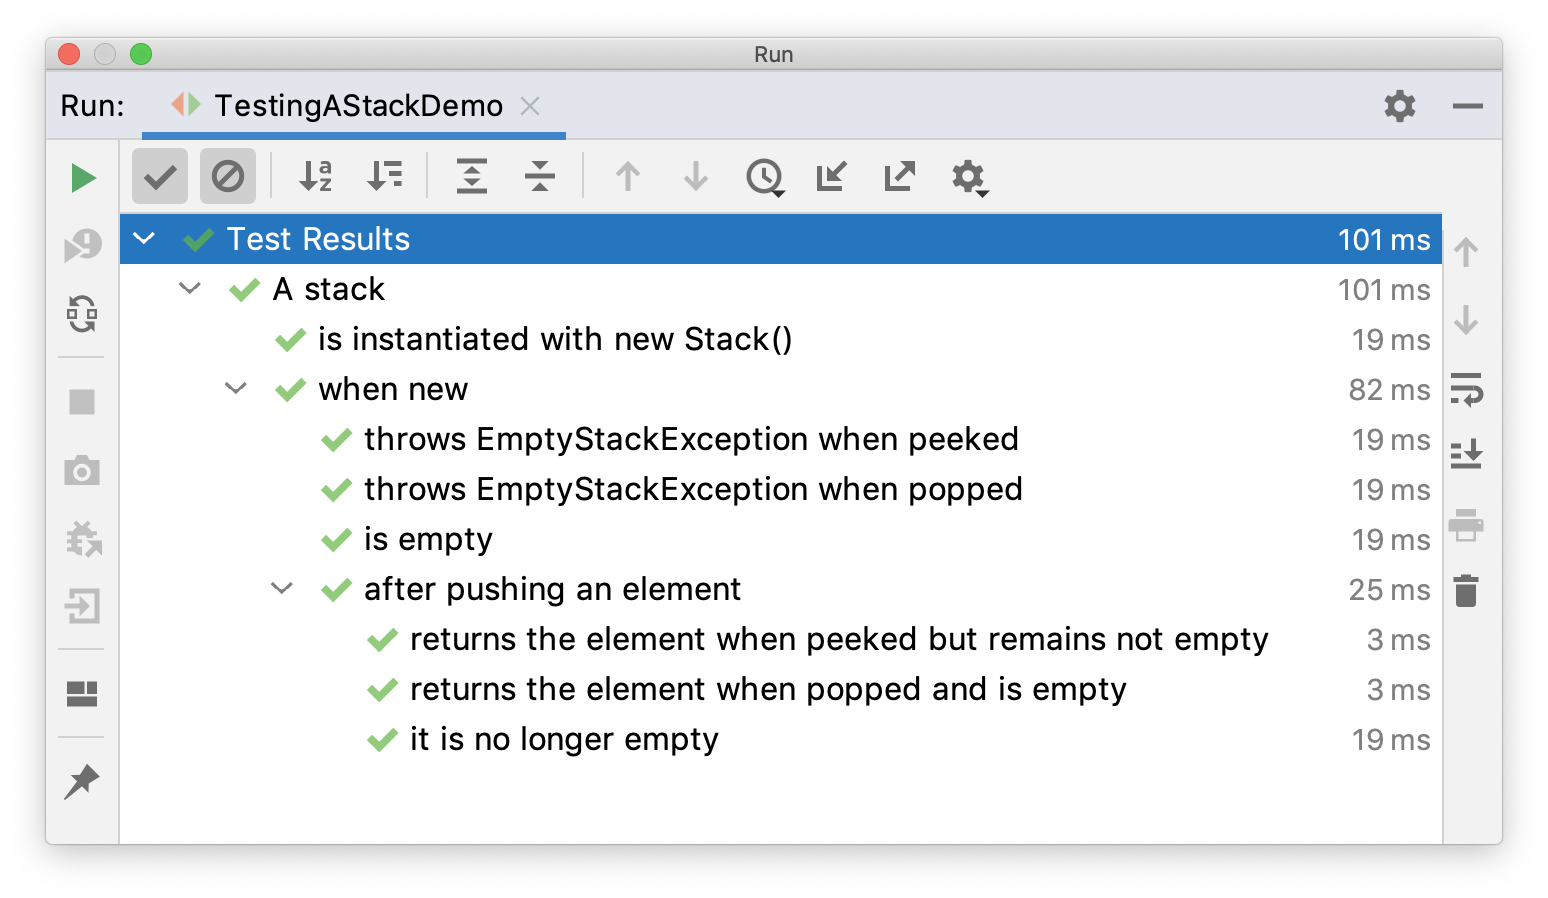
在此範例中,外部測試的先決條件透過為設定程式碼定義層次生命週期方法而在內部測試中使用。例如,createNewStack() 是一個 @BeforeEach 生命周期方法,用於定義它的測試類別以及定義它的類別下方的巢狀樹狀結構中的所有層級。
來自外部測試的設定程式碼在執行內部測試之前執行,這一事實使您能夠獨立執行所有測試。您甚至可以單獨執行內部測試而無需執行外部測試,因為始終會執行來自外部測試的設定程式碼。
只有非靜態巢狀類別(即內部類別)可以用作 @Nested 測試類別。巢狀結構可以任意深度,並且這些內部類別受到完整的生命週期支援,但有一個例外:預設情況下 @BeforeAll 和 @AfterAll 方法不起作用。原因是 Java 在 Java 16 之前不允許在內部類別中使用 static 成員。但是,可以透過使用 @TestInstance(Lifecycle.PER_CLASS) 註解 @Nested 測試類別來規避此限制(請參閱 測試實例生命週期)。如果您使用 Java 16 或更高版本,@BeforeAll 和 @AfterAll 方法可以在 @Nested 測試類別中宣告為 static,並且此限制不再適用。 |
2.14. 建構子和方法的依賴注入
在所有先前的 JUnit 版本中,不允許測試建構子或方法具有參數(至少在使用標準 Runner 實作時是如此)。作為 JUnit Jupiter 的主要變更之一,現在允許測試建構子和方法都具有參數。這允許更大的靈活性,並為建構子和方法啟用依賴注入。
ParameterResolver 定義了測試擴充功能的 API,這些擴充功能希望在運行時動態解析參數。如果測試類別建構子、測試方法或生命週期方法(請參閱 定義)接受參數,則參數必須在運行時由已註冊的 ParameterResolver 解析。
目前有三個內建的解析器會自動註冊。
-
TestInfoParameterResolver:如果建構子或方法參數的類型為TestInfo,TestInfoParameterResolver將會提供一個對應於目前容器或測試的TestInfo實例,作為該參數的值。然後,可以使用TestInfo來檢索關於目前容器或測試的資訊,例如顯示名稱、測試類別、測試方法和相關標籤。顯示名稱可以是技術名稱(例如測試類別或測試方法的名稱),也可以是透過@DisplayName配置的自訂名稱。TestInfo可作為 JUnit 4 中TestName規則的直接替代品。以下示範如何將TestInfo注入到@BeforeAll方法、測試類別建構子、@BeforeEach方法和@Test方法中。
import static org.junit.jupiter.api.Assertions.assertEquals;
import static org.junit.jupiter.api.Assertions.assertTrue;

import org.junit.jupiter.api.BeforeAll;
import org.junit.jupiter.api.BeforeEach;
import org.junit.jupiter.api.DisplayName;
import org.junit.jupiter.api.Tag;
import org.junit.jupiter.api.Test;
import org.junit.jupiter.api.TestInfo;

@DisplayName("TestInfo Demo")
class TestInfoDemo {

    @BeforeAll
    static void beforeAll(TestInfo testInfo) {
        assertEquals("TestInfo Demo", testInfo.getDisplayName());
    }

    TestInfoDemo(TestInfo testInfo) {
        String displayName = testInfo.getDisplayName();
        assertTrue(displayName.equals("TEST 1") || displayName.equals("test2()"));
    }

    @BeforeEach
    void init(TestInfo testInfo) {
        String displayName = testInfo.getDisplayName();
        assertTrue(displayName.equals("TEST 1") || displayName.equals("test2()"));
    }

    @Test
    @DisplayName("TEST 1")
    @Tag("my-tag")
    void test1(TestInfo testInfo) {
        assertEquals("TEST 1", testInfo.getDisplayName());
        assertTrue(testInfo.getTags().contains("my-tag"));
    }

    @Test
    void test2() {
    }

}-
RepetitionExtension:如果@RepeatedTest、@BeforeEach或@AfterEach方法中的方法參數類型為RepetitionInfo,RepetitionExtension將會提供一個RepetitionInfo的實例。然後,可以使用RepetitionInfo來檢索關於目前重複次數、總重複次數、已失敗重複次數以及對應@RepeatedTest的失敗閾值等資訊。但是請注意,RepetitionExtension並未在@RepeatedTest的上下文之外註冊。請參閱 重複測試範例。 -
TestReporterParameterResolver:如果建構子或方法參數的類型為TestReporter,TestReporterParameterResolver將會提供一個TestReporter的實例。TestReporter可用於發布關於目前測試執行的額外資料或將檔案附加到其中。資料可以在TestExecutionListener中透過reportingEntryPublished()或fileEntryPublished()方法分別被取用。這允許它們在 IDE 中查看或包含在報告中。在 JUnit Jupiter 中,您應該使用
TestReporter來取代在 JUnit 4 中用於將資訊列印到stdout或stderr的方式。使用@RunWith(JUnitPlatform.class)將會把所有報告的條目輸出到stdout。此外,某些 IDE 會將報告條目列印到stdout或在測試結果的使用者介面中顯示它們。
class TestReporterDemo {

    @Test
    void reportSingleValue(TestReporter testReporter) {
        testReporter.publishEntry("a status message");
    }

    @Test
    void reportKeyValuePair(TestReporter testReporter) {
        testReporter.publishEntry("a key", "a value");
    }

    @Test
    void reportMultipleKeyValuePairs(TestReporter testReporter) {
        Map<String, String> values = new HashMap<>();
        values.put("user name", "dk38");
        values.put("award year", "1974");

        testReporter.publishEntry(values);
    }

    @Test
    void reportFiles(TestReporter testReporter, @TempDir Path tempDir) throws Exception {

        testReporter.publishFile("test1.txt", MediaType.TEXT_PLAIN_UTF_8,
            file -> Files.write(file, singletonList("Test 1")));

        Path existingFile = Files.write(tempDir.resolve("test2.txt"), singletonList("Test 2"));
        testReporter.publishFile(existingFile, MediaType.TEXT_PLAIN_UTF_8);

        testReporter.publishDirectory("test3", dir -> {
            Files.write(dir.resolve("nested1.txt"), singletonList("Nested content 1"));
            Files.write(dir.resolve("nested2.txt"), singletonList("Nested content 2"));
        });

        Path existingDir = Files.createDirectory(tempDir.resolve("test4"));
        Files.write(existingDir.resolve("nested1.txt"), singletonList("Nested content 1"));
        Files.write(existingDir.resolve("nested2.txt"), singletonList("Nested content 2"));
        testReporter.publishDirectory(existingDir);
    }
}
其他參數解析器必須透過 @ExtendWith 註冊適當的 擴充功能 來顯式啟用。 |
查看 RandomParametersExtension 以取得自訂 ParameterResolver 的範例。雖然它並非旨在用於生產環境,但它示範了擴充模型和參數解析過程的簡潔性和表達力。MyRandomParametersTest 示範了如何將隨機值注入到 @Test 方法中。
@ExtendWith(RandomParametersExtension.class)
class MyRandomParametersTest {

    @Test
    void injectsInteger(@Random int i, @Random int j) {
        assertNotEquals(i, j);
    }

    @Test
    void injectsDouble(@Random double d) {
        assertEquals(0.0, d, 1.0);
    }

}
對於真實世界的用例,請查看 MockitoExtension 和 SpringExtension 的原始碼。
當要注入的參數類型是您的 ParameterResolver 的唯一條件時,您可以使用泛型 TypeBasedParameterResolver 基礎類別。supportsParameters 方法在幕後實作,並支援參數化類型。
2.15. 測試介面和預設方法
JUnit Jupiter 允許在介面 default 方法上宣告 @Test、@RepeatedTest、@ParameterizedTest、@TestFactory、@TestTemplate、@BeforeEach 和 @AfterEach。@BeforeAll 和 @AfterAll 可以宣告在測試介面中的 static 方法上,或者如果測試介面或測試類別使用 @TestInstance(Lifecycle.PER_CLASS) 註解(請參閱 測試實例生命週期),則可以宣告在介面 default 方法上。以下是一些範例。
@TestInstance(Lifecycle.PER_CLASS)
interface TestLifecycleLogger {

    static final Logger logger = Logger.getLogger(TestLifecycleLogger.class.getName());

    @BeforeAll
    default void beforeAllTests() {
        logger.info("Before all tests");
    }

    @AfterAll
    default void afterAllTests() {
        logger.info("After all tests");
    }

    @BeforeEach
    default void beforeEachTest(TestInfo testInfo) {
        logger.info(() -> String.format("About to execute [%s]",
            testInfo.getDisplayName()));
    }

    @AfterEach
    default void afterEachTest(TestInfo testInfo) {
        logger.info(() -> String.format("Finished executing [%s]",
            testInfo.getDisplayName()));
    }

}
interface TestInterfaceDynamicTestsDemo {
@TestFactory
default Stream<DynamicTest> dynamicTestsForPalindromes() {
return Stream.of("racecar", "radar", "mom", "dad")
.map(text -> dynamicTest(text, () -> assertTrue(isPalindrome(text))));
}
}@ExtendWith 和 @Tag 可以宣告在測試介面上,以便實作該介面的類別自動繼承其標籤和擴充功能。請參閱 測試執行前後的回呼 以取得 TimingExtension 的原始碼。
@Tag("timed")
@ExtendWith(TimingExtension.class)
interface TimeExecutionLogger {
}
在您的測試類別中,您可以實作這些測試介面以套用它們。
class TestInterfaceDemo implements TestLifecycleLogger,
        TimeExecutionLogger, TestInterfaceDynamicTestsDemo {

    @Test
    void isEqualValue() {
        assertEquals(1, "a".length(), "is always equal");
    }

}
執行 TestInterfaceDemo 會產生類似以下的輸出
INFO  example.TestLifecycleLogger - Before all tests
INFO  example.TestLifecycleLogger - About to execute [dynamicTestsForPalindromes()]
INFO  example.TimingExtension - Method [dynamicTestsForPalindromes] took 19 ms.
INFO  example.TestLifecycleLogger - Finished executing [dynamicTestsForPalindromes()]
INFO  example.TestLifecycleLogger - About to execute [isEqualValue()]
INFO  example.TimingExtension - Method [isEqualValue] took 1 ms.
INFO  example.TestLifecycleLogger - Finished executing [isEqualValue()]
INFO  example.TestLifecycleLogger - After all tests
此功能的另一個可能應用是為介面合約編寫測試。例如,您可以為 Object.equals 或 Comparable.compareTo 的實作方式編寫測試,如下所示。
public interface Testable<T> {

    T createValue();

}
public interface EqualsContract<T> extends Testable<T> {
T createNotEqualValue();
@Test
default void valueEqualsItself() {
T value = createValue();
assertEquals(value, value);
}
@Test
default void valueDoesNotEqualNull() {
T value = createValue();
assertNotEquals(null, value);
}
@Test
default void valueDoesNotEqualDifferentValue() {
T value = createValue();
T differentValue = createNotEqualValue();
assertNotEquals(value, differentValue);
assertNotEquals(differentValue, value);
}
}public interface ComparableContract<T extends Comparable<T>> extends Testable<T> {
T createSmallerValue();
@Test
default void returnsZeroWhenComparedToItself() {
T value = createValue();
assertEquals(0, value.compareTo(value));
}
@Test
default void returnsPositiveNumberWhenComparedToSmallerValue() {
T value = createValue();
T smallerValue = createSmallerValue();
assertTrue(value.compareTo(smallerValue) > 0);
}
@Test
default void returnsNegativeNumberWhenComparedToLargerValue() {
T value = createValue();
T smallerValue = createSmallerValue();
assertTrue(smallerValue.compareTo(value) < 0);
}
}在您的測試類別中,您可以實作這兩個合約介面,從而繼承相應的測試。當然,您必須實作抽象方法。
class StringTests implements ComparableContract<String>, EqualsContract<String> {

    @Override
    public String createValue() {
        return "banana";
    }

    @Override
    public String createSmallerValue() {
        return "apple"; // 'a' < 'b' in "banana"
    }

    @Override
    public String createNotEqualValue() {
        return "cherry";
    }

}| 以上測試僅作為範例,因此並不完整。 |
2.16. 重複測試
JUnit Jupiter 提供了重複執行測試指定次數的能力,方法是使用 @RepeatedTest 註解方法並指定所需的總重複次數。重複測試的每次調用行為都像執行常規 @Test 方法一樣,完全支援相同的生命週期回呼和擴充功能。
以下範例示範如何宣告一個名為 repeatedTest() 的測試,它將自動重複執行 10 次。
@RepeatedTest(10)
void repeatedTest() {
    // ...
}
自 JUnit Jupiter 5.10 起,@RepeatedTest 可以配置失敗閾值,該閾值表示在發生指定次數的失敗後,剩餘的重複將會自動跳過。將 failureThreshold 屬性設定為小於總重複次數的正數,以便在遇到指定的失敗次數後跳過剩餘重複的調用。
例如,如果您使用 @RepeatedTest 來重複調用您懷疑是不穩定的測試,則單次失敗就足以證明該測試是不穩定的,並且無需調用剩餘的重複次數。為了支援該特定用例,請將 failureThreshold = 1 設定為 1。您可以根據您的用例選擇將閾值設定為大於 1 的數字。
預設情況下,failureThreshold 屬性設定為 Integer.MAX_VALUE,表示不會套用失敗閾值,這實際上意味著無論任何重複是否失敗,都會調用指定的重複次數。
如果 @RepeatedTest 方法的重複執行是並行的,則無法保證失敗閾值。因此,建議在配置平行執行時,使用 @Execution(SAME_THREAD) 註解 @RepeatedTest 方法。請參閱 平行執行 以取得更多詳細資訊。 |
除了指定重複次數和失敗閾值外,還可以透過 @RepeatedTest 註解的 name 屬性為每次重複配置自訂顯示名稱。此外,顯示名稱可以是靜態文字和動態佔位符的組合模式。目前支援以下佔位符。
-
{displayName}:@RepeatedTest方法的顯示名稱 -
{currentRepetition}:目前的重複計數 -
{totalRepetitions}:總重複次數
給定重複的預設顯示名稱是根據以下模式產生的:"repetition {currentRepetition} of {totalRepetitions}"。因此,先前 repeatedTest() 範例的個別重複的顯示名稱將為:repetition 1 of 10、repetition 2 of 10 等。如果您希望將 @RepeatedTest 方法的顯示名稱包含在每次重複的名稱中,您可以定義自己的自訂模式或使用預定義的 RepeatedTest.LONG_DISPLAY_NAME 模式。後者等於 "{displayName} :: repetition {currentRepetition} of {totalRepetitions}",這會產生個別重複的顯示名稱,例如 repeatedTest() :: repetition 1 of 10、repeatedTest() :: repetition 2 of 10 等。
為了檢索關於目前重複次數、總重複次數、已失敗重複次數和失敗閾值的資訊,開發人員可以選擇將 RepetitionInfo 的實例注入到 @RepeatedTest、@BeforeEach 或 @AfterEach 方法中。
2.16.1. 重複測試範例
本節末尾的 RepeatedTestsDemo 類別示範了幾個重複測試的範例。
repeatedTest() 方法與前一節的範例相同;而 repeatedTestWithRepetitionInfo() 示範了如何將 RepetitionInfo 的實例注入到測試中,以存取目前重複測試的總重複次數。
repeatedTestWithFailureThreshold() 示範了如何設定失敗閾值,並模擬了每隔一次重複的意外失敗。結果行為可以在本節末尾的 ConsoleLauncher 輸出中查看。
接下來的兩個方法示範了如何在每個重複的顯示名稱中包含 @RepeatedTest 方法的自訂 @DisplayName。customDisplayName() 將自訂顯示名稱與自訂模式結合,然後使用 TestInfo 來驗證產生的顯示名稱的格式。Repeat! 是來自 @DisplayName 宣告的 {displayName},而 1/1 來自 {currentRepetition}/{totalRepetitions}。相反地,customDisplayNameWithLongPattern() 使用了前面提到的預定義 RepeatedTest.LONG_DISPLAY_NAME 模式。
repeatedTestInGerman() 示範了將重複測試的顯示名稱翻譯成外語的能力 — 在本例中為德語,產生了個別重複的名稱,例如:Wiederholung 1 von 5、Wiederholung 2 von 5 等。
由於 beforeEach() 方法使用 @BeforeEach 註解,因此它將在每次重複測試的每次重複之前執行。透過將 TestInfo 和 RepetitionInfo 注入到方法中,我們可以看到可以取得關於目前正在執行的重複測試的資訊。啟用 INFO 日誌等級執行 RepeatedTestsDemo 會產生以下輸出。
INFO: About to execute repetition 1 of 10 for repeatedTest
INFO: About to execute repetition 2 of 10 for repeatedTest
INFO: About to execute repetition 3 of 10 for repeatedTest
INFO: About to execute repetition 4 of 10 for repeatedTest
INFO: About to execute repetition 5 of 10 for repeatedTest
INFO: About to execute repetition 6 of 10 for repeatedTest
INFO: About to execute repetition 7 of 10 for repeatedTest
INFO: About to execute repetition 8 of 10 for repeatedTest
INFO: About to execute repetition 9 of 10 for repeatedTest
INFO: About to execute repetition 10 of 10 for repeatedTest
INFO: About to execute repetition 1 of 5 for repeatedTestWithRepetitionInfo
INFO: About to execute repetition 2 of 5 for repeatedTestWithRepetitionInfo
INFO: About to execute repetition 3 of 5 for repeatedTestWithRepetitionInfo
INFO: About to execute repetition 4 of 5 for repeatedTestWithRepetitionInfo
INFO: About to execute repetition 5 of 5 for repeatedTestWithRepetitionInfo
INFO: About to execute repetition 1 of 8 for repeatedTestWithFailureThreshold
INFO: About to execute repetition 2 of 8 for repeatedTestWithFailureThreshold
INFO: About to execute repetition 3 of 8 for repeatedTestWithFailureThreshold
INFO: About to execute repetition 4 of 8 for repeatedTestWithFailureThreshold
INFO: About to execute repetition 1 of 1 for customDisplayName
INFO: About to execute repetition 1 of 1 for customDisplayNameWithLongPattern
INFO: About to execute repetition 1 of 5 for repeatedTestInGerman
INFO: About to execute repetition 2 of 5 for repeatedTestInGerman
INFO: About to execute repetition 3 of 5 for repeatedTestInGerman
INFO: About to execute repetition 4 of 5 for repeatedTestInGerman
INFO: About to execute repetition 5 of 5 for repeatedTestInGerman
import static org.junit.jupiter.api.Assertions.assertEquals;
import static org.junit.jupiter.api.Assertions.fail;

import java.util.logging.Logger;

import org.junit.jupiter.api.BeforeEach;
import org.junit.jupiter.api.DisplayName;
import org.junit.jupiter.api.RepeatedTest;
import org.junit.jupiter.api.RepetitionInfo;
import org.junit.jupiter.api.TestInfo;

class RepeatedTestsDemo {

    private Logger logger = // ...

    @BeforeEach
    void beforeEach(TestInfo testInfo, RepetitionInfo repetitionInfo) {
        int currentRepetition = repetitionInfo.getCurrentRepetition();
        int totalRepetitions = repetitionInfo.getTotalRepetitions();
        String methodName = testInfo.getTestMethod().get().getName();
        logger.info(String.format("About to execute repetition %d of %d for %s", //
            currentRepetition, totalRepetitions, methodName));
    }

    @RepeatedTest(10)
    void repeatedTest() {
        // ...
    }

    @RepeatedTest(5)
    void repeatedTestWithRepetitionInfo(RepetitionInfo repetitionInfo) {
        assertEquals(5, repetitionInfo.getTotalRepetitions());
    }

    @RepeatedTest(value = 8, failureThreshold = 2)
    void repeatedTestWithFailureThreshold(RepetitionInfo repetitionInfo) {
        // Simulate unexpected failure every second repetition
        if (repetitionInfo.getCurrentRepetition() % 2 == 0) {
            fail("Boom!");
        }
    }

    @RepeatedTest(value = 1, name = "{displayName} {currentRepetition}/{totalRepetitions}")
    @DisplayName("Repeat!")
    void customDisplayName(TestInfo testInfo) {
        assertEquals("Repeat! 1/1", testInfo.getDisplayName());
    }

    @RepeatedTest(value = 1, name = RepeatedTest.LONG_DISPLAY_NAME)
    @DisplayName("Details...")
    void customDisplayNameWithLongPattern(TestInfo testInfo) {
        assertEquals("Details... :: repetition 1 of 1", testInfo.getDisplayName());
    }

    @RepeatedTest(value = 5, name = "Wiederholung {currentRepetition} von {totalRepetitions}")
    void repeatedTestInGerman() {
        // ...
    }

}
當使用啟用 Unicode 主題的 ConsoleLauncher 時,執行 RepeatedTestsDemo 會產生以下輸出到控制台。
├─ RepeatedTestsDemo ✔
│  ├─ repeatedTest() ✔
│  │  ├─ repetition 1 of 10 ✔
│  │  ├─ repetition 2 of 10 ✔
│  │  ├─ repetition 3 of 10 ✔
│  │  ├─ repetition 4 of 10 ✔
│  │  ├─ repetition 5 of 10 ✔
│  │  ├─ repetition 6 of 10 ✔
│  │  ├─ repetition 7 of 10 ✔
│  │  ├─ repetition 8 of 10 ✔
│  │  ├─ repetition 9 of 10 ✔
│  │  └─ repetition 10 of 10 ✔
│  ├─ repeatedTestWithRepetitionInfo(RepetitionInfo) ✔
│  │  ├─ repetition 1 of 5 ✔
│  │  ├─ repetition 2 of 5 ✔
│  │  ├─ repetition 3 of 5 ✔
│  │  ├─ repetition 4 of 5 ✔
│  │  └─ repetition 5 of 5 ✔
│  ├─ repeatedTestWithFailureThreshold(RepetitionInfo) ✔
│  │  ├─ repetition 1 of 8 ✔
│  │  ├─ repetition 2 of 8 ✘ Boom!
│  │  ├─ repetition 3 of 8 ✔
│  │  ├─ repetition 4 of 8 ✘ Boom!
│  │  ├─ repetition 5 of 8 ↷ Failure threshold [2] exceeded
│  │  ├─ repetition 6 of 8 ↷ Failure threshold [2] exceeded
│  │  ├─ repetition 7 of 8 ↷ Failure threshold [2] exceeded
│  │  └─ repetition 8 of 8 ↷ Failure threshold [2] exceeded
│  ├─ Repeat! ✔
│  │  └─ Repeat! 1/1 ✔
│  ├─ Details... ✔
│  │  └─ Details... :: repetition 1 of 1 ✔
│  └─ repeatedTestInGerman() ✔
│     ├─ Wiederholung 1 von 5 ✔
│     ├─ Wiederholung 2 von 5 ✔
│     ├─ Wiederholung 3 von 5 ✔
│     ├─ Wiederholung 4 von 5 ✔
│     └─ Wiederholung 5 von 5 ✔
2.17. 參數化測試
參數化測試使您可以使用不同的引數多次執行測試。它們的宣告方式與常規 @Test 方法相同,但改用 @ParameterizedTest 註解。此外,您必須宣告至少一個來源,該來源將為每次調用提供引數,然後在測試方法中取用這些引數。
以下範例示範了一個參數化測試,該測試使用 @ValueSource 註解來指定 String 陣列作為引數來源。
@ParameterizedTest
@ValueSource(strings = { "racecar", "radar", "able was I ere I saw elba" })
void palindromes(String candidate) {
    assertTrue(StringUtils.isPalindrome(candidate));
}當執行上述參數化測試方法時,每次調用都會單獨報告。例如,ConsoleLauncher 將列印類似以下的輸出。
palindromes(String) ✔
├─ [1] candidate=racecar ✔
├─ [2] candidate=radar ✔
└─ [3] candidate=able was I ere I saw elba ✔
2.17.1. 必要設定
為了使用參數化測試,您需要在 junit-jupiter-params 構件上新增相依性。請參閱 相依性元數據 以取得詳細資訊。
2.17.2. 取用引數
參數化測試方法通常直接從配置的來源取用引數(請參閱 引數來源),遵循引數來源索引和方法參數索引之間的一對一關聯(請參閱 @CsvSource 中的範例)。但是,參數化測試方法也可以選擇將來自來源的引數聚合到傳遞給方法的單一物件中(請參閱 引數聚合)。其他引數也可以由 ParameterResolver 提供(例如,取得 TestInfo、TestReporter 等的實例)。具體來說,參數化測試方法必須根據以下規則宣告形式參數。
-
必須首先宣告零個或多個索引引數。
-
接下來必須宣告零個或多個聚合器。
-
最後必須宣告由
ParameterResolver提供的零個或多個引數。
在這種情況下,索引引數是由 ArgumentsProvider 提供的 Arguments 中給定索引的引數,該引數作為引數傳遞給參數化方法的形式參數列表中的相同索引。聚合器是 ArgumentsAccessor 類型的任何參數或使用 @AggregateWith 註解的任何參數。
|
AutoCloseable 引數
實作 為了防止這種情況發生,請將 |
2.17.3. 引數來源
JUnit Jupiter 開箱即用提供了相當多的來源註解。以下每個小節都提供了簡要概述以及每個來源的範例。請參閱 org.junit.jupiter.params.provider 套件中的 Javadoc 以取得更多資訊。
@ValueSource
@ValueSource 是最簡單的來源之一。它讓您指定單一文字值陣列,並且只能用於為每次參數化測試調用提供單一引數。
@ValueSource 支援以下類型的文字值。
-
short -
byte -
int -
long -
float -
double -
char -
boolean -
java.lang.String -
java.lang.Class
例如,以下 @ParameterizedTest 方法將被調用三次,分別使用值 1、2 和 3。
@ParameterizedTest
@ValueSource(ints = { 1, 2, 3 })
void testWithValueSource(int argument) {
    assertTrue(argument > 0 && argument < 4);
}
Null 和空來源
為了檢查邊角案例並驗證我們的軟體在供應錯誤輸入時的正確行為,提供 null 和空值給我們的參數化測試可能很有用。以下註解用作接受單一引數的參數化測試的 null 和空值來源。
-
@NullSource:為註解的@ParameterizedTest方法提供單一null引數。-
@NullSource不能用於具有原始類型的參數。
-
-
@EmptySource:為標註的@ParameterizedTest方法的下列型別參數提供單一空引數:java.lang.String、java.util.Collection(以及具有public無引數建構子的具體子型別)、java.util.List、java.util.Set、java.util.SortedSet、java.util.NavigableSet、java.util.Map(以及具有public無引數建構子的具體子型別)、java.util.SortedMap、java.util.NavigableMap、原始陣列 (例如int[]、char[][]等)、物件陣列 (例如String[]、Integer[][]等)。 -
@NullAndEmptySource:是一個組合註解 (composed annotation),結合了@NullSource和@EmptySource的功能。
如果您需要為參數化測試提供多種不同類型的空白字串,您可以使用 @ValueSource — 例如,@ValueSource(strings = {" ", " ", "\t", "\n"})。
您也可以結合 @NullSource、@EmptySource 和 @ValueSource 來測試更廣泛的 null、空 和空白輸入。以下範例示範了如何針對字串實現此目的。
@ParameterizedTest
@NullSource
@EmptySource
@ValueSource(strings = { " ", "   ", "\t", "\n" })
void nullEmptyAndBlankStrings(String text) {
    assertTrue(text == null || text.trim().isEmpty());
}
使用組合的 @NullAndEmptySource 註解可以簡化上述程式碼,如下所示。
@ParameterizedTest
@NullAndEmptySource
@ValueSource(strings = { " ", "   ", "\t", "\n" })
void nullEmptyAndBlankStrings(String text) {
    assertTrue(text == null || text.trim().isEmpty());
}
nullEmptyAndBlankStrings(String) 參數化測試方法的兩種變體都會產生六次調用:null 一次、空字串一次,以及透過 @ValueSource 提供的明確空白字串四次。 |
@EnumSource
@EnumSource 提供了一種使用 Enum 常數的便捷方法。
@ParameterizedTest
@EnumSource(ChronoUnit.class)
void testWithEnumSource(TemporalUnit unit) {
    assertNotNull(unit);
}
註解的 value 屬性是選填的。當省略時,將使用第一個方法參數的宣告型別。如果它沒有參考列舉型別,則測試將會失敗。因此,在上面的範例中,value 屬性是必需的,因為方法參數宣告為 TemporalUnit,即由 ChronoUnit 實作的介面,而 ChronoUnit 不是列舉型別。將方法參數型別變更為 ChronoUnit 可讓您從註解中省略明確的列舉型別,如下所示。
@ParameterizedTest
@EnumSource
void testWithEnumSourceWithAutoDetection(ChronoUnit unit) {
    assertNotNull(unit);
}
此註解提供了一個選填的 names 屬性,可讓您指定應使用的常數,如下列範例所示。
@ParameterizedTest
@EnumSource(names = { "DAYS", "HOURS" })
void testWithEnumSourceInclude(ChronoUnit unit) {
    assertTrue(EnumSet.of(ChronoUnit.DAYS, ChronoUnit.HOURS).contains(unit));
}
除了 names 之外,您還可以使用 from 和 to 屬性來指定常數的範圍。該範圍從 from 屬性中指定的常數開始,並包含所有後續常數,直到並包括 to 屬性中指定的常數,基於列舉常數的自然順序。
如果省略 from 和 to 屬性,它們預設為列舉型別中的第一個和最後一個常數。如果省略所有 names、from 和 to 屬性,則將使用所有常數。以下範例示範如何指定常數範圍。
@ParameterizedTest
@EnumSource(from = "HOURS", to = "DAYS")
void testWithEnumSourceRange(ChronoUnit unit) {
    assertTrue(EnumSet.of(ChronoUnit.HOURS, ChronoUnit.HALF_DAYS, ChronoUnit.DAYS).contains(unit));
}
@EnumSource 註解還提供了一個選填的 mode 屬性,可以對傳遞給測試方法的常數進行細粒度控制。例如,您可以從列舉常數池中排除名稱,或指定正則表達式,如下列範例所示。
@ParameterizedTest
@EnumSource(mode = EXCLUDE, names = { "ERAS", "FOREVER" })
void testWithEnumSourceExclude(ChronoUnit unit) {
    assertFalse(EnumSet.of(ChronoUnit.ERAS, ChronoUnit.FOREVER).contains(unit));
}
@ParameterizedTest
@EnumSource(mode = MATCH_ALL, names = "^.*DAYS$")
void testWithEnumSourceRegex(ChronoUnit unit) {
assertTrue(unit.name().endsWith("DAYS"));
}您還可以將 mode 與 from、to 和 names 屬性結合使用,以定義常數範圍,同時從該範圍中排除特定值,如下所示。
@ParameterizedTest
@EnumSource(from = "HOURS", to = "DAYS", mode = EXCLUDE, names = { "HALF_DAYS" })
void testWithEnumSourceRangeExclude(ChronoUnit unit) {
    assertTrue(EnumSet.of(ChronoUnit.HOURS, ChronoUnit.DAYS).contains(unit));
    assertFalse(EnumSet.of(ChronoUnit.HALF_DAYS).contains(unit));
}
@MethodSource
@MethodSource 可讓您參考測試類別或外部類別的一個或多個工厂 (factory) 方法。
測試類別中的工厂方法必須是 static,除非測試類別使用 @TestInstance(Lifecycle.PER_CLASS) 註解;而外部類別中的工厂方法必須始終是 static。
每個工厂方法都必須產生引數 (arguments) 的串流 (stream),並且串流中的每組引數都將作為標註的 @ParameterizedTest 方法的個別調用的實體引數提供。一般來說,這會轉換為 Arguments 的 Stream (即 Stream<Arguments>);但是,實際的具體回傳型別可以採用多種形式。在此上下文中,「串流」是可以讓 JUnit 可靠地轉換為 Stream 的任何內容,例如 Stream、DoubleStream、LongStream、IntStream、Collection、Iterator、Iterable、物件陣列或原始型別陣列。串流中的「引數」可以作為 Arguments 的實例、物件陣列 (例如 Object[]) 或單個值提供,如果參數化測試方法接受單個引數。
如果您只需要單個參數,則可以回傳參數型別實例的 Stream,如下列範例所示。
@ParameterizedTest
@MethodSource("stringProvider")
void testWithExplicitLocalMethodSource(String argument) {
    assertNotNull(argument);
}

static Stream<String> stringProvider() {
    return Stream.of("apple", "banana");
}
如果您沒有透過 @MethodSource 明確提供工厂方法名稱,JUnit Jupiter 將依照慣例搜尋與目前 @ParameterizedTest 方法同名的工厂方法。以下範例示範了這一點。
@ParameterizedTest
@MethodSource
void testWithDefaultLocalMethodSource(String argument) {
    assertNotNull(argument);
}

static Stream<String> testWithDefaultLocalMethodSource() {
    return Stream.of("apple", "banana");
}
也支援原始型別的串流 (DoubleStream、IntStream 和 LongStream),如下列範例所示。
@ParameterizedTest
@MethodSource("range")
void testWithRangeMethodSource(int argument) {
    assertNotEquals(9, argument);
}

static IntStream range() {
    return IntStream.range(0, 20).skip(10);
}
如果參數化測試方法宣告多個參數,則需要回傳 Arguments 實例或物件陣列的集合、串流或陣列,如下所示 (有關支援的回傳型別的更多詳細資訊,請參閱 @MethodSource 的 Javadoc)。請注意,arguments(Object…) 是在 Arguments 介面中定義的靜態工厂方法。此外,Arguments.of(Object…) 可以用作 arguments(Object…) 的替代方案。
@ParameterizedTest
@MethodSource("stringIntAndListProvider")
void testWithMultiArgMethodSource(String str, int num, List<String> list) {
    assertEquals(5, str.length());
    assertTrue(num >=1 && num <=2);
    assertEquals(2, list.size());
}

static Stream<Arguments> stringIntAndListProvider() {
    return Stream.of(
        arguments("apple", 1, Arrays.asList("a", "b")),
        arguments("lemon", 2, Arrays.asList("x", "y"))
    );
}可以透過提供其完整限定方法名稱 (fully qualified method name) 來參考外部 static 工厂方法,如下列範例所示。
package example;

import java.util.stream.Stream;

import org.junit.jupiter.params.ParameterizedTest;
import org.junit.jupiter.params.provider.MethodSource;

class ExternalMethodSourceDemo {

    @ParameterizedTest
    @MethodSource("example.StringsProviders#tinyStrings")
    void testWithExternalMethodSource(String tinyString) {
        // test with tiny string
    }
}

class StringsProviders {

    static Stream<String> tinyStrings() {
        return Stream.of(".", "oo", "OOO");
    }
}
工厂方法可以宣告參數,這些參數將由 ParameterResolver 擴充 API 的已註冊實作提供。在以下範例中,工厂方法是透過其名稱參考的,因為測試類別中只有一個這樣的方法。如果有多個同名的本地方法,也可以提供參數來區分它們 – 例如,@MethodSource("factoryMethod()") 或 @MethodSource("factoryMethod(java.lang.String)")。或者,可以透過其完整限定方法名稱來參考工厂方法,例如 @MethodSource("example.MyTests#factoryMethod(java.lang.String)")。
@RegisterExtension
static final IntegerResolver integerResolver = new IntegerResolver();

@ParameterizedTest
@MethodSource("factoryMethodWithArguments")
void testWithFactoryMethodWithArguments(String argument) {
    assertTrue(argument.startsWith("2"));
}

static Stream<Arguments> factoryMethodWithArguments(int quantity) {
    return Stream.of(
            arguments(quantity + " apples"),
            arguments(quantity + " lemons")
    );
}

static class IntegerResolver implements ParameterResolver {

    @Override
    public boolean supportsParameter(ParameterContext parameterContext,
            ExtensionContext extensionContext) {

        return parameterContext.getParameter().getType() == int.class;
    }

    @Override
    public Object resolveParameter(ParameterContext parameterContext,
            ExtensionContext extensionContext) {

        return 2;
    }

}
@FieldSource
@FieldSource 可讓您參考測試類別或外部類別的一個或多個欄位。
測試類別中的欄位必須是 static,除非測試類別使用 @TestInstance(Lifecycle.PER_CLASS) 註解;而外部類別中的欄位必須始終是 static。
每個欄位都必須能夠提供引數的串流,並且「串流」中的每組「引數」都將作為標註的 @ParameterizedTest 方法的個別調用的實體引數提供。
在此上下文中,「串流」是可以讓 JUnit 可靠地轉換為 Stream 的任何內容;但是,實際的具體欄位型別可以採用多種形式。一般來說,這會轉換為 Collection、Iterable、串流的 Supplier (Stream、DoubleStream、LongStream 或 IntStream)、Iterator 的 Supplier、物件陣列或原始型別陣列。「串流」中的每組「引數」都可以作為 Arguments 的實例、物件陣列 (例如 Object[]、String[] 等) 或單個值提供,如果參數化測試方法接受單個引數。
|
與 |
請注意,作為一組「引數」提供的一維物件陣列的處理方式與其他型別的引數不同。具體而言,一維物件陣列的所有元素都將作為個別的實體引數傳遞給 @ParameterizedTest 方法。有關更多詳細資訊,請參閱 @FieldSource 的 Javadoc。
如果您沒有透過 @FieldSource 明確提供欄位名稱,JUnit Jupiter 將依照慣例在測試類別中搜尋與目前 @ParameterizedTest 方法同名的欄位。以下範例示範了這一點。此參數化測試方法將被調用兩次:值為 "apple" 和 "banana"。
@ParameterizedTest
@FieldSource
void arrayOfFruits(String fruit) {
    assertFruit(fruit);
}

static final String[] arrayOfFruits = { "apple", "banana" };
以下範例示範如何透過 @FieldSource 提供單個明確的欄位名稱。此參數化測試方法將被調用兩次:值為 "apple" 和 "banana"。
@ParameterizedTest
@FieldSource("listOfFruits")
void singleFieldSource(String fruit) {
    assertFruit(fruit);
}

static final List<String> listOfFruits = Arrays.asList("apple", "banana");
以下範例示範如何透過 @FieldSource 提供多個明確的欄位名稱。此範例使用上一個範例中的 listOfFruits 欄位以及 additionalFruits 欄位。因此,此參數化測試方法將被調用四次:值為 "apple"、"banana"、"cherry" 和 "dewberry"。
@ParameterizedTest
@FieldSource({ "listOfFruits", "additionalFruits" })
void multipleFieldSources(String fruit) {
    assertFruit(fruit);
}

static final Collection<String> additionalFruits = Arrays.asList("cherry", "dewberry");
也可以透過 @FieldSource 欄位提供 Stream、DoubleStream、IntStream、LongStream 或 Iterator 作為引數來源,只要串流或迭代器包裝在 java.util.function.Supplier 中即可。以下範例示範如何提供命名引數的 Stream 的 Supplier。此參數化測試方法將被調用兩次:值為 "apple" 和 "banana",顯示名稱分別為 Apple 和 Banana。
@ParameterizedTest
@FieldSource
void namedArgumentsSupplier(String fruit) {
    assertFruit(fruit);
}

static final Supplier<Stream<Arguments>> namedArgumentsSupplier = () -> Stream.of(
    arguments(named("Apple", "apple")),
    arguments(named("Banana", "banana"))
);|
請注意, 同樣地, |
如果參數化測試方法宣告多個參數,則對應的 @FieldSource 欄位必須能夠提供 Arguments 實例或物件陣列的集合、串流供應商或陣列,如下所示 (有關 @FieldSource 支援型別的更多詳細資訊,請參閱 Javadoc)。
@ParameterizedTest
@FieldSource("stringIntAndListArguments")
void testWithMultiArgFieldSource(String str, int num, List<String> list) {
    assertEquals(5, str.length());
    assertTrue(num >=1 && num <=2);
    assertEquals(2, list.size());
}

static List<Arguments> stringIntAndListArguments = Arrays.asList(
    arguments("apple", 1, Arrays.asList("a", "b")),
    arguments("lemon", 2, Arrays.asList("x", "y"))
);|
請注意, |
可以透過提供其完整限定欄位名稱 (fully qualified field name) 來參考外部 static @FieldSource 欄位,如下列範例所示。
@ParameterizedTest
@FieldSource("example.FruitUtils#tropicalFruits")
void testWithExternalFieldSource(String tropicalFruit) {
    // test with tropicalFruit
}
@CsvSource
@CsvSource 可讓您將引數列表表示為逗號分隔值 (即 CSV String 字面值)。透過 @CsvSource 中的 value 屬性提供的每個字串都代表一個 CSV 記錄,並導致參數化測試的一次調用。第一個記錄可以選擇性地用於提供 CSV 標頭 (有關詳細資訊和範例,請參閱 useHeadersInDisplayName 屬性的 Javadoc)。
@ParameterizedTest
@CsvSource({
    "apple,      1",
    "banana,        2",
    "'lemon, lime', 0xF1",
    "strawberry,    700_000"
})
void testWithCsvSource(String fruit, int rank) {
    assertNotNull(fruit);
    assertNotEquals(0, rank);
}
預設分隔符號是逗號 (,),但您可以使用另一個字元來設定 delimiter 屬性。或者,delimiterString 屬性可讓您使用 String 分隔符號而不是單個字元。但是,不能同時設定這兩個分隔符號屬性。
預設情況下,@CsvSource 使用單引號 (') 作為其引號字元,但可以透過 quoteCharacter 屬性變更此設定。請參閱上面範例和下表中的 'lemon, lime' 值。除非設定了 emptyValue 屬性,否則帶引號的空值 ('') 會產生空 String;而完全空的值會被解釋為 null 參考。透過指定一個或多個 nullValues,可以將自訂值解釋為 null 參考 (請參閱下表中的 NIL 範例)。如果 null 參考的目標型別是原始型別,則會擲回 ArgumentConversionException。
未加引號的空值將始終轉換為 null 參考,無論透過 nullValues 屬性配置任何自訂值。 |
除非在帶引號的字串中,否則預設情況下會修剪 CSV 欄位中的前導和尾隨空白字元。可以透過將 ignoreLeadingAndTrailingWhitespace 屬性設定為 true 來變更此行為。
| 輸入範例 | 結果引數列表 |
|---|---|
|
|
|
|
|
|
|
|
|
|
|
|
如果您使用的程式語言支援文字區塊 (text blocks) — 例如,Java SE 15 或更高版本 — 您可以選擇使用 @CsvSource 的 textBlock 屬性。文字區塊中的每個記錄都代表一個 CSV 記錄,並導致參數化測試的一次調用。第一個記錄可以選擇性地用於透過將 useHeadersInDisplayName 屬性設定為 true 來提供 CSV 標頭,如下例所示。
使用文字區塊,上一個範例可以實作如下。
@ParameterizedTest(name = "[{index}] {arguments}")
@CsvSource(useHeadersInDisplayName = true, textBlock = """
    FRUIT,         RANK
    apple,         1
    banana,        2
    'lemon, lime', 0xF1
    strawberry,    700_000
    """)
void testWithCsvSource(String fruit, int rank) {
    // ...
}
上一個範例產生的顯示名稱包含 CSV 標頭名稱。
[1] FRUIT = apple, RANK = 1
[2] FRUIT = banana, RANK = 2
[3] FRUIT = lemon, lime, RANK = 0xF1
[4] FRUIT = strawberry, RANK = 700_000
與透過 value 屬性提供的 CSV 記錄相反,文字區塊可以包含註解。任何以 # 符號開頭的行都將被視為註解並被忽略。但是請注意,# 符號必須是行中的第一個字元,且前面沒有任何前導空白字元。因此,建議將結束文字區塊分隔符號 (""") 放在輸入的最後一行的末尾,或放在下一行,與輸入的其餘部分左對齊 (如下例所示,它示範了類似於表格的格式)。
@ParameterizedTest
@CsvSource(delimiter = '|', quoteCharacter = '"', textBlock = """
    #-----------------------------
    #    FRUIT     |     RANK
    #-----------------------------
         apple     |      1
    #-----------------------------
         banana    |      2
    #-----------------------------
      "lemon lime" |     0xF1
    #-----------------------------
       strawberry  |    700_000
    #-----------------------------
    """)
void testWithCsvSource(String fruit, int rank) {
    // ...
}|
Java 的 文字區塊 功能會在編譯程式碼時自動移除附帶空白字元 (incidental whitespace)。但是,其他 JVM 語言 (例如 Groovy 和 Kotlin) 則不會。因此,如果您使用的程式語言不是 Java,並且您的文字區塊在帶引號的字串中包含註解或換行符號,則需要確保文字區塊中沒有前導空白字元。 |
@CsvFileSource
@CsvFileSource 可讓您使用來自類別路徑或本機檔案系統的逗號分隔值 (CSV) 檔案。CSV 檔案中的每個記錄都會導致參數化測試的一次調用。第一個記錄可以選擇性地用於提供 CSV 標頭。您可以指示 JUnit 透過 numLinesToSkip 屬性忽略標頭。如果您希望在顯示名稱中使用標頭,則可以將 useHeadersInDisplayName 屬性設定為 true。以下範例示範了 numLinesToSkip 和 useHeadersInDisplayName 的用法。
預設分隔符號是逗號 (,),但您可以使用另一個字元來設定 delimiter 屬性。或者,delimiterString 屬性可讓您使用 String 分隔符號而不是單個字元。但是,不能同時設定這兩個分隔符號屬性。
|
CSV 檔案中的註解 任何以 # 符號開頭的行都將被解釋為註解並被忽略。 |
@ParameterizedTest
@CsvFileSource(resources = "/two-column.csv", numLinesToSkip = 1)
void testWithCsvFileSourceFromClasspath(String country, int reference) {
    assertNotNull(country);
    assertNotEquals(0, reference);
}

@ParameterizedTest
@CsvFileSource(files = "src/test/resources/two-column.csv", numLinesToSkip = 1)
void testWithCsvFileSourceFromFile(String country, int reference) {
    assertNotNull(country);
    assertNotEquals(0, reference);
}

@ParameterizedTest(name = "[{index}] {arguments}")
@CsvFileSource(resources = "/two-column.csv", useHeadersInDisplayName = true)
void testWithCsvFileSourceAndHeaders(String country, int reference) {
    assertNotNull(country);
    assertNotEquals(0, reference);
}COUNTRY, REFERENCE
Sweden, 1
Poland, 2
"United States of America", 3
France, 700_000以下列表顯示了上面前兩個參數化測試方法產生的顯示名稱。
[1] country=Sweden, reference=1
[2] country=Poland, reference=2
[3] country=United States of America, reference=3
[4] country=France, reference=700_000
以下列表顯示了上面最後一個使用 CSV 標頭名稱的參數化測試方法產生的顯示名稱。
[1] COUNTRY = Sweden, REFERENCE = 1
[2] COUNTRY = Poland, REFERENCE = 2
[3] COUNTRY = United States of America, REFERENCE = 3
[4] COUNTRY = France, REFERENCE = 700_000
相較於 @CsvSource 中使用的預設語法,@CsvFileSource 預設使用雙引號 (") 作為引號字元,但這可以透過 quoteCharacter 屬性來變更。請參閱上方範例中的 "United States of America" 值。除非設定了 emptyValue 屬性,否則空的帶引號值 ("") 會產生一個空的 String;然而,完全空的值會被解讀為 null 參考。透過指定一個或多個 nullValues,可以將自訂值解讀為 null 參考。如果 null 參考的目標類型是原始類型,則會拋出 ArgumentConversionException。
未加引號的空值將始終轉換為 null 參考,無論透過 nullValues 屬性配置任何自訂值。 |
除非在帶引號的字串中,否則預設情況下會修剪 CSV 欄位中的前導和尾隨空白字元。可以透過將 ignoreLeadingAndTrailingWhitespace 屬性設定為 true 來變更此行為。
@ArgumentsSource
@ArgumentsSource 可用於指定自訂、可重複使用的 ArgumentsProvider。請注意,ArgumentsProvider 的實作必須宣告為頂層類別或 static 巢狀類別。
@ParameterizedTest
@ArgumentsSource(MyArgumentsProvider.class)
void testWithArgumentsSource(String argument) {
    assertNotNull(argument);
}
public class MyArgumentsProvider implements ArgumentsProvider {
@Override
public Stream<? extends Arguments> provideArguments(ExtensionContext context) {
return Stream.of("apple", "banana").map(Arguments::of);
}
}如果您希望實作一個也會使用註解的自訂 ArgumentsProvider(例如內建的提供器,如 ValueArgumentsProvider 或 CsvArgumentsProvider),您可以擴展 AnnotationBasedArgumentsProvider 類別。
此外,ArgumentsProvider 的實作可以宣告建構子參數,以便它們可以由已註冊的 ParameterResolver 解析,如下例所示。
public class MyArgumentsProviderWithConstructorInjection implements ArgumentsProvider {

    private final TestInfo testInfo;

    public MyArgumentsProviderWithConstructorInjection(TestInfo testInfo) {
        this.testInfo = testInfo;
    }

    @Override
    public Stream<? extends Arguments> provideArguments(ExtensionContext context) {
        return Stream.of(Arguments.of(testInfo.getDisplayName()));
    }
}
使用可重複註解的多個來源
可重複註解提供了一種方便的方式,可以從不同的提供器指定多個來源。
@DisplayName("A parameterized test that makes use of repeatable annotations")
@ParameterizedTest
@MethodSource("someProvider")
@MethodSource("otherProvider")
void testWithRepeatedAnnotation(String argument) {
    assertNotNull(argument);
}

static Stream<String> someProvider() {
    return Stream.of("foo");
}

static Stream<String> otherProvider() {
    return Stream.of("bar");
}
繼承上述參數化測試,每個引數都會執行一個測試案例
[1] foo
[2] bar
以下註解是可重複的
-
@ValueSource -
@EnumSource -
@MethodSource -
@FieldSource -
@CsvSource -
@CsvFileSource -
@ArgumentsSource
2.17.4. 引數計數驗證
| 引數計數驗證目前是一項實驗性功能。歡迎您試用並向 JUnit 團隊提供回饋,以便他們可以改進並最終推廣此功能。 |
預設情況下,當引數來源提供的引數多於測試方法所需時,這些額外引數會被忽略,並且測試照常執行。這可能會導致錯誤,其中引數永遠不會傳遞到參數化測試方法。
為了防止這種情況,您可以將引數計數驗證設定為 'strict'。然後,任何額外引數都會導致錯誤。
若要變更所有測試的此行為,請將 junit.jupiter.params.argumentCountValidation 組態參數 設定為 strict。若要變更單一測試的此行為,請使用 @ParameterizedTest 註解的 argumentCountValidation 屬性
@ParameterizedTest(argumentCountValidation = ArgumentCountValidationMode.STRICT)
@CsvSource({ "42, -666" })
void testWithArgumentCountValidation(int number) {
    assertTrue(number > 0);
}
2.17.5. 引數轉換
擴展轉換
JUnit Jupiter 支援為提供給 @ParameterizedTest 的引數進行 擴展原始類型轉換。例如,使用 @ValueSource(ints = { 1, 2, 3 }) 註解的參數化測試可以宣告為不僅接受 int 類型的引數,還可以接受 long、float 或 double 類型的引數。
隱含轉換
為了支援像 @CsvSource 這樣的用例,JUnit Jupiter 提供了許多內建的隱含類型轉換器。轉換過程取決於每個方法參數的宣告類型。
例如,如果 @ParameterizedTest 宣告了 TimeUnit 類型的參數,並且宣告來源提供的實際類型是 String,則該字串將自動轉換為對應的 TimeUnit 列舉常數。
@ParameterizedTest
@ValueSource(strings = "SECONDS")
void testWithImplicitArgumentConversion(ChronoUnit argument) {
    assertNotNull(argument.name());
}
String 實例會隱含地轉換為以下目標類型。
十進制、十六進制和八進制 String 字面量將轉換為其整數類型:byte、short、int、long 及其包裝器對應類型。 |
| 目標類型 | 範例 |
|---|---|
|
|
|
|
|
|
|
|
|
|
|
|
|
|
|
|
|
|
|
|
|
|
|
|
|
|
|
|
|
|
|
|
|
|
|
|
|
|
|
|
|
|
|
|
|
|
|
|
|
|
|
|
|
|
|
|
|
|
|
|
|
|
|
|
|
|
|
|
|
|
|
|
後備字串轉物件轉換
除了從字串到上表列出的目標類型的隱含轉換之外,如果目標類型宣告正好一個合適的工厂方法或工厂建構子(如下定義),JUnit Jupiter 也提供了一種後備機制,用於從 String 自動轉換為給定的目標類型。
-
工厂方法:在目標類型中宣告的非私有
static方法,它接受單個String引數並返回目標類型的實例。方法的名稱可以是任意的,不需要遵循任何特定的慣例。 -
工厂建構子:目標類型中的非私有建構子,它接受單個
String引數。請注意,目標類型必須宣告為頂層類別或static巢狀類別。
| 如果發現多個工厂方法,它們將被忽略。如果同時發現工厂方法和工厂建構子,則將使用工厂方法而不是建構子。 |
例如,在以下 @ParameterizedTest 方法中,Book 引數將通過調用 Book.fromTitle(String) 工厂方法並傳遞 "42 Cats" 作為書名來建立。
@ParameterizedTest
@ValueSource(strings = "42 Cats")
void testWithImplicitFallbackArgumentConversion(Book book) {
    assertEquals("42 Cats", book.getTitle());
}
public class Book {
private final String title;
private Book(String title) {
this.title = title;
}
public static Book fromTitle(String title) {
return new Book(title);
}
public String getTitle() {
return this.title;
}
}顯式轉換
您可以顯式指定要用於特定參數的 ArgumentConverter,而不是依賴隱含引數轉換,方法是使用 @ConvertWith 註解,如下例所示。請注意,ArgumentConverter 的實作必須宣告為頂層類別或 static 巢狀類別。
@ParameterizedTest
@EnumSource(ChronoUnit.class)
void testWithExplicitArgumentConversion(
        @ConvertWith(ToStringArgumentConverter.class) String argument) {

    assertNotNull(ChronoUnit.valueOf(argument));
}
public class ToStringArgumentConverter extends SimpleArgumentConverter {
@Override
protected Object convert(Object source, Class<?> targetType) {
assertEquals(String.class, targetType, "Can only convert to String");
if (source instanceof Enum<?>) {
return ((Enum<?>) source).name();
}
return String.valueOf(source);
}
}如果轉換器僅用於將一種類型轉換為另一種類型,您可以擴展 TypedArgumentConverter 以避免樣板類型檢查。
public class ToLengthArgumentConverter extends TypedArgumentConverter<String, Integer> {

    protected ToLengthArgumentConverter() {
        super(String.class, Integer.class);
    }

    @Override
    protected Integer convert(String source) {
        return (source != null ? source.length() : 0);
    }

}顯式引數轉換器旨在由測試和擴展作者實作。因此,junit-jupiter-params 僅提供一個顯式引數轉換器,它也可以作為參考實作:JavaTimeArgumentConverter。它通過組成的註解 JavaTimeConversionPattern 使用。
@ParameterizedTest
@ValueSource(strings = { "01.01.2017", "31.12.2017" })
void testWithExplicitJavaTimeConverter(
        @JavaTimeConversionPattern("dd.MM.yyyy") LocalDate argument) {

    assertEquals(2017, argument.getYear());
}
如果您希望實作一個也會使用註解的自訂 ArgumentConverter(例如 JavaTimeArgumentConverter),您可以擴展 AnnotationBasedArgumentConverter 類別。
2.17.6. 引數聚合
預設情況下,提供給 @ParameterizedTest 方法的每個引數對應於單個方法參數。因此,預期提供大量引數的引數來源可能會導致大型方法簽名。
在這種情況下,可以使用 ArgumentsAccessor 而不是多個參數。使用此 API,您可以通過傳遞到測試方法的單個引數來存取提供的引數。此外,還支援 隱含轉換 中討論的類型轉換。
此外,您可以使用 ArgumentsAccessor.getInvocationIndex() 檢索當前測試調用索引。
@ParameterizedTest
@CsvSource({
    "Jane, Doe, F, 1990-05-20",
    "John, Doe, M, 1990-10-22"
})
void testWithArgumentsAccessor(ArgumentsAccessor arguments) {
    Person person = new Person(
                                arguments.getString(0),
                                arguments.getString(1),
                                arguments.get(2, Gender.class),
                                arguments.get(3, LocalDate.class));

    if (person.getFirstName().equals("Jane")) {
        assertEquals(Gender.F, person.getGender());
    }
    else {
        assertEquals(Gender.M, person.getGender());
    }
    assertEquals("Doe", person.getLastName());
    assertEquals(1990, person.getDateOfBirth().getYear());
}
ArgumentsAccessor 的實例會自動注入到任何 ArgumentsAccessor 類型的參數中。
自訂聚合器
除了使用 ArgumentsAccessor 直接存取 @ParameterizedTest 方法的引數之外,JUnit Jupiter 也支援使用自訂的、可重複使用的聚合器。
若要使用自訂聚合器,請實作 ArgumentsAggregator 介面,並通過 @ParameterizedTest 方法中相容參數上的 @AggregateWith 註解註冊它。然後,聚合的結果將作為參數提供給調用參數化測試時的對應參數。請注意,ArgumentsAggregator 的實作必須宣告為頂層類別或 static 巢狀類別。
@ParameterizedTest
@CsvSource({
    "Jane, Doe, F, 1990-05-20",
    "John, Doe, M, 1990-10-22"
})
void testWithArgumentsAggregator(@AggregateWith(PersonAggregator.class) Person person) {
    // perform assertions against person
}
public class PersonAggregator implements ArgumentsAggregator {
@Override
public Person aggregateArguments(ArgumentsAccessor arguments, ParameterContext context) {
return new Person(
arguments.getString(0),
arguments.getString(1),
arguments.get(2, Gender.class),
arguments.get(3, LocalDate.class));
}
}如果您發現自己在整個程式碼庫中為多個參數化測試方法重複宣告 @AggregateWith(MyTypeAggregator.class),您可能希望建立一個自訂的組合註解,例如 @CsvToMyType,它使用 @AggregateWith(MyTypeAggregator.class) 進行元註解。以下範例示範了使用自訂 @CsvToPerson 註解的實際操作。
@ParameterizedTest
@CsvSource({
    "Jane, Doe, F, 1990-05-20",
    "John, Doe, M, 1990-10-22"
})
void testWithCustomAggregatorAnnotation(@CsvToPerson Person person) {
    // perform assertions against person
}@Retention(RetentionPolicy.RUNTIME)
@Target(ElementType.PARAMETER)
@AggregateWith(PersonAggregator.class)
public @interface CsvToPerson {
}2.17.7. 自訂顯示名稱
預設情況下,參數化測試調用的顯示名稱包含調用索引和該特定調用的所有引數的 String 表示形式。每個引數前面都有其參數名稱(除非該引數僅通過 ArgumentsAccessor 或 ArgumentAggregator 可用),如果參數名稱存在於位元組碼中(對於 Java,測試程式碼必須使用 -parameters 編譯器標誌進行編譯)。
但是,您可以通過 @ParameterizedTest 註解的 name 屬性來自訂調用顯示名稱,如下例所示。
@DisplayName("Display name of container")
@ParameterizedTest(name = "{index} ==> the rank of ''{0}'' is {1}")
@CsvSource({ "apple, 1", "banana, 2", "'lemon, lime', 3" })
void testWithCustomDisplayNames(String fruit, int rank) {
}
使用 ConsoleLauncher 執行上述方法時,您將看到類似於以下的輸出。
Display name of container ✔
├─ 1 ==> the rank of 'apple' is 1 ✔
├─ 2 ==> the rank of 'banana' is 2 ✔
└─ 3 ==> the rank of 'lemon, lime' is 3 ✔
|
請注意, |
自訂顯示名稱中支援以下佔位符。
| 佔位符 | 描述 |
|---|---|
|
方法的顯示名稱 |
|
當前調用索引(從 1 開始) |
|
完整的、逗號分隔的引數列表 |
|
完整的、帶參數名稱的逗號分隔的引數列表 |
|
引數集的名稱 |
|
|
|
單個引數 |
當在顯示名稱中包含引數時,如果它們超過配置的最大長度,其字串表示形式將被截斷。該限制可通過 junit.jupiter.params.displayname.argument.maxlength 組態參數配置,預設值為 512 個字元。 |
當使用 @MethodSource、@FieldSource 或 @ArgumentsSource 時,您可以為個別引數或整組引數提供自訂名稱。
使用 Named API 為個別引數提供自訂名稱,如果引數包含在調用顯示名稱中,則將使用自訂名稱,如下例所示。
@DisplayName("A parameterized test with named arguments")
@ParameterizedTest(name = "{index}: {0}")
@MethodSource("namedArguments")
void testWithNamedArguments(File file) {
}

static Stream<Arguments> namedArguments() {
    return Stream.of(
        arguments(named("An important file", new File("path1"))),
        arguments(named("Another file", new File("path2")))
    );
}
使用 ConsoleLauncher 執行上述方法時,您將看到類似於以下的輸出。
A parameterized test with named arguments ✔
├─ 1: An important file ✔
└─ 2: Another file ✔
|
請注意, 同樣地, |
使用 ArgumentSet API 為整組引數提供自訂名稱,自訂名稱將用作顯示名稱,如下例所示。
@DisplayName("A parameterized test with named argument sets")
@ParameterizedTest
@FieldSource("argumentSets")
void testWithArgumentSets(File file1, File file2) {
}

static List<Arguments> argumentSets = Arrays.asList(
    argumentSet("Important files", new File("path1"), new File("path2")),
    argumentSet("Other files", new File("path3"), new File("path4"))
);
使用 ConsoleLauncher 執行上述方法時,您將看到類似於以下的輸出。
A parameterized test with named argument sets ✔
├─ [1] Important files ✔
└─ [2] Other files ✔
|
請注意, |
如果您想為專案中所有參數化測試設定預設名稱模式,您可以在 junit-platform.properties 檔案中宣告 junit.jupiter.params.displayname.default 組態參數,如下列範例所示(其他選項請參閱組態參數)。
junit.jupiter.params.displayname.default = {index}參數化測試的顯示名稱會根據以下優先順序規則決定
-
@ParameterizedTest中的name屬性(如果存在) -
junit.jupiter.params.displayname.default組態參數的值(如果存在) -
@ParameterizedTest中定義的DEFAULT_DISPLAY_NAME常數
2.17.8. 生命周期與互操作性
參數化測試的每次調用都具有與常規 @Test 方法相同的生命週期。例如,@BeforeEach 方法將在每次調用之前執行。與動態測試類似,調用將在 IDE 的測試樹中逐一顯示。您可以隨意在同一個測試類別中混合使用常規 @Test 方法和 @ParameterizedTest 方法。
您可以將 ParameterResolver 擴展與 @ParameterizedTest 方法一起使用。但是,由引數來源解析的方法參數需要放在引數列表的最前面。由於一個測試類別可能包含常規測試以及具有不同參數列表的參數化測試,因此引數來源的值不會為生命週期方法(例如 @BeforeEach)和測試類別建構子解析。
@BeforeEach
void beforeEach(TestInfo testInfo) {
    // ...
}

@ParameterizedTest
@ValueSource(strings = "apple")
void testWithRegularParameterResolver(String argument, TestReporter testReporter) {
    testReporter.publishEntry("argument", argument);
}

@AfterEach
void afterEach(TestInfo testInfo) {
    // ...
}
2.18. 測試範本
@TestTemplate 方法不是常規的測試案例,而是一個測試案例的範本。因此,它被設計為根據已註冊的提供者返回的調用上下文數量多次調用。因此,它必須與已註冊的 TestTemplateInvocationContextProvider 擴展一起使用。測試範本方法的每次調用都像執行常規 @Test 方法一樣,完全支援相同的生命週期回呼和擴展。有關使用範例,請參閱為測試範本提供調用上下文。
2.19. 動態測試
JUnit Jupiter 中的標準 @Test 註解(在註解中描述)與 JUnit 4 中的 @Test 註解非常相似。兩者都描述了實作測試案例的方法。這些測試案例在本質上是靜態的,因為它們在編譯時完全指定,並且它們的行為無法通過運行時發生的任何事情來更改。假設提供了一種基本形式的動態行為,但在其表達能力方面有意地受到限制。
除了這些標準測試之外,JUnit Jupiter 中還引入了一種全新的測試程式設計模型。這種新型測試是一種動態測試,它在運行時由使用 @TestFactory 註解的工厂方法產生。
與 @Test 方法相反,@TestFactory 方法本身不是測試案例,而是一個測試案例的工厂。因此,動態測試是工厂的產物。從技術上講,@TestFactory 方法必須返回單個 DynamicNode 或 DynamicNode 實例的 Stream、Collection、Iterable、Iterator 或陣列。DynamicNode 的可實例化子類別是 DynamicContainer 和 DynamicTest。DynamicContainer 實例由顯示名稱和動態子節點列表組成,從而可以建立任意巢狀的動態節點層次結構。DynamicTest 實例將被延遲執行,從而實現動態甚至非確定性的測試案例生成。
@TestFactory 返回的任何 Stream 都將通過調用 stream.close() 正確關閉,使其可以安全地使用諸如 Files.lines() 之類的資源。
與 @Test 方法一樣,@TestFactory 方法不得為 private 或 static,並且可以選擇性地宣告要由 ParameterResolvers 解析的參數。
DynamicTest 是在運行時生成的測試案例。它由顯示名稱和 Executable 組成。Executable 是一個 @FunctionalInterface,這意味著動態測試的實作可以作為lambda 表達式或方法引用提供。
|
動態測試生命週期 動態測試的執行生命週期與標準 @Test 案例的生命週期截然不同。具體來說,對於單個動態測試沒有生命週期回呼。這意味著 @BeforeEach 和 @AfterEach 方法及其對應的擴展回呼是為 @TestFactory 方法執行的,而不是為每個動態測試執行的。換句話說,如果您從動態測試的 lambda 表達式中存取測試實例中的欄位,則這些欄位不會在同一個 @TestFactory 方法生成的各個動態測試執行之間通過回呼方法或擴展重置。 |
2.19.1. 動態測試範例
以下 DynamicTestsDemo 類別示範了測試工厂和動態測試的幾個範例。
第一個方法返回無效的返回類型。由於在編譯時無法檢測到無效的返回類型,因此在運行時檢測到時會拋出 JUnitException。
接下來的六個方法示範了 DynamicTest 實例的 Collection、Iterable、Iterator、陣列或 Stream 的生成。這些範例大多數實際上並未展示動態行為,而只是原則上示範了支援的返回類型。但是,dynamicTestsFromStream() 和 dynamicTestsFromIntStream() 示範了如何為給定的一組字串或一系列輸入數字生成動態測試。
下一個方法本質上是真正的動態的。generateRandomNumberOfTests() 實作了一個 Iterator,它生成隨機數、顯示名稱生成器和測試執行器,然後將這三者都提供給 DynamicTest.stream()。儘管 generateRandomNumberOfTests() 的非確定性行為當然與測試可重複性相衝突,因此應謹慎使用,但它有助於示範動態測試的表達能力和強大功能。
下一個方法在靈活性方面與 generateRandomNumberOfTests() 類似;但是,dynamicTestsFromStreamFactoryMethod() 通過 DynamicTest.stream() 工厂方法從現有的 Stream 生成動態測試流。
為了示範目的,dynamicNodeSingleTest() 方法生成單個 DynamicTest 而不是流,而 dynamicNodeSingleContainer() 方法生成使用 DynamicContainer 的動態測試的巢狀層次結構。
import static example.util.StringUtils.isPalindrome;
import static org.junit.jupiter.api.Assertions.assertEquals;
import static org.junit.jupiter.api.Assertions.assertFalse;
import static org.junit.jupiter.api.Assertions.assertNotNull;
import static org.junit.jupiter.api.Assertions.assertTrue;
import static org.junit.jupiter.api.DynamicContainer.dynamicContainer;
import static org.junit.jupiter.api.DynamicTest.dynamicTest;

import java.util.Arrays;
import java.util.Collection;
import java.util.Iterator;
import java.util.List;
import java.util.Random;
import java.util.function.Function;
import java.util.stream.IntStream;
import java.util.stream.Stream;

import example.util.Calculator;

import org.junit.jupiter.api.DynamicNode;
import org.junit.jupiter.api.DynamicTest;
import org.junit.jupiter.api.Tag;
import org.junit.jupiter.api.TestFactory;
import org.junit.jupiter.api.function.ThrowingConsumer;

class DynamicTestsDemo {

    private final Calculator calculator = new Calculator();

    // This will result in a JUnitException!
    @TestFactory
    List<String> dynamicTestsWithInvalidReturnType() {
        return Arrays.asList("Hello");
    }

    @TestFactory
    Collection<DynamicTest> dynamicTestsFromCollection() {
        return Arrays.asList(
            dynamicTest("1st dynamic test", () -> assertTrue(isPalindrome("madam"))),
            dynamicTest("2nd dynamic test", () -> assertEquals(4, calculator.multiply(2, 2)))
        );
    }

    @TestFactory
    Iterable<DynamicTest> dynamicTestsFromIterable() {
        return Arrays.asList(
            dynamicTest("3rd dynamic test", () -> assertTrue(isPalindrome("madam"))),
            dynamicTest("4th dynamic test", () -> assertEquals(4, calculator.multiply(2, 2)))
        );
    }

    @TestFactory
    Iterator<DynamicTest> dynamicTestsFromIterator() {
        return Arrays.asList(
            dynamicTest("5th dynamic test", () -> assertTrue(isPalindrome("madam"))),
            dynamicTest("6th dynamic test", () -> assertEquals(4, calculator.multiply(2, 2)))
        ).iterator();
    }

    @TestFactory
    DynamicTest[] dynamicTestsFromArray() {
        return new DynamicTest[] {
            dynamicTest("7th dynamic test", () -> assertTrue(isPalindrome("madam"))),
            dynamicTest("8th dynamic test", () -> assertEquals(4, calculator.multiply(2, 2)))
        };
    }

    @TestFactory
    Stream<DynamicTest> dynamicTestsFromStream() {
        return Stream.of("racecar", "radar", "mom", "dad")
            .map(text -> dynamicTest(text, () -> assertTrue(isPalindrome(text))));
    }

    @TestFactory
    Stream<DynamicTest> dynamicTestsFromIntStream() {
        // Generates tests for the first 10 even integers.
        return IntStream.iterate(0, n -> n + 2).limit(10)
            .mapToObj(n -> dynamicTest("test" + n, () -> assertEquals(0, n % 2)));
    }

    @TestFactory
    Stream<DynamicTest> generateRandomNumberOfTests() {

        // Generates random positive integers between 0 and 100 until
        // a number evenly divisible by 7 is encountered.
        Iterator<Integer> inputGenerator = new Iterator<Integer>() {

            Random random = new Random();
            int current;

            @Override
            public boolean hasNext() {
                current = random.nextInt(100);
                return current % 7 != 0;
            }

            @Override
            public Integer next() {
                return current;
            }
        };

        // Generates display names like: input:5, input:37, input:85, etc.
        Function<Integer, String> displayNameGenerator = (input) -> "input:" + input;

        // Executes tests based on the current input value.
        ThrowingConsumer<Integer> testExecutor = (input) -> assertTrue(input % 7 != 0);

        // Returns a stream of dynamic tests.
        return DynamicTest.stream(inputGenerator, displayNameGenerator, testExecutor);
    }

    @TestFactory
    Stream<DynamicTest> dynamicTestsFromStreamFactoryMethod() {
        // Stream of palindromes to check
        Stream<String> inputStream = Stream.of("racecar", "radar", "mom", "dad");

        // Generates display names like: racecar is a palindrome
        Function<String, String> displayNameGenerator = text -> text + " is a palindrome";

        // Executes tests based on the current input value.
        ThrowingConsumer<String> testExecutor = text -> assertTrue(isPalindrome(text));

        // Returns a stream of dynamic tests.
        return DynamicTest.stream(inputStream, displayNameGenerator, testExecutor);
    }

    @TestFactory
    Stream<DynamicNode> dynamicTestsWithContainers() {
        return Stream.of("A", "B", "C")
            .map(input -> dynamicContainer("Container " + input, Stream.of(
                dynamicTest("not null", () -> assertNotNull(input)),
                dynamicContainer("properties", Stream.of(
                    dynamicTest("length > 0", () -> assertTrue(input.length() > 0)),
                    dynamicTest("not empty", () -> assertFalse(input.isEmpty()))
                ))
            )));
    }

    @TestFactory
    DynamicNode dynamicNodeSingleTest() {
        return dynamicTest("'pop' is a palindrome", () -> assertTrue(isPalindrome("pop")));
    }

    @TestFactory
    DynamicNode dynamicNodeSingleContainer() {
        return dynamicContainer("palindromes",
            Stream.of("racecar", "radar", "mom", "dad")
                .map(text -> dynamicTest(text, () -> assertTrue(isPalindrome(text)))
        ));
    }
}
2.19.2. 動態測試和具名支援
在某些情況下,使用 Named API 和 DynamicTest 上對應的 stream() 工厂方法來指定輸入以及描述性名稱可能更自然,如下面的第一個範例所示。第二個範例更進一步,允許通過實作 Executable 介面以及通過 NamedExecutable 基礎類別的 Named 來提供應執行的程式碼區塊。
import static example.util.StringUtils.isPalindrome;
import static org.junit.jupiter.api.Assertions.assertTrue;
import static org.junit.jupiter.api.Named.named;

import java.util.stream.Stream;

import org.junit.jupiter.api.DynamicTest;
import org.junit.jupiter.api.NamedExecutable;
import org.junit.jupiter.api.TestFactory;

public class DynamicTestsNamedDemo {

    @TestFactory
    Stream<DynamicTest> dynamicTestsFromStreamFactoryMethodWithNames() {
        // Stream of palindromes to check
        var inputStream = Stream.of(
            named("racecar is a palindrome", "racecar"),
            named("radar is also a palindrome", "radar"),
            named("mom also seems to be a palindrome", "mom"),
            named("dad is yet another palindrome", "dad")
        );

        // Returns a stream of dynamic tests.
        return DynamicTest.stream(inputStream, text -> assertTrue(isPalindrome(text)));
    }

    @TestFactory
    Stream<DynamicTest> dynamicTestsFromStreamFactoryMethodWithNamedExecutables() {
        // Stream of palindromes to check
        var inputStream = Stream.of("racecar", "radar", "mom", "dad")
                .map(PalindromeNamedExecutable::new);

        // Returns a stream of dynamic tests based on NamedExecutables.
        return DynamicTest.stream(inputStream);
    }

    record PalindromeNamedExecutable(String text) implements NamedExecutable {

        @Override
        public String getName() {
            return String.format("'%s' is a palindrome", text);
        }

        @Override
        public void execute() {
            assertTrue(isPalindrome(text));
        }
    }
}
2.19.3. 動態測試的 URI 測試來源
JUnit Platform 提供了 TestSource,它是測試或容器來源的表示形式,用於通過 IDE 和建置工具導航到其位置。
動態測試或動態容器的 TestSource 可以從 java.net.URI 建構,該 java.net.URI 可以通過 DynamicTest.dynamicTest(String, URI, Executable) 或 DynamicContainer.dynamicContainer(String, URI, Stream) 工厂方法分別提供。URI 將轉換為以下 TestSource 實作之一。
ClasspathResourceSource-
如果
URI包含classpathscheme — 例如,classpath:/test/foo.xml?line=20,column=2。 DirectorySource-
如果
URI表示檔案系統中存在的目錄。 FileSource-
如果
URI表示檔案系統中存在的檔案。 MethodSource-
如果
URI包含methodscheme 和完全限定的方法名稱 (FQMN) — 例如,method:org.junit.Foo#bar(java.lang.String, java.lang.String[])。有關 FQMN 的支援格式,請參閱DiscoverySelectors.selectMethod的 Javadoc。 ClassSource-
如果
URI包含classscheme 和完全限定的類別名稱 — 例如,class:org.junit.Foo?line=42。 UriSource-
如果以上
TestSource實作均不適用。
2.20. 超時
@Timeout 註解允許宣告如果測試、測試工厂、測試範本或生命週期方法的執行時間超過給定的持續時間,則應失敗。持續時間的時間單位預設為秒,但可以配置。
以下範例顯示了如何將 @Timeout 應用於生命週期和測試方法。
class TimeoutDemo {

    @BeforeEach
    @Timeout(5)
    void setUp() {
        // fails if execution time exceeds 5 seconds
    }

    @Test
    @Timeout(value = 500, unit = TimeUnit.MILLISECONDS)
    void failsIfExecutionTimeExceeds500Milliseconds() {
        // fails if execution time exceeds 500 milliseconds
    }

    @Test
    @Timeout(value = 500, unit = TimeUnit.MILLISECONDS, threadMode = ThreadMode.SEPARATE_THREAD)
    void failsIfExecutionTimeExceeds500MillisecondsInSeparateThread() {
        // fails if execution time exceeds 500 milliseconds, the test code is executed in a separate thread
    }

}
要將相同的超時應用於測試類別及其所有 @Nested 類別中的所有測試方法,您可以在類別級別宣告 @Timeout 註解。然後,它將應用於該類別及其 @Nested 類別中的所有測試、測試工厂和測試範本方法,除非被特定方法或 @Nested 類別上的 @Timeout 註解覆蓋。請注意,在類別級別宣告的 @Timeout 註解不會應用於生命週期方法。
在 @TestFactory 方法上宣告 @Timeout 會檢查工厂方法是否在指定的持續時間內返回,但不會驗證工厂生成的每個單獨 DynamicTest 的執行時間。請使用 assertTimeout() 或 assertTimeoutPreemptively() 來達到此目的。
如果 @Timeout 出現在 @TestTemplate 方法上 — 例如,@RepeatedTest 或 @ParameterizedTest — 則每次調用都將應用給定的超時。
2.20.1. 線程模式
可以使用以下三種線程模式之一應用超時:SAME_THREAD、SEPARATE_THREAD 或 INFERRED。
當使用 SAME_THREAD 時,註解方法的執行在測試的主線程中進行。如果超過超時,主線程將從另一個線程中斷。這樣做是為了確保與 Spring 等框架的互操作性,這些框架利用對當前運行線程敏感的機制 — 例如,ThreadLocal 事務管理。
相反,當使用 SEPARATE_THREAD 時,就像 assertTimeoutPreemptively() 斷言一樣,註解方法的執行在單獨的線程中進行,這可能會導致不良的副作用,請參閱使用 assertTimeoutPreemptively() 的搶佔式超時。
當使用 INFERRED(預設)線程模式時,線程模式通過 junit.jupiter.execution.timeout.thread.mode.default 組態參數解析。如果提供的組態參數無效或不存在,則使用 SAME_THREAD 作為後備。
2.20.2. 預設超時
以下組態參數可用於為特定類別的所有方法指定預設超時,除非它們或封閉的測試類別使用 @Timeout 進行註解
junit.jupiter.execution.timeout.default-
所有可測試和生命週期方法的預設超時
junit.jupiter.execution.timeout.testable.method.default-
所有可測試方法的預設超時
junit.jupiter.execution.timeout.test.method.default-
@Test方法的預設超時 junit.jupiter.execution.timeout.testtemplate.method.default-
@TestTemplate方法的預設超時 junit.jupiter.execution.timeout.testfactory.method.default-
@TestFactory方法的預設超時 junit.jupiter.execution.timeout.lifecycle.method.default-
所有生命週期方法的預設超時
junit.jupiter.execution.timeout.beforeall.method.default-
@BeforeAll方法的預設超時 junit.jupiter.execution.timeout.beforeeach.method.default-
@BeforeEach方法的預設超時 junit.jupiter.execution.timeout.aftereach.method.default-
@AfterEach方法的預設超時 junit.jupiter.execution.timeout.afterall.method.default-
@AfterAll方法的預設超時
更具體的組態參數會覆蓋不太具體的參數。例如,junit.jupiter.execution.timeout.test.method.default 覆蓋 junit.jupiter.execution.timeout.testable.method.default,後者又覆蓋 junit.jupiter.execution.timeout.default。
此類組態參數的值必須採用以下不區分大小寫的格式:<number> [ns|μs|ms|s|m|h|d]。數字和單位之間的空格可以省略。不指定單位等同於使用秒。
| 參數值 | 等效註解 |
|---|---|
|
|
|
|
|
|
|
|
|
|
|
|
|
|
|
|
2.20.3. 將 @Timeout 用於輪詢測試
在處理非同步程式碼時,常見的做法是編寫測試,在執行任何斷言之前,透過輪詢等待某些事件發生。在某些情況下,您可以重寫邏輯以使用 CountDownLatch 或其他同步機制,但有時這是不可能的 — 例如,如果受測主體將訊息發送到外部訊息代理程式中的通道,並且在訊息已成功透過通道發送之前,無法執行斷言。像這樣的非同步測試需要某種形式的逾時,以確保它們不會無限期地執行而使測試套件掛起,如果非同步訊息從未成功傳遞,就會發生這種情況。
透過為輪詢的非同步測試配置逾時,您可以確保測試不會無限期地執行。以下範例示範如何使用 JUnit Jupiter 的 @Timeout 註解來達成此目的。此技術可以非常容易地用於實作「輪詢直到」邏輯。
@Test
@Timeout(5) // Poll at most 5 seconds
void pollUntil() throws InterruptedException {
    while (asynchronousResultNotAvailable()) {
        Thread.sleep(250); // custom poll interval
    }
    // Obtain the asynchronous result and perform assertions
}| 如果您需要更精確地控制輪詢間隔,並在非同步測試中擁有更大的彈性,請考慮使用專用的程式庫,例如 Awaitility。 |
2.20.4. 偵錯逾時
在對逾時方法執行的執行緒調用 Thread.interrupt() 之前,會先調用已註冊的 Pre-Interrupt Callback 擴充功能。這允許檢查應用程式狀態並輸出可能有助於診斷逾時原因的額外資訊。
逾時時的執行緒傾印
JUnit 註冊了 Pre-Interrupt Callback 擴充點的預設實作,如果啟用 junit.jupiter.execution.timeout.threaddump.enabled 組態參數 設為 true,則會將所有執行緒的堆疊傾印到 System.out。
2.20.5. 全域停用 @Timeout
當在偵錯階段逐步執行程式碼時,固定的逾時限制可能會影響測試結果,例如,即使所有斷言都已滿足,仍將測試標記為失敗。
JUnit Jupiter 支援 junit.jupiter.execution.timeout.mode 組態參數,以配置何時套用逾時。有三種模式:enabled、disabled 和 disabled_on_debug。預設模式為 enabled。當虛擬機器執行階段的輸入參數之一以 -agentlib:jdwp 或 -Xrunjdwp 開頭時,則認為該執行階段在偵錯模式下執行。disabled_on_debug 模式會查詢此啟發式方法。
2.21. 平行執行
預設情況下,JUnit Jupiter 測試在單一執行緒中依序執行。自 5.3 版起,平行執行測試(例如,為了加速執行)作為可選擇加入的功能提供。若要啟用平行執行,請將 junit.jupiter.execution.parallel.enabled 組態參數設定為 true,例如,在 junit-platform.properties 中(請參閱 組態參數 以取得其他選項)。
請注意,啟用此屬性只是平行執行測試所需的第一步。如果啟用,測試類別和方法仍將依預設依序執行。測試樹狀結構中的節點是否並行執行由其執行模式控制。以下兩種模式可用。
SAME_THREAD-
強制在父項使用的相同執行緒中執行。例如,當在測試方法上使用時,測試方法將與包含測試類別的任何
@BeforeAll或@AfterAll方法在相同的執行緒中執行。 CONCURRENT-
並行執行,除非資源鎖定強制在相同的執行緒中執行。
依預設,測試樹狀結構中的節點使用 SAME_THREAD 執行模式。您可以透過設定 junit.jupiter.execution.parallel.mode.default 組態參數來變更預設值。或者,您可以使用 @Execution 註解來變更已註解元素及其子元素(如果有的話)的執行模式,這可讓您逐個啟動個別測試類別的平行執行。
junit.jupiter.execution.parallel.enabled = true
junit.jupiter.execution.parallel.mode.default = concurrent
預設執行模式適用於測試樹狀結構的所有節點,但有一些值得注意的例外,即使用 Lifecycle.PER_CLASS 模式或 MethodOrderer 的測試類別。在前一種情況下,測試作者必須確保測試類別是執行緒安全的;在後一種情況下,並行執行可能會與配置的執行順序衝突。因此,在這兩種情況下,只有在測試類別或方法上存在 @Execution(CONCURRENT) 註解時,此類測試類別中的測試方法才會並行執行。
當啟用平行執行並註冊預設 ClassOrderer 時(請參閱 類別順序 以取得詳細資訊),頂層測試類別最初將相應地排序,並按該順序排程。但是,由於執行它們的執行緒不是由 JUnit 直接控制的,因此無法保證它們會完全按照該順序啟動。
此外,您可以透過設定 junit.jupiter.execution.parallel.mode.classes.default 組態參數來配置頂層類別的預設執行模式。透過結合這兩個組態參數,您可以配置類別以平行方式執行,但其方法在相同的執行緒中執行
junit.jupiter.execution.parallel.enabled = true
junit.jupiter.execution.parallel.mode.default = same_thread
junit.jupiter.execution.parallel.mode.classes.default = concurrent
相反的組合將平行執行一個類別中的所有方法,但頂層類別將依序執行
junit.jupiter.execution.parallel.enabled = true
junit.jupiter.execution.parallel.mode.default = concurrent
junit.jupiter.execution.parallel.mode.classes.default = same_thread
下圖說明了對於 junit.jupiter.execution.parallel.mode.default 和 junit.jupiter.execution.parallel.mode.classes.default 的所有四種組合(請參閱第一列中的標籤),每個類別有兩個測試方法的兩個頂層測試類別 A 和 B 的執行行為。

如果未明確設定 junit.jupiter.execution.parallel.mode.classes.default 組態參數,則將改為使用 junit.jupiter.execution.parallel.mode.default 的值。
2.21.1. 組態
可以使用 ParallelExecutionConfigurationStrategy 來配置諸如所需平行度和最大池大小之類的屬性。JUnit Platform 開箱即用地提供了兩種實作:dynamic 和 fixed。或者,您可以實作 custom 策略。
若要選擇策略,請將 junit.jupiter.execution.parallel.config.strategy 組態參數設定為以下選項之一。
dynamic-
根據可用處理器/核心的數量乘以
junit.jupiter.execution.parallel.config.dynamic.factor組態參數(預設為1)來計算所需的平行度。可選的junit.jupiter.execution.parallel.config.dynamic.max-pool-size-factor組態參數可用於限制最大執行緒數。 fixed-
使用強制性的
junit.jupiter.execution.parallel.config.fixed.parallelism組態參數作為所需的平行度。可選的junit.jupiter.execution.parallel.config.fixed.max-pool-size組態參數可用於限制最大執行緒數。 custom-
允許您透過強制性的
junit.jupiter.execution.parallel.config.custom.class組態參數指定自訂ParallelExecutionConfigurationStrategy實作,以決定所需的組態。
如果未設定任何組態策略,JUnit Jupiter 將使用因子為 1 的 dynamic 組態策略。因此,所需的平行度將等於可用處理器/核心的數量。
|
平行度本身並不意味著最大並行執行緒數 依預設,JUnit Jupiter 不保證並行執行的測試數量不會超過配置的平行度。例如,當使用下一節中描述的同步機制之一時,幕後使用的 ForkJoinPool 可能會產生額外的執行緒,以確保執行繼續具有足夠的平行度。如果您需要此類保證,使用 Java 9+,可以透過控制 dynamic、fixed 和 custom 策略的最大池大小來限制最大並行執行緒數。 |
相關屬性
下表列出了用於配置平行執行的相關屬性。請參閱 組態參數 以取得有關如何設定此類屬性的詳細資訊。
| 屬性 | 描述 | 支援的值 | 預設值 |
|---|---|---|---|
|
啟用平行測試執行 |
|
|
|
測試樹狀結構中節點的預設執行模式 |
|
|
|
頂層類別的預設執行模式 |
|
|
|
用於所需平行度和最大池大小的執行策略 |
|
|
|
要乘以可用處理器/核心數量的因子,以確定 |
正十進制數字 |
|
|
要乘以可用處理器/核心數量和 |
正十進制數字,必須大於或等於 |
256 + |
|
停用 |
|
|
|
|
正整數 |
無預設值 |
|
|
正整數,必須大於或等於 |
256 + |
|
停用 |
|
|
|
用於 |
例如,org.example.CustomStrategy |
無預設值 |
2.21.2. 同步
除了使用 @Execution 註解控制執行模式外,JUnit Jupiter 還提供了另一個基於註解的宣告式同步機制。@ResourceLock 註解允許您宣告測試類別或方法使用特定的共用資源,該資源需要同步存取以確保可靠的測試執行。共用資源由唯一名稱(String)識別。名稱可以是使用者定義的,也可以是 Resources 中的預定義常數之一:SYSTEM_PROPERTIES、SYSTEM_OUT、SYSTEM_ERR、LOCALE 或 TIME_ZONE。
除了靜態宣告這些共用資源外,@ResourceLock 註解還具有 providers 屬性,允許註冊 ResourceLocksProvider 介面的實作,這些實作可以在執行階段動態新增共用資源。請注意,使用 @ResourceLock 註解靜態宣告的資源會與 ResourceLocksProvider 實作動態新增的資源結合。
如果以下範例中的測試在不使用 @ResourceLock 的情況下平行執行,則它們將是不穩定的。有時它們會通過,而另一些時候它們會因為寫入然後讀取相同 JVM 系統屬性的固有競爭條件而失敗。
當使用 @ResourceLock 註解宣告對共用資源的存取時,JUnit Jupiter 引擎會使用此資訊來確保不會平行執行任何衝突的測試。此保證延伸到測試類別或方法的生命週期方法。例如,如果測試方法使用 @ResourceLock 註解進行註解,則「鎖定」將在執行任何 @BeforeEach 方法之前取得,並在所有 @AfterEach 方法執行完成後釋放。
|
隔離執行測試
如果您的大多數測試類別都可以平行執行而無需任何同步,但您有一些測試類別需要隔離執行,則可以使用 |
除了唯一識別共用資源的 String 之外,您還可以指定存取模式。需要對共用資源進行 READ 存取的兩個測試可以彼此平行執行,但不能在任何其他需要對相同共用資源進行 READ_WRITE 存取的測試正在執行時執行。
@ResourceLock 註解「靜態」宣告共用資源@Execution(CONCURRENT)
class StaticSharedResourcesDemo {
private Properties backup;
@BeforeEach
void backup() {
backup = new Properties();
backup.putAll(System.getProperties());
}
@AfterEach
void restore() {
System.setProperties(backup);
}
@Test
@ResourceLock(value = SYSTEM_PROPERTIES, mode = READ)
void customPropertyIsNotSetByDefault() {
assertNull(System.getProperty("my.prop"));
}
@Test
@ResourceLock(value = SYSTEM_PROPERTIES, mode = READ_WRITE)
void canSetCustomPropertyToApple() {
System.setProperty("my.prop", "apple");
assertEquals("apple", System.getProperty("my.prop"));
}
@Test
@ResourceLock(value = SYSTEM_PROPERTIES, mode = READ_WRITE)
void canSetCustomPropertyToBanana() {
System.setProperty("my.prop", "banana");
assertEquals("banana", System.getProperty("my.prop"));
}
}ResourceLocksProvider 實作「動態」新增共用資源@Execution(CONCURRENT)
@ResourceLock(providers = DynamicSharedResourcesDemo.Provider.class)
class DynamicSharedResourcesDemo {
private Properties backup;
@BeforeEach
void backup() {
backup = new Properties();
backup.putAll(System.getProperties());
}
@AfterEach
void restore() {
System.setProperties(backup);
}
@Test
void customPropertyIsNotSetByDefault() {
assertNull(System.getProperty("my.prop"));
}
@Test
void canSetCustomPropertyToApple() {
System.setProperty("my.prop", "apple");
assertEquals("apple", System.getProperty("my.prop"));
}
@Test
void canSetCustomPropertyToBanana() {
System.setProperty("my.prop", "banana");
assertEquals("banana", System.getProperty("my.prop"));
}
static class Provider implements ResourceLocksProvider {
@Override
public Set<Lock> provideForMethod(List<Class<?>> enclosingInstanceTypes, Class<?> testClass,
Method testMethod) {
ResourceAccessMode mode = testMethod.getName().startsWith("canSet") ? READ_WRITE : READ;
return Collections.singleton(new Lock(SYSTEM_PROPERTIES, mode));
}
}
}此外,也可以透過 @ResourceLock 註解中的 target 屬性,為直接子節點宣告「靜態」共用資源,該屬性接受來自 ResourceLockTarget 列舉的值。
在類別層級的 @ResourceLock 註解中指定 target = CHILDREN,其語意與為在此類別中宣告的每個測試方法和巢狀測試類別新增具有相同 value 和 mode 的註解相同。
當測試類別宣告 READ 鎖定時,這可能會改善平行化,但只有少數方法持有 READ_WRITE 鎖定。
如果在 @ResourceLock 沒有 target = CHILDREN 的情況下,以下範例中的測試將在 SAME_THREAD 中執行。這是因為測試類別宣告了 READ 共用資源,但一個測試方法持有 READ_WRITE 鎖定,這將強制所有測試方法都使用 SAME_THREAD 執行模式。
target 屬性為子節點宣告共用資源@Execution(CONCURRENT)
@ResourceLock(value = "a", mode = READ, target = CHILDREN)
public class ChildrenSharedResourcesDemo {
@ResourceLock(value = "a", mode = READ_WRITE)
@Test
void test1() throws InterruptedException {
Thread.sleep(2000L);
}
@Test
void test2() throws InterruptedException {
Thread.sleep(2000L);
}
@Test
void test3() throws InterruptedException {
Thread.sleep(2000L);
}
@Test
void test4() throws InterruptedException {
Thread.sleep(2000L);
}
@Test
void test5() throws InterruptedException {
Thread.sleep(2000L);
}
}2.22. 內建擴充功能
雖然 JUnit 團隊鼓勵可重複使用的擴充套件應被打包並維護在獨立的程式庫中,但 JUnit Jupiter 仍包含一些使用者導向的擴充套件實作,這些實作被認為非常通用,使用者不應該需要再額外添加依賴項。
2.22.1. @TempDir 擴充套件
內建的 TempDirectory 擴充套件用於為單個測試或測試類別中的所有測試建立和清理臨時目錄。它預設已註冊。要使用它,請使用 @TempDir 註解類型為 java.nio.file.Path 或 java.io.File 的非 final、未賦值的欄位,或者將類型為 java.nio.file.Path 或 java.io.File 並使用 @TempDir 註解的參數添加到測試類別建構子、生命週期方法或測試方法中。
例如,以下測試宣告了一個使用 @TempDir 註解的參數,用於單個測試方法,在臨時目錄中建立並寫入檔案,並檢查其內容。
@Test
void writeItemsToFile(@TempDir Path tempDir) throws IOException {
    Path file = tempDir.resolve("test.txt");

    new ListWriter(file).write("a", "b", "c");

    assertEquals(singletonList("a,b,c"), Files.readAllLines(file));
}
您可以透過指定多個註解參數來注入多個臨時目錄。
@Test
void copyFileFromSourceToTarget(@TempDir Path source, @TempDir Path target) throws IOException {
    Path sourceFile = source.resolve("test.txt");
    new ListWriter(sourceFile).write("a", "b", "c");

    Path targetFile = Files.copy(sourceFile, target.resolve("test.txt"));

    assertNotEquals(sourceFile, targetFile);
    assertEquals(singletonList("a,b,c"), Files.readAllLines(targetFile));
}
若要還原為對整個測試類別或方法(取決於註解使用的層級)使用單個臨時目錄的舊行為,您可以將 junit.jupiter.tempdir.scope 組態參數設定為 per_context。但是,請注意,此選項已被棄用,並將在未來版本中移除。 |
以下範例在 static 欄位中儲存共用臨時目錄。這允許在測試類別的所有生命週期方法和測試方法中使用相同的 sharedTempDir。為了更好的隔離,您應該使用實例欄位或建構子注入,以便每個測試方法使用單獨的目錄。
class SharedTempDirectoryDemo {

    @TempDir
    static Path sharedTempDir;

    @Test
    void writeItemsToFile() throws IOException {
        Path file = sharedTempDir.resolve("test.txt");

        new ListWriter(file).write("a", "b", "c");

        assertEquals(singletonList("a,b,c"), Files.readAllLines(file));
    }

    @Test
    void anotherTestThatUsesTheSameTempDir() {
        // use sharedTempDir
    }

}
@TempDir 註解有一個可選的 cleanup 屬性,可以設定為 NEVER、ON_SUCCESS 或 ALWAYS。如果清理模式設定為 NEVER,則在測試完成後不會刪除臨時目錄。如果設定為 ON_SUCCESS,則僅在測試成功完成後才會刪除臨時目錄。
預設清理模式為 ALWAYS。您可以使用 junit.jupiter.tempdir.cleanup.mode.default 組態參數 來覆蓋此預設值。
class CleanupModeDemo {

    @Test
    void fileTest(@TempDir(cleanup = ON_SUCCESS) Path tempDir) {
        // perform test
    }

}
@TempDir 支援透過可選的 factory 屬性以程式化的方式建立臨時目錄。這通常用於取得對臨時目錄建立的控制權,例如定義父目錄或應使用的檔案系統。
工廠可以透過實作 TempDirFactory 來建立。實作必須提供無參數建構子,並且不應對它們被實例化的時間和次數做出任何假設,但它們可以假設它們的 createTempDirectory(…) 和 close() 方法都將在每個實例中被調用一次,並按此順序,且來自同一個執行緒。
Jupiter 中提供的預設實作將目錄建立委派給 java.nio.file.Files::createTempDirectory,它使用預設檔案系統和系統的臨時目錄作為父目錄。它傳遞 junit- 作為產生目錄名稱的前綴字串,以幫助將其識別為由 JUnit 建立。
以下範例定義了一個工廠,該工廠使用測試名稱作為目錄名稱前綴,而不是 junit 常數值。
class TempDirFactoryDemo {

    @Test
    void factoryTest(@TempDir(factory = Factory.class) Path tempDir) {
        assertTrue(tempDir.getFileName().toString().startsWith("factoryTest"));
    }

    static class Factory implements TempDirFactory {

        @Override
        public Path createTempDirectory(AnnotatedElementContext elementContext, ExtensionContext extensionContext)
                throws IOException {
            return Files.createTempDirectory(extensionContext.getRequiredTestMethod().getName());
        }

    }

}
也可以使用記憶體內檔案系統,例如 Jimfs 來建立臨時目錄。以下範例示範如何實現這一點。
class InMemoryTempDirDemo {

    @Test
    void test(@TempDir(factory = JimfsTempDirFactory.class) Path tempDir) {
        // perform test
    }

    static class JimfsTempDirFactory implements TempDirFactory {

        private final FileSystem fileSystem = Jimfs.newFileSystem(Configuration.unix());

        @Override
        public Path createTempDirectory(AnnotatedElementContext elementContext, ExtensionContext extensionContext)
                throws IOException {
            return Files.createTempDirectory(fileSystem.getPath("/"), "junit-");
        }

        @Override
        public void close() throws IOException {
            fileSystem.close();
        }

    }

}
@TempDir 也可以用作 元註解 以減少重複。以下程式碼清單顯示如何建立自訂的 @JimfsTempDir 註解,該註解可以用作 @TempDir(factory = JimfsTempDirFactory.class) 的直接替代品。
@TempDir 元註解的自訂註解@Target({ ElementType.ANNOTATION_TYPE, ElementType.FIELD, ElementType.PARAMETER })
@Retention(RetentionPolicy.RUNTIME)
@TempDir(factory = JimfsTempDirFactory.class)
@interface JimfsTempDir {
}以下範例示範如何使用自訂的 @JimfsTempDir 註解。
class JimfsTempDirAnnotationDemo {

    @Test
    void test(@JimfsTempDir Path tempDir) {
        // perform test
    }

}
在宣告 TempDir 註解的欄位或參數上的元註解或其他註解可能會公開其他屬性來設定工廠。可以透過 createTempDirectory(…) 方法的 AnnotatedElementContext 參數來存取這些註解和相關屬性。
您可以使用 junit.jupiter.tempdir.factory.default 組態參數 來指定您想要預設使用的 TempDirFactory 的完整類別名稱。就像透過 @TempDir 註解的 factory 屬性設定的工廠一樣,提供的類別必須實作 TempDirFactory 介面。預設工廠將用於所有 @TempDir 註解,除非註解的 factory 屬性指定了不同的工廠。
總之,臨時目錄的工廠是根據以下優先順序規則確定的
-
@TempDir註解的factory屬性(如果存在) -
透過組態參數設定的預設
TempDirFactory(如果存在) -
否則,將使用
org.junit.jupiter.api.io.TempDirFactory$Standard。
2.22.2. @AutoClose 擴充套件
內建的 AutoCloseExtension 自動關閉與欄位關聯的資源。它預設已註冊。要使用它,請使用 @AutoClose 註解測試類別中的欄位。
@AutoClose 欄位可以是 static 或非 static。如果在評估 @AutoClose 欄位的值時為 null,則該欄位將被忽略,但會記錄警告訊息以通知您。
預設情況下,@AutoClose 期望註解欄位的值實作一個 close() 方法,該方法將被調用以關閉資源。但是,開發人員可以透過 value 屬性自訂關閉方法的名稱。例如,@AutoClose("shutdown") 指示 JUnit 尋找 shutdown() 方法來關閉資源。
@AutoClose 欄位從父類別繼承。此外,子類別中的 @AutoClose 欄位將在父類別中的 @AutoClose 欄位之前關閉。
當給定的測試類別中存在多個 @AutoClose 欄位時,資源關閉的順序取決於一種確定性但故意不明顯的演算法。這確保了測試套件的後續運行以相同的順序關閉資源,從而允許可重複的建置。
AutoCloseExtension 實作了 AfterAllCallback 和 TestInstancePreDestroyCallback 擴充套件 API。因此,static @AutoClose 欄位將在目前測試類別中的所有測試完成後關閉,實際上是在測試類別的 @AfterAll 方法執行之後。非 static @AutoClose 欄位將在目前測試類別實例被銷毀之前關閉。具體來說,如果測試類別配置了 @TestInstance(Lifecycle.PER_METHOD) 語義,則非 static @AutoClose 欄位將在每個測試方法、測試工廠方法或測試範本方法的執行之後關閉。但是,如果測試類別配置了 @TestInstance(Lifecycle.PER_CLASS) 語義,則非 static @AutoClose 欄位將在目前測試類別實例不再需要時才關閉,這表示在 @AfterAll 方法之後以及所有 static @AutoClose 欄位都已關閉之後。
以下範例示範如何使用 @AutoClose 註解實例欄位,以便在測試執行後自動關閉資源。在此範例中,我們假設預設的 @TestInstance(Lifecycle.PER_METHOD) 語義適用。
@AutoClose 關閉資源的測試類別class AutoCloseDemo {
@AutoClose (1)
WebClient webClient = new WebClient(); (2)
String serverUrl = // specify server URL ...
@Test
void getProductList() {
// Use WebClient to connect to web server and verify response
assertEquals(200, webClient.get(serverUrl + "/products").getResponseStatus());
}
}| 1 | 使用 @AutoClose 註解實例欄位。 |
| 2 | WebClient 實作了 java.lang.AutoCloseable,它定義了一個 close() 方法,該方法將在每個 @Test 方法之後被調用。 |
3. 從 JUnit 4 遷移
儘管 JUnit Jupiter 程式設計模型和擴充套件模型不原生支援 JUnit 4 的功能,例如 Rules 和 Runners,但不期望原始碼維護者需要更新他們所有的現有測試、測試擴充套件和自訂建置測試基礎架構以遷移到 JUnit Jupiter。
相反地,JUnit 透過JUnit Vintage 測試引擎提供了一條溫和的遷移路徑,該引擎允許使用 JUnit Platform 基礎架構執行基於 JUnit 3 和 JUnit 4 的現有測試。由於特定於 JUnit Jupiter 的所有類別和註解都位於 org.junit.jupiter 基本套件下,因此在類別路徑中同時擁有 JUnit 4 和 JUnit Jupiter 不會導致任何衝突。因此,可以安全地維護現有的 JUnit 4 測試以及 JUnit Jupiter 測試。此外,由於 JUnit 團隊將繼續為 JUnit 4.x 基準線提供維護和錯誤修復版本,因此開發人員有充足的時間按照自己的計劃遷移到 JUnit Jupiter。
3.1. 在 JUnit Platform 上執行 JUnit 4 測試
確保 junit-vintage-engine 構件在您的測試執行階段路徑中。在這種情況下,JUnit Platform 啟動器將自動選取 JUnit 3 和 JUnit 4 測試。
請參閱 junit5-samples 儲存庫中的範例專案,以了解如何使用 Gradle 和 Maven 完成此操作。
3.2. 平行執行
JUnit Vintage 測試引擎支援頂層測試類別和測試方法的平行執行,允許現有的 JUnit 3 和 JUnit 4 測試從透過並行測試執行提高的效能中受益。可以使用以下 組態參數 啟用和配置它
junit.vintage.execution.parallel.enabled=true|false-
啟用/停用平行執行(預設為
false)。需要選擇加入classes或methods以使用以下組態參數平行執行。 junit.vintage.execution.parallel.classes=true|false-
啟用/停用測試類別的平行執行(預設為
false)。 junit.vintage.execution.parallel.methods=true|false-
啟用/停用測試方法的平行執行(預設為
false)。 junit.vintage.execution.parallel.pool-size=<number>-
指定用於平行執行的執行緒池大小。預設情況下,使用可用處理器的數量。
junit-platform.properties 中的範例組態
junit.vintage.execution.parallel.enabled=true
junit.vintage.execution.parallel.classes=true
junit.vintage.execution.parallel.methods=true
junit.vintage.execution.parallel.pool-size=4設定這些屬性後,VintageTestEngine 將平行執行測試,從而可能顯著減少整體測試套件執行時間。
3.3. 遷移提示
以下是在將現有的 JUnit 4 測試遷移到 JUnit Jupiter 時您應該注意的主題。
-
註解位於
org.junit.jupiter.api套件中。 -
斷言位於
org.junit.jupiter.api.Assertions中。 -
假設位於
org.junit.jupiter.api.Assumptions中。-
請注意,JUnit Jupiter 5.4 及更高版本支援來自 JUnit 4 的
org.junit.Assume類別的方法以進行假設。具體來說,JUnit Jupiter 支援 JUnit 4 的AssumptionViolatedException來表示測試應該中止而不是標記為失敗。
-
-
@Before和@After不再存在;請改用@BeforeEach和@AfterEach。 -
@BeforeClass和@AfterClass不再存在;請改用@BeforeAll和@AfterAll。 -
@Ignore不再存在:請改用@Disabled或其他內建的 執行條件-
另請參閱 JUnit 4 @Ignore 支援。
-
-
@Category不再存在;請改用@Tag。 -
@RunWith不再存在;已被@ExtendWith取代。 -
@Rule和@ClassRule不再存在;已被@ExtendWith和@RegisterExtension取代。-
另請參閱 有限的 JUnit 4 Rule 支援。
-
-
@Test(expected = …)和ExpectedException規則不再存在;請改用Assertions.assertThrows(…)。-
如果您仍然需要使用
ExpectedException,請參閱 有限的 JUnit 4 Rule 支援。
-
-
JUnit Jupiter 中的斷言和假設接受失敗訊息作為它們的最後一個參數,而不是第一個參數。
-
有關詳細資訊,請參閱 失敗訊息參數。
-
3.4. 有限的 JUnit 4 Rule 支援
如上所述,JUnit Jupiter 不支援也不會原生支援 JUnit 4 規則。然而,JUnit 團隊意識到,許多組織,尤其是大型組織,可能擁有大量使用自訂規則的 JUnit 4 程式碼庫。為了服務這些組織並實現漸進式遷移路徑,JUnit 團隊已決定在 JUnit Jupiter 內逐字支援一部分 JUnit 4 規則。此支援基於適配器,並且僅限於那些在語義上與 JUnit Jupiter 擴充套件模型相容的規則,即那些不會完全改變測試的整體執行流程的規則。
JUnit Jupiter 的 junit-jupiter-migrationsupport 模組目前支援以下三種 Rule 類型,包括這些類型的子類別
-
org.junit.rules.ExternalResource(包括org.junit.rules.TemporaryFolder) -
org.junit.rules.Verifier(包括org.junit.rules.ErrorCollector) -
org.junit.rules.ExpectedException
就像 JUnit 4 一樣,Rule 註解的欄位和方法都受到支援。透過在測試類別上使用這些類別層級的擴充功能,傳統程式碼庫中的 Rule 實作可以保持不變,包括 JUnit 4 rule 的 import 語句。
這種有限形式的 Rule 支援可以透過類別層級的註解 @EnableRuleMigrationSupport 開啟。此註解是一個組合註解,它啟用所有 rule 遷移支援擴充功能:VerifierSupport、ExternalResourceSupport 和 ExpectedExceptionSupport。或者,您可以選擇使用 @EnableJUnit4MigrationSupport 註解您的測試類別,這將註冊 rule 和 JUnit 4 的 @Ignore 註解的遷移支援(請參閱 JUnit 4 @Ignore 支援)。
然而,如果您打算為 JUnit Jupiter 開發新的擴充功能,請使用 JUnit Jupiter 的新擴充功能模型,而不是 JUnit 4 的 rule 基礎模型。
3.5. JUnit 4 @Ignore 支援
為了提供從 JUnit 4 到 JUnit Jupiter 的平滑遷移路徑,junit-jupiter-migrationsupport 模組提供了對 JUnit 4 的 @Ignore 註解的支援,類似於 Jupiter 的 @Disabled 註解。
若要將 @Ignore 用於基於 JUnit Jupiter 的測試,請在您的建置中配置 junit-jupiter-migrationsupport 模組的測試依賴,然後使用 @ExtendWith(IgnoreCondition.class) 或 @EnableJUnit4MigrationSupport 註解您的測試類別(這會自動註冊 IgnoreCondition 以及 有限的 JUnit 4 Rule 支援)。IgnoreCondition 是一個 ExecutionCondition,它會停用使用 @Ignore 註解的測試類別或測試方法。
import org.junit.Ignore;
import org.junit.jupiter.api.Test;
import org.junit.jupiter.migrationsupport.EnableJUnit4MigrationSupport;

// @ExtendWith(IgnoreCondition.class)
@EnableJUnit4MigrationSupport
class IgnoredTestsDemo {

    @Ignore
    @Test
    void testWillBeIgnored() {
    }

    @Test
    void testWillBeExecuted() {
    }
}
3.6. 失敗訊息引數
JUnit Jupiter 中的 Assumptions 和 Assertions 類別宣告引數的順序與 JUnit 4 不同。在 JUnit 4 中,斷言和假設方法接受失敗訊息作為第一個引數;然而,在 JUnit Jupiter 中,斷言和假設方法接受失敗訊息作為最後一個引數。
例如,JUnit 4 中的 assertEquals 方法宣告為 assertEquals(String message, Object expected, Object actual),但在 JUnit Jupiter 中,它宣告為 assertEquals(Object expected, Object actual, String message)。這樣做的理由是失敗訊息是可選的,而可選的引數應該在方法簽名中的必要引數之後宣告。
受到此變更影響的方法如下:
-
Assertions (斷言)
-
assertTrue -
assertFalse -
assertNull -
assertNotNull -
assertEquals -
assertNotEquals -
assertArrayEquals -
assertSame -
assertNotSame -
assertThrows
-
-
Assumptions (假設)
-
assumeTrue -
assumeFalse
-
4. 執行測試
4.1. IDE 支援
4.1.1. IntelliJ IDEA
IntelliJ IDEA 自 2016.2 版本起支援在 JUnit Platform 上執行測試。如需更多資訊,請查閱此 IntelliJ IDEA 資源。不過請注意,建議使用 IDEA 2017.3 或更新版本,因為較新版本的 IDEA 會根據專案中使用的 API 版本自動下載以下 JAR 檔:junit-platform-launcher、junit-jupiter-engine 和 junit-vintage-engine。
| IDEA 2017.3 之前的 IntelliJ IDEA 版本捆綁了特定版本的 JUnit 5。因此,如果您想使用較新版本的 JUnit Jupiter,則在 IDE 內執行測試可能會由於版本衝突而失敗。在這種情況下,請按照以下說明使用比 IntelliJ IDEA 捆綁的版本更新的 JUnit 5 版本。 |
為了使用不同的 JUnit 5 版本(例如 5.12.0),您可能需要在 classpath 中包含 junit-platform-launcher、junit-jupiter-engine 和 junit-vintage-engine JAR 檔的對應版本。
testImplementation(platform("org.junit:junit-bom:5.12.0"))
testRuntimeOnly("org.junit.platform:junit-platform-launcher") {
  because("Only needed to run tests in a version of IntelliJ IDEA that bundles older versions")
}
testRuntimeOnly("org.junit.jupiter:junit-jupiter-engine")
testRuntimeOnly("org.junit.vintage:junit-vintage-engine")<!-- ... -->
<dependencies>
<!-- Only needed to run tests in a version of IntelliJ IDEA that bundles older versions -->
<dependency>
<groupId>org.junit.platform</groupId>
<artifactId>junit-platform-launcher</artifactId>
<scope>test</scope>
</dependency>
<dependency>
<groupId>org.junit.jupiter</groupId>
<artifactId>junit-jupiter-engine</artifactId>
<scope>test</scope>
</dependency>
<dependency>
<groupId>org.junit.vintage</groupId>
<artifactId>junit-vintage-engine</artifactId>
<scope>test</scope>
</dependency>
</dependencies>
<dependencyManagement>
<dependencies>
<dependency>
<groupId>org.junit</groupId>
<artifactId>junit-bom</artifactId>
<version>5.12.0</version>
<type>pom</type>
<scope>import</scope>
</dependency>
</dependencies>
</dependencyManagement>4.1.2. Eclipse
Eclipse IDE 自 Eclipse Oxygen.1a (4.7.1a) 版本起提供對 JUnit Platform 的支援。
有關在 Eclipse 中使用 JUnit 5 的更多資訊,請查閱 Eclipse Project Oxygen.1a (4.7.1a) - New and Noteworthy 文件中關於 Eclipse 對 JUnit 5 的支援 的官方章節。
4.1.3. NetBeans
NetBeans 自 Apache NetBeans 10.0 版本起提供對 JUnit Jupiter 和 JUnit Platform 的支援。
如需更多資訊,請查閱 Apache NetBeans 10.0 版本說明的 JUnit 5 章節。
4.1.4. Visual Studio Code
Visual Studio Code 透過 Java Test Runner 擴充功能支援 JUnit Jupiter 和 JUnit Platform,該擴充功能預設作為 Java Extension Pack 的一部分安裝。
如需更多資訊,請查閱 Visual Studio Code 中的 Java 文件中的 Testing 章節。
4.1.5. 其他 IDE
如果您使用的編輯器或 IDE 不是前面章節中列出的那些,JUnit 團隊提供了兩種替代解決方案來協助您使用 JUnit 5。您可以使用 Console Launcher 手動執行 — 例如,從命令列 — 或者,如果您的 IDE 內建支援 JUnit 4,則可以使用 基於 JUnit 4 的 Runner 執行測試。
4.2. 建置支援
4.2.1. Gradle
從 4.6 版本開始,Gradle 提供對在 JUnit Platform 上執行測試的 原生支援。若要啟用它,您需要在 build.gradle 中的 test 任務宣告中指定 useJUnitPlatform()。
test {
    useJUnitPlatform()
}test {
useJUnitPlatform {
includeTags("fast", "smoke & feature-a")
// excludeTags("slow", "ci")
includeEngines("junit-jupiter")
// excludeEngines("junit-vintage")
}
}有關選項的完整列表,請參閱 官方 Gradle 文件。
對齊依賴版本
除非您使用的是 Spring Boot,它定義了自己的依賴管理方式,否則建議使用 JUnit Platform BOM 來對齊所有 JUnit 5 構件的版本。
dependencies {
    testImplementation(platform("org.junit:junit-bom:5.12.0"))
}
使用 BOM 允許您在宣告對所有具有 org.junit.platform、org.junit.jupiter 和 org.junit.vintage 群組 ID 的構件的依賴項時省略版本。
| 有關如何覆寫 Spring Boot 應用程式中使用的 JUnit 版本,請參閱 Spring Boot。 |
組態參數
標準 Gradle test 任務目前未提供專用的 DSL 來設定 JUnit Platform 組態參數,以影響測試探索和執行。但是,您可以透過系統屬性(如下所示)或透過 junit-platform.properties 檔案在建置腳本中提供組態參數。
test {
    // ...
    systemProperty("junit.jupiter.conditions.deactivate", "*")
    systemProperty("junit.jupiter.extensions.autodetection.enabled", true)
    systemProperty("junit.jupiter.testinstance.lifecycle.default", "per_class")
    // ...
}
配置測試引擎
為了執行任何測試,TestEngine 實作必須位於 classpath 中。
若要配置對基於 JUnit Jupiter 的測試的支援,請在依賴聚合的 JUnit Jupiter 構件上配置 testImplementation 依賴項,如下所示。
dependencies {
    testImplementation("org.junit.jupiter:junit-jupiter:5.12.0") // version can be omitted when using the BOM
}
只要您在 JUnit 4 上配置 testImplementation 依賴項,並在 JUnit Vintage TestEngine 實作上配置 testRuntimeOnly 依賴項(如下所示),JUnit Platform 就可以執行基於 JUnit 4 的測試。
dependencies {
    testImplementation("junit:junit:4.13.2")
    testRuntimeOnly("org.junit.vintage:junit-vintage-engine:5.12.0") // version can be omitted when using the BOM
}
配置日誌記錄(可選)
JUnit 使用 java.util.logging 套件(又名 JUL)中的 Java Logging API 來發出警告和偵錯資訊。有關組態選項,請參閱 LogManager 的官方文件。
或者,可以將日誌訊息重新導向到其他日誌記錄框架,例如 Log4j 或 Logback。若要使用提供 LogManager 自訂實作的日誌記錄框架,請將 java.util.logging.manager 系統屬性設定為要使用的 LogManager 實作的完整類別名稱。以下範例示範如何配置 Log4j 2.x(詳細資訊請參閱 Log4j JDK Logging Adapter)。
test {
    systemProperty("java.util.logging.manager", "org.apache.logging.log4j.jul.LogManager")
    // Avoid overhead (see https://logging.apache.org/log4j/2.x/manual/jmx.html#enabling-jmx)
    systemProperty("log4j2.disableJmx", "true")
}
其他日誌記錄框架提供了不同的方法來重新導向使用 java.util.logging 記錄的訊息。例如,對於 Logback,您可以透過將額外的依賴項新增至 runtime classpath 來使用 JUL to SLF4J Bridge。
4.2.2. Maven
Maven Surefire 和 Maven Failsafe 提供對在 JUnit Platform 上執行測試的 原生支援。junit5-jupiter-starter-maven 專案中的 pom.xml 檔案示範了如何使用 Maven Surefire 外掛程式,並且可以作為配置 Maven 建置的起點。
|
使用最新版本的 Maven Surefire/Failsafe 以避免互通性問題
為了避免互通性問題,建議使用最新版本的 Maven Surefire/Failsafe(3.0.0 或更高版本),因為它可以自動對齊使用的 JUnit Platform Launcher 版本與在測試 runtime classpath 中找到的 JUnit Platform 版本。 如果您使用的版本早於 3.0.0-M4,您可以透過將 JUnit Platform Launcher 相符版本的測試依賴項新增至 Maven 建置來解決缺少對齊的問題,如下所示。 |
對齊依賴版本
除非您使用的是 Spring Boot,它定義了自己的依賴管理方式,否則建議使用 JUnit Platform BOM 來對齊所有 JUnit 5 構件的版本。
<dependencyManagement>
    <dependencies>
        <dependency>
            <groupId>org.junit</groupId>
            <artifactId>junit-bom</artifactId>
            <version>5.12.0</version>
            <type>pom</type>
            <scope>import</scope>
        </dependency>
    </dependencies>
</dependencyManagement>
使用 BOM 允許您在宣告對所有具有 org.junit.platform、org.junit.jupiter 和 org.junit.vintage 群組 ID 的構件的依賴項時省略版本。
| 有關如何覆寫 Spring Boot 應用程式中使用的 JUnit 版本,請參閱 Spring Boot。 |
配置測試引擎
為了讓 Maven Surefire 或 Maven Failsafe 執行任何測試,至少必須將一個 TestEngine 實作新增至測試 classpath。
若要配置對基於 JUnit Jupiter 的測試的支援,請在 JUnit Jupiter API 和 JUnit Jupiter TestEngine 實作上配置 test 範圍的依賴項,如下所示。
<!-- ... -->
<dependencies>
    <!-- ... -->
    <dependency>
        <groupId>org.junit.jupiter</groupId>
        <artifactId>junit-jupiter</artifactId>
        <version>5.12.0</version> <!-- can be omitted when using the BOM -->
        <scope>test</scope>
    </dependency>
    <!-- ... -->
</dependencies>
<build>
    <plugins>
        <plugin>
            <artifactId>maven-surefire-plugin</artifactId>
            <version>3.5.2</version>
        </plugin>
        <plugin>
            <artifactId>maven-failsafe-plugin</artifactId>
            <version>3.5.2</version>
        </plugin>
    </plugins>
</build>
<!-- ... -->
只要您在 JUnit 4 和 JUnit Vintage TestEngine 實作上配置 test 範圍的依賴項(如下所示),Maven Surefire 和 Maven Failsafe 就可以與 Jupiter 測試一起執行基於 JUnit 4 的測試。
<!-- ... -->
<dependencies>
    <!-- ... -->
    <dependency>
        <groupId>junit</groupId>
        <artifactId>junit</artifactId>
        <version>4.13.2</version>
        <scope>test</scope>
    </dependency>
    <dependency>
        <groupId>org.junit.vintage</groupId>
        <artifactId>junit-vintage-engine</artifactId>
        <version>5.12.0</version> <!-- can be omitted when using the BOM -->
        <scope>test</scope>
    </dependency>
    <!-- ... -->
</dependencies>
<!-- ... -->
<build>
    <plugins>
        <plugin>
            <artifactId>maven-surefire-plugin</artifactId>
            <version>3.5.2</version>
        </plugin>
        <plugin>
            <artifactId>maven-failsafe-plugin</artifactId>
            <version>3.5.2</version>
        </plugin>
    </plugins>
</build>
<!-- ... -->
依測試類別名稱篩選
Maven Surefire 外掛程式將掃描完整名稱符合以下模式的測試類別。
-
**/Test*.java -
**/*Test.java -
**/*Tests.java -
**/*TestCase.java
此外,預設情況下,它將排除所有巢狀類別(包括靜態成員類別)。
不過請注意,您可以透過在 pom.xml 檔案中配置明確的 include 和 exclude 規則來覆寫此預設行為。例如,為了防止 Maven Surefire 排除靜態成員類別,您可以覆寫其排除規則,如下所示。
<!-- ... -->
<build>
    <plugins>
        <plugin>
            <artifactId>maven-surefire-plugin</artifactId>
            <version>3.5.2</version>
            <configuration>
                <excludes>
                    <exclude/>
                </excludes>
            </configuration>
        </plugin>
    </plugins>
</build>
<!-- ... -->
有關詳細資訊,請參閱 Maven Surefire 的 Inclusions and Exclusions of Tests 文件。
依標籤篩選
-
若要包含標籤或標籤表達式,請使用
groups。 -
若要排除標籤或標籤表達式,請使用
excludedGroups。
<!-- ... -->
<build>
    <plugins>
        <plugin>
            <artifactId>maven-surefire-plugin</artifactId>
            <version>3.5.2</version>
            <configuration>
                <groups>acceptance | !feature-a</groups>
                <excludedGroups>integration, regression</excludedGroups>
            </configuration>
        </plugin>
    </plugins>
</build>
<!-- ... -->
組態參數
您可以透過宣告 configurationParameters 屬性,並使用 Java Properties 檔案語法(如下所示)或透過 junit-platform.properties 檔案提供鍵值對,來設定 JUnit Platform 組態參數,以影響測試探索和執行。
<!-- ... -->
<build>
    <plugins>
        <plugin>
            <artifactId>maven-surefire-plugin</artifactId>
            <version>3.5.2</version>
            <configuration>
                <properties>
                    <configurationParameters>
                        junit.jupiter.conditions.deactivate = *
                        junit.jupiter.extensions.autodetection.enabled = true
                        junit.jupiter.testinstance.lifecycle.default = per_class
                    </configurationParameters>
                </properties>
            </configuration>
        </plugin>
    </plugins>
</build>
<!-- ... -->
4.2.3. Ant
從 1.10.3 版本開始,Ant 具有 junitlauncher 任務,該任務提供對在 JUnit Platform 上啟動測試的原生支援。junitlauncher 任務專門負責啟動 JUnit Platform 並將選定的測試集合傳遞給它。然後,JUnit Platform 委派給已註冊的測試引擎來探索和執行測試。
junitlauncher 任務嘗試盡可能與原生 Ant 結構(例如 resource collections)對齊,以允許使用者選擇他們想要由測試引擎執行的測試。與許多其他核心 Ant 任務相比,這使該任務具有一致且自然的感覺。
從 Ant 的 1.10.6 版本開始,junitlauncher 任務支援 在單獨的 JVM 中 fork 測試。
junit5-jupiter-starter-ant 專案中的 build.xml 檔案示範了如何使用該任務,並且可以作為起點。
基本用法
以下範例示範如何配置 junitlauncher 任務以選擇單個測試類別(即 org.myapp.test.MyFirstJUnit5Test)。
<path id="test.classpath">
    <!-- The location where you have your compiled classes -->
    <pathelement location="${build.classes.dir}" />
</path>

<!-- ... -->

<junitlauncher>
    <classpath refid="test.classpath" />
    <test name="org.myapp.test.MyFirstJUnit5Test" />
</junitlauncher>
test 元素允許您指定要選擇和執行的單個測試類別。classpath 元素允許您指定用於啟動 JUnit Platform 的 classpath。此 classpath 也將用於定位作為執行一部分的測試類別。
以下範例示範如何設定 junitlauncher 工作,以從多個位置選取測試類別。
<path id="test.classpath">
    <!-- The location where you have your compiled classes -->
    <pathelement location="${build.classes.dir}" />
</path>
<!-- ... -->
<junitlauncher>
    <classpath refid="test.classpath" />
    <testclasses outputdir="${output.dir}">
        <fileset dir="${build.classes.dir}">
            <include name="org/example/**/demo/**/" />
        </fileset>
        <fileset dir="${some.other.dir}">
            <include name="org/myapp/**/" />
        </fileset>
    </testclasses>
</junitlauncher>在上述範例中,testclasses 元素可讓您選取位於不同位置的多個測試類別。
如需更多關於使用方式和組態選項的詳細資訊,請參閱官方 Ant 文件中關於 junitlauncher 工作 的說明。
4.2.4. Spring Boot
Spring Boot 提供自動支援來管理專案中使用的 JUnit 版本。此外,spring-boot-starter-test 成品會自動包含測試函式庫,例如 JUnit Jupiter、AssertJ、Mockito 等。
如果您的建置依賴 Spring Boot 的相依性管理支援,您不應在建置腳本中匯入 junit-bom,因為這會導致重複(且可能衝突)的 JUnit 相依性管理。
如果您需要覆寫 Spring Boot 應用程式中使用的相依性版本,您必須覆寫 Spring Boot 外掛程式所使用的 BOM 中定義的 版本屬性 的確切名稱。例如,Spring Boot 中 JUnit Jupiter 版本屬性的名稱是 junit-jupiter.version。關於變更相依性版本的機制,在 Gradle 和 Maven 文件中均有說明。
使用 Gradle 時,您可以透過在您的 build.gradle 檔案中包含以下內容來覆寫 JUnit Jupiter 版本。
ext['junit-jupiter.version'] = '5.12.0'使用 Maven 時,您可以透過在您的 pom.xml 檔案中包含以下內容來覆寫 JUnit Jupiter 版本。
<properties>
    <junit-jupiter.version>5.12.0</junit-jupiter.version>
</properties>
4.3. Console Launcher
ConsoleLauncher 是一個命令列 Java 應用程式,可讓您從主控台啟動 JUnit Platform。例如,它可以用於執行 JUnit Vintage 和 JUnit Jupiter 測試,並將測試執行結果列印到主控台。
可執行的 Fat JAR (junit-platform-console-standalone-1.12.0.jar) 包含其所有相依性的內容,發佈在 Maven Central 儲存庫的 junit-platform-console-standalone 目錄下。它包含以下成品的內容
-
junit:junit:4.13.2 -
org.apiguardian:apiguardian-api:1.1.2 -
org.hamcrest:hamcrest-core:1.3 -
org.junit.jupiter:junit-jupiter-api:5.12.0 -
org.junit.jupiter:junit-jupiter-engine:5.12.0 -
org.junit.jupiter:junit-jupiter-params:5.12.0 -
org.junit.platform:junit-platform-commons:1.12.0 -
org.junit.platform:junit-platform-console:1.12.0 -
org.junit.platform:junit-platform-engine:1.12.0 -
org.junit.platform:junit-platform-launcher:1.12.0 -
org.junit.platform:junit-platform-reporting:1.12.0 -
org.junit.platform:junit-platform-suite-api:1.12.0 -
org.junit.platform:junit-platform-suite-commons:1.12.0 -
org.junit.platform:junit-platform-suite-engine:1.12.0 -
org.junit.vintage:junit-vintage-engine:5.12.0 -
org.opentest4j:opentest4j:1.3.0
|
由於 此外,您不太可能需要在專案的 Maven POM 或 Gradle 建置腳本中包含對 如果您需要在建置腳本中宣告對 |
您可以 執行 獨立的 ConsoleLauncher,如下所示。
$ java -jar junit-platform-console-standalone-1.12.0.jar execute <OPTIONS>

├─ JUnit Vintage
│  └─ example.JUnit4Tests
│     └─ standardJUnit4Test ✔
└─ JUnit Jupiter
   ├─ StandardTests
   │  ├─ succeedingTest() ✔
   │  └─ skippedTest() ↷ for demonstration purposes
   └─ A special test case
      ├─ Custom test name containing spaces ✔
      ├─ ╯°□°)╯ ✔
      └─ 😱 ✔

Test run finished after 64 ms
[         5 containers found      ]
[         0 containers skipped    ]
[         5 containers started    ]
[         0 containers aborted    ]
[         5 containers successful ]
[         0 containers failed     ]
[         6 tests found           ]
[         1 tests skipped         ]
[         5 tests started         ]
[         0 tests aborted         ]
[         5 tests successful      ]
[         0 tests failed          ]
您也可以執行獨立的 ConsoleLauncher,如下所示(例如,包含目錄中的所有 jar 檔)
$ java -cp classes:testlib/* org.junit.platform.console.ConsoleLauncher <OPTIONS>|
結束代碼 如果任何容器或測試失敗,ConsoleLauncher 會以狀態碼 1 結束。如果沒有發現任何測試,並且提供了 --fail-if-no-tests 命令列選項,則 ConsoleLauncher 會以狀態碼 2 結束。否則,結束代碼為 0。 |
4.3.1. 子命令和選項
ConsoleLauncher 提供以下子命令
Usage: junit [OPTIONS] [COMMAND]
Launches the JUnit Platform for test discovery and execution.
      [@<filename>...]   One or more argument files containing options.
  -h, --help             Display help information.
      --version          Display version information.
      --disable-ansi-colors
                         Disable ANSI colors in output (not supported by all terminals).
Commands:
  discover  Discover tests
  execute   Execute tests
  engines   List available test engines

For more information, please refer to the JUnit User Guide at
https://junit.dev.org.tw/junit5/docs/1.12.0/user-guide/
探索測試
Usage: junit discover [OPTIONS]
Discover tests
      [@<filename>...]       One or more argument files containing options.
      --disable-ansi-colors  Disable ANSI colors in output (not supported by all terminals).
      --disable-banner       Disable print out of the welcome message.
  -h, --help                 Display help information.
      --version              Display version information.

SELECTORS

      --scan-classpath, --scan-class-path[=PATH]
                             Scan all directories on the classpath or explicit classpath
                               roots. Without arguments, only directories on the system
                               classpath as well as additional classpath entries supplied via
                               -cp (directories and JAR files) are scanned. Explicit classpath
                               roots that are not on the classpath will be silently ignored.
                               This option can be repeated.
      --scan-modules         Scan all resolved modules for test discovery.
  -u, --select-uri=URI...    Select a URI for test discovery. This option can be repeated.
  -f, --select-file=FILE...  Select a file for test discovery. The line and column numbers can
                               be provided as URI query parameters (e.g. foo.txt?
                               line=12&column=34). This option can be repeated.
  -d, --select-directory=DIR...
                             Select a directory for test discovery. This option can be
                               repeated.
  -o, --select-module=NAME...
                             Select single module for test discovery. This option can be
                               repeated.
  -p, --select-package=PKG...
                             Select a package for test discovery. This option can be repeated.
  -c, --select-class=CLASS...
                             Select a class for test discovery. This option can be repeated.
  -m, --select-method=NAME...
                             Select a method for test discovery. This option can be repeated.
  -r, --select-resource=RESOURCE...
                             Select a classpath resource for test discovery. This option can
                               be repeated.
  -i, --select-iteration=PREFIX:VALUE[INDEX(..INDEX)?(,INDEX(..INDEX)?)*]...
                             Select iterations for test discovery via a prefixed identifier
                               and a list of indexes or index ranges (e.g. method:com.acme.
                               Foo#m()[1..2] selects the first and second iteration of the m()
                               method in the com.acme.Foo class). This option can be repeated.
      --uid, --select-unique-id=UNIQUE-ID...
                             Select a unique id for test discovery. This option can be
                               repeated.
      --select=PREFIX:VALUE...
                             Select via a prefixed identifier (e.g. method:com.acme.Foo#m
                               selects the m() method in the com.acme.Foo class). This option
                               can be repeated.

  For more information on selectors including syntax examples, see
  https://junit.dev.org.tw/junit5/docs/current/user-guide/#running-tests-discovery-selectors

FILTERS

  -n, --include-classname=PATTERN
                             Provide a regular expression to include only classes whose fully
                               qualified names match. To avoid loading classes unnecessarily,
                               the default pattern only includes class names that begin with
                               "Test" or end with "Test" or "Tests". When this option is
                               repeated, all patterns will be combined using OR semantics.
                               Default: ^(Test.*|.+[.$]Test.*|.*Tests?)$
  -N, --exclude-classname=PATTERN
                             Provide a regular expression to exclude those classes whose fully
                               qualified names match. When this option is repeated, all
                               patterns will be combined using OR semantics.
      --include-package=PKG  Provide a package to be included in the test run. This option can
                               be repeated.
      --exclude-package=PKG  Provide a package to be excluded from the test run. This option
                               can be repeated.
      --include-methodname=PATTERN
                             Provide a regular expression to include only methods whose fully
                               qualified names without parameters match. When this option is
                               repeated, all patterns will be combined using OR semantics.
      --exclude-methodname=PATTERN
                             Provide a regular expression to exclude those methods whose fully
                               qualified names without parameters match. When this option is
                               repeated, all patterns will be combined using OR semantics.
  -t, --include-tag=TAG      Provide a tag or tag expression to include only tests whose tags
                               match. When this option is repeated, all patterns will be
                               combined using OR semantics.
  -T, --exclude-tag=TAG      Provide a tag or tag expression to exclude those tests whose tags
                               match. When this option is repeated, all patterns will be
                               combined using OR semantics.
  -e, --include-engine=ID    Provide the ID of an engine to be included in the test run. This
                               option can be repeated.
  -E, --exclude-engine=ID    Provide the ID of an engine to be excluded from the test run.
                               This option can be repeated.

RUNTIME CONFIGURATION

      -cp, --classpath, --class-path=PATH
                             Provide additional classpath entries -- for example, for adding
                               engines and their dependencies. This option can be repeated.
      --config-resource=PATH Set configuration parameters for test discovery and execution via
                               a classpath resource. This option can be repeated.
      --config=KEY=VALUE     Set a configuration parameter for test discovery and execution.
                               This option can be repeated.

CONSOLE OUTPUT

      --color-palette=FILE   Specify a path to a properties file to customize ANSI style of
                               output (not supported by all terminals).
      --single-color         Style test output using only text attributes, no color (not
                               supported by all terminals).
      --details=MODE         Select an output details mode for when tests are executed. Use
                               one of: none, summary, flat, tree, verbose, testfeed. If 'none'
                               is selected, then only the summary and test failures are shown.
                               Default: tree.
      --details-theme=THEME  Select an output details tree theme for when tests are executed.
                               Use one of: ascii, unicode. Default is detected based on
                               default character encoding.

For more information, please refer to the JUnit User Guide at
https://junit.dev.org.tw/junit5/docs/1.12.0/user-guide/
執行測試
Usage: junit execute [OPTIONS]
Execute tests
      [@<filename>...]       One or more argument files containing options.
      --disable-ansi-colors  Disable ANSI colors in output (not supported by all terminals).
      --disable-banner       Disable print out of the welcome message.
  -h, --help                 Display help information.
      --version              Display version information.

SELECTORS

      --scan-classpath, --scan-class-path[=PATH]
                             Scan all directories on the classpath or explicit classpath
                               roots. Without arguments, only directories on the system
                               classpath as well as additional classpath entries supplied via
                               -cp (directories and JAR files) are scanned. Explicit classpath
                               roots that are not on the classpath will be silently ignored.
                               This option can be repeated.
      --scan-modules         Scan all resolved modules for test discovery.
  -u, --select-uri=URI...    Select a URI for test discovery. This option can be repeated.
  -f, --select-file=FILE...  Select a file for test discovery. The line and column numbers can
                               be provided as URI query parameters (e.g. foo.txt?
                               line=12&column=34). This option can be repeated.
  -d, --select-directory=DIR...
                             Select a directory for test discovery. This option can be
                               repeated.
  -o, --select-module=NAME...
                             Select single module for test discovery. This option can be
                               repeated.
  -p, --select-package=PKG...
                             Select a package for test discovery. This option can be repeated.
  -c, --select-class=CLASS...
                             Select a class for test discovery. This option can be repeated.
  -m, --select-method=NAME...
                             Select a method for test discovery. This option can be repeated.
  -r, --select-resource=RESOURCE...
                             Select a classpath resource for test discovery. This option can
                               be repeated.
  -i, --select-iteration=PREFIX:VALUE[INDEX(..INDEX)?(,INDEX(..INDEX)?)*]...
                             Select iterations for test discovery via a prefixed identifier
                               and a list of indexes or index ranges (e.g. method:com.acme.
                               Foo#m()[1..2] selects the first and second iteration of the m()
                               method in the com.acme.Foo class). This option can be repeated.
      --uid, --select-unique-id=UNIQUE-ID...
                             Select a unique id for test discovery. This option can be
                               repeated.
      --select=PREFIX:VALUE...
                             Select via a prefixed identifier (e.g. method:com.acme.Foo#m
                               selects the m() method in the com.acme.Foo class). This option
                               can be repeated.

  For more information on selectors including syntax examples, see
  https://junit.dev.org.tw/junit5/docs/current/user-guide/#running-tests-discovery-selectors

FILTERS

  -n, --include-classname=PATTERN
                             Provide a regular expression to include only classes whose fully
                               qualified names match. To avoid loading classes unnecessarily,
                               the default pattern only includes class names that begin with
                               "Test" or end with "Test" or "Tests". When this option is
                               repeated, all patterns will be combined using OR semantics.
                               Default: ^(Test.*|.+[.$]Test.*|.*Tests?)$
  -N, --exclude-classname=PATTERN
                             Provide a regular expression to exclude those classes whose fully
                               qualified names match. When this option is repeated, all
                               patterns will be combined using OR semantics.
      --include-package=PKG  Provide a package to be included in the test run. This option can
                               be repeated.
      --exclude-package=PKG  Provide a package to be excluded from the test run. This option
                               can be repeated.
      --include-methodname=PATTERN
                             Provide a regular expression to include only methods whose fully
                               qualified names without parameters match. When this option is
                               repeated, all patterns will be combined using OR semantics.
      --exclude-methodname=PATTERN
                             Provide a regular expression to exclude those methods whose fully
                               qualified names without parameters match. When this option is
                               repeated, all patterns will be combined using OR semantics.
  -t, --include-tag=TAG      Provide a tag or tag expression to include only tests whose tags
                               match. When this option is repeated, all patterns will be
                               combined using OR semantics.
  -T, --exclude-tag=TAG      Provide a tag or tag expression to exclude those tests whose tags
                               match. When this option is repeated, all patterns will be
                               combined using OR semantics.
  -e, --include-engine=ID    Provide the ID of an engine to be included in the test run. This
                               option can be repeated.
  -E, --exclude-engine=ID    Provide the ID of an engine to be excluded from the test run.
                               This option can be repeated.

RUNTIME CONFIGURATION

      -cp, --classpath, --class-path=PATH
                             Provide additional classpath entries -- for example, for adding
                               engines and their dependencies. This option can be repeated.
      --config-resource=PATH Set configuration parameters for test discovery and execution via
                               a classpath resource. This option can be repeated.
      --config=KEY=VALUE     Set a configuration parameter for test discovery and execution.
                               This option can be repeated.

CONSOLE OUTPUT

      --color-palette=FILE   Specify a path to a properties file to customize ANSI style of
                               output (not supported by all terminals).
      --single-color         Style test output using only text attributes, no color (not
                               supported by all terminals).
      --details=MODE         Select an output details mode for when tests are executed. Use
                               one of: none, summary, flat, tree, verbose, testfeed. If 'none'
                               is selected, then only the summary and test failures are shown.
                               Default: tree.
      --details-theme=THEME  Select an output details tree theme for when tests are executed.
                               Use one of: ascii, unicode. Default is detected based on
                               default character encoding.

REPORTING

      --fail-if-no-tests     Fail and return exit status code 2 if no tests are found.
      --reports-dir=DIR      Enable report output into a specified local directory (will be
                               created if it does not exist).

For more information, please refer to the JUnit User Guide at
https://junit.dev.org.tw/junit5/docs/1.12.0/user-guide/
列出測試引擎
Usage: junit engines [OPTIONS]
List available test engines
      [@<filename>...]   One or more argument files containing options.
      --disable-ansi-colors
                         Disable ANSI colors in output (not supported by all terminals).
      --disable-banner   Disable print out of the welcome message.
  -h, --help             Display help information.
      --version          Display version information.

For more information, please refer to the JUnit User Guide at
https://junit.dev.org.tw/junit5/docs/1.12.0/user-guide/
4.3.2. 參數檔案 (@-files)
在某些平台上,當您建立包含大量選項或長參數的命令列時,可能會遇到系統對命令列長度的限制。
自 1.3 版起,ConsoleLauncher 支援參數檔案,也稱為 @-files。參數檔案本身包含要傳遞給命令的參數。當底層的 picocli 命令列解析器遇到以字元 @ 開頭的參數時,它會將該檔案的內容展開到參數列表中。
檔案中的參數可以使用空格或換行符分隔。如果參數包含內嵌的空白字元,則整個參數應以雙引號或單引號括起來 — 例如,"-f=My Files/Stuff.java"。
如果參數檔案不存在或無法讀取,則該參數將被視為字面值,並且不會被移除。這很可能會導致「不符的參數」錯誤訊息。您可以透過執行命令時將 picocli.trace 系統屬性設定為 DEBUG 來排解此類錯誤。
可以在命令列上指定多個 @-files。指定的路徑可以是相對於目前目錄或絕對路徑。
您可以透過使用額外的 @ 符號來逸出以 @ 字元開頭的實際參數。例如,@@somearg 將變成 @somearg,並且不會受到展開。
4.3.3. 顏色自訂
可以用自訂的方式設定 ConsoleLauncher 輸出中使用的顏色。--single-color 選項將套用內建的單色樣式,而 --color-palette 將接受屬性檔案來覆寫 ANSI SGR 顏色樣式。以下屬性檔案示範了預設樣式
SUCCESSFUL = 32
ABORTED = 33
FAILED = 31
SKIPPED = 35
CONTAINER = 35
TEST = 34
DYNAMIC = 35
REPORTED = 37
4.4. 使用 JUnit 4 執行 JUnit Platform
JUnitPlatform 執行器已被棄用
近年來,所有主流建置工具和 IDE 都提供內建支援,可以直接在 JUnit Platform 上執行測試。 此外, 因此, 如果您正在使用 |
JUnitPlatform 執行器是一個基於 JUnit 4 的 Runner,它使您能夠在 JUnit 4 環境中執行任何其程式設計模型在 JUnit Platform 上受支援的測試 — 例如,JUnit Jupiter 測試類別。
使用 @RunWith(JUnitPlatform.class) 註解類別,使其能夠與支援 JUnit 4 但尚未直接支援 JUnit Platform 的 IDE 和建置系統一起執行。
| 由於 JUnit Platform 具有 JUnit 4 沒有的功能,因此執行器只能支援 JUnit Platform 功能的子集,尤其是在報告方面(請參閱 顯示名稱與技術名稱)。 |
4.4.1. 設定
您需要在類別路徑上具有以下成品及其相依性。請參閱 相依性Metadata 以取得關於群組 ID、成品 ID 和版本的詳細資訊。
4.4.2. 顯示名稱與技術名稱
若要為透過 @RunWith(JUnitPlatform.class) 執行的類別定義自訂顯示名稱,請使用 @SuiteDisplayName 註解該類別並提供自訂值。
預設情況下,顯示名稱將用於測試成品;但是,當使用 JUnitPlatform 執行器透過建置工具(例如 Gradle 或 Maven)執行測試時,產生的測試報告通常需要包含測試成品的技術名稱 — 例如,完整限定的類別名稱 — 而不是較短的顯示名稱,例如測試類別的簡單名稱或包含特殊字元的自訂顯示名稱。若要為報告目的啟用技術名稱,請在 @RunWith(JUnitPlatform.class) 旁邊宣告 @UseTechnicalNames 註解。
請注意,@UseTechnicalNames 的存在會覆寫透過 @SuiteDisplayName 設定的任何自訂顯示名稱。
4.4.3. 單一測試類別
使用 JUnitPlatform 執行器的一種方法是直接使用 @RunWith(JUnitPlatform.class) 註解測試類別。請注意,以下範例中的測試方法使用 org.junit.jupiter.api.Test (JUnit Jupiter) 註解,而不是 org.junit.Test (JUnit 4)。此外,在這種情況下,測試類別必須是 public;否則,某些 IDE 和建置工具可能無法將其識別為 JUnit 4 測試類別。
import static org.junit.jupiter.api.Assertions.fail;

import org.junit.jupiter.api.Test;
import org.junit.runner.RunWith;

@RunWith(org.junit.platform.runner.JUnitPlatform.class)
public class JUnitPlatformClassDemo {

    @Test
    void succeedingTest() {
        /* no-op */
    }

    @Test
    void failingTest() {
        fail("Failing for failing's sake.");
    }

}
4.4.4. 測試套件
如果您有多個測試類別,您可以建立一個測試套件,如下列範例所示。
import org.junit.platform.suite.api.SelectPackages;
import org.junit.platform.suite.api.SuiteDisplayName;
import org.junit.runner.RunWith;

@RunWith(org.junit.platform.runner.JUnitPlatform.class)
@SuiteDisplayName("JUnit Platform Suite Demo")
@SelectPackages("example")
public class JUnitPlatformSuiteDemo {
}
JUnitPlatformSuiteDemo 將探索並執行 example 套件及其子套件中的所有測試。預設情況下,它只會包含名稱以 Test 開頭或以 Test 或 Tests 結尾的測試類別。
|
其他組態選項 除了 @SelectPackages 之外,還有更多用於探索和篩選測試的組態選項。請查閱 org.junit.platform.suite.api 套件的 Javadoc 以取得更多詳細資訊。 |
使用 @RunWith(JUnitPlatform.class) 註解的測試類別和套件 無法 直接在 JUnit Platform 上執行(或如某些 IDE 中所述作為「JUnit 5」測試執行)。此類類別和套件只能使用 JUnit 4 基礎架構執行。 |
4.5. 探索選擇器
JUnit Platform 提供了一組豐富的探索選擇器,可用於指定應探索或執行的測試。
探索選擇器可以使用 DiscoverySelectors 類別中的工廠方法以程式方式建立,在使用 JUnit Platform Suite Engine 時透過註解以宣告方式指定,透過 Console Launcher 的選項指定,或以字串形式透過其識別符通用地指定。
以下探索選擇器是開箱即用的
| Java 類型 | API | 註解 | 命令列啟動器 | 識別符 |
|---|---|---|---|---|
|
|
|||
— |
|
|
||
|
|
|||
|
|
|||
|
|
|||
|
|
|
||
|
|
|||
|
|
|||
|
|
|
||
|
|
|
||
|
|
|||
|
|
|
||
|
|
4.6. 組態參數
除了指示平台要包含哪些測試類別和測試引擎、要掃描哪些套件等等之外,有時還需要提供額外的自訂組態參數,這些參數特定於特定的測試引擎、監聽器或已註冊的擴充功能。例如,JUnit Jupiter 的 TestEngine 支援以下使用案例的組態參數。
組態參數是基於文字的鍵值對,可以通過以下機制之一提供給在 JUnit 平台上運行的測試引擎。
-
LauncherDiscoveryRequestBuilder中的configurationParameter()和configurationParameters()方法,用於建構提供給 Launcher API 的請求。
當通過 JUnit Platform 提供的工具之一運行測試時,您可以按如下方式指定組態參數-
Console Launcher:使用
--config命令列選項。 -
Gradle:使用
systemProperty或systemPropertiesDSL。 -
Maven Surefire provider:使用
configurationParameters屬性。
-
-
LauncherDiscoveryRequestBuilder中的configurationParametersResources()方法。
當通過 Console Launcher 運行測試時,您可以使用--config-resource命令列選項指定自訂組態檔案。 -
JVM 系統屬性。
-
JUnit Platform 預設組態檔案:類別路徑根目錄中名為
junit-platform.properties的檔案,該檔案遵循 JavaProperties檔案的語法規則。
組態參數會按照上面定義的確切順序查找。因此,直接提供給 Launcher 的組態參數優先於通過自訂組態檔案、系統屬性和預設組態檔案提供的組態參數。同樣,通過系統屬性提供的組態參數優先於通過預設組態檔案提供的組態參數。 |
4.6.1. 模式比對語法
本節介紹應用於用於以下功能的組態參數的模式比對語法。
如果給定組態參數的值僅由星號 (*) 組成,則該模式將比對所有候選類別。否則,該值將被視為逗號分隔的模式列表,其中每個模式將與每個候選類別的完整類別名稱 (FQCN) 進行比對。模式中的任何點 (.) 都將與 FQCN 中的點 (.) 或錢字符號 ($) 比對。任何星號 (*) 都將與 FQCN 中的一個或多個字元比對。模式中的所有其他字元都將與 FQCN 一對一比對。
範例
-
*:比對所有候選類別。 -
org.junit.*:比對org.junit基礎套件及其任何子套件下的所有候選類別。 -
*.MyCustomImpl:比對每個簡單類別名稱完全為MyCustomImpl的候選類別。 -
*System*:比對 FQCN 包含System的每個候選類別。 -
*System*, *Unit*:比對 FQCN 包含System或Unit的每個候選類別。 -
org.example.MyCustomImpl:比對 FQCN 完全為org.example.MyCustomImpl的候選類別。 -
org.example.MyCustomImpl, org.example.TheirCustomImpl:比對 FQCN 完全為org.example.MyCustomImpl或org.example.TheirCustomImpl的候選類別。
4.7. 標籤
標籤是 JUnit Platform 用於標記和篩選測試的概念。將標籤添加到容器和測試的程式設計模型由測試框架定義。例如,在基於 JUnit Jupiter 的測試中,應使用 @Tag 註解(請參閱 標籤和篩選)。對於基於 JUnit 4 的測試,Vintage 引擎將 @Category 註解映射到標籤(請參閱 類別支援)。其他測試框架可能會定義自己的註解或其他方式供使用者指定標籤。
4.7.1. 標籤的語法規則
無論如何指定標籤,JUnit Platform 都會強制執行以下規則
-
標籤不得為
null或空白。 -
修剪後的標籤不得包含空格。
-
修剪後的標籤不得包含 ISO 控制字元。
-
修剪後的標籤不得包含以下任何保留字元。
-
,:逗號 -
(:左括號 -
):右括號 -
&:連字號 -
|:垂直線 -
!:驚嘆號
-
| 在上述上下文中,「修剪後」表示已移除開頭和結尾的空格字元。 |
4.7.2. 標籤表達式
標籤表達式是具有運算符 !、& 和 | 的布林表達式。此外,( 和 ) 可用於調整運算符優先順序。
支援兩個特殊表達式,any() 和 none(),它們分別選擇具有任何標籤的所有測試,以及沒有任何標籤的所有測試。這些特殊表達式可以像普通標籤一樣與其他表達式組合使用。
| 運算符 | 含義 | 結合性 |
|---|---|---|
|
not |
右 |
|
and |
左 |
|
or |
左 |
如果您跨多個維度標記測試,則標籤表達式可協助您選擇要執行的測試。當按測試類型(例如,micro、integration、end-to-end)和功能(例如,product、catalog、shipping)標記時,以下標籤表達式可能很有用。
| 標籤表達式 | 選取 |
|---|---|
|
product 的所有測試 |
|
catalog 的所有測試加上 shipping 的所有測試 |
|
catalog 和 shipping 之間交集的所有測試 |
|
product 的所有測試,但不包括 end-to-end 測試 |
|
product 或 shipping 的所有 micro 或 integration 測試 |
4.8. 擷取標準輸出/錯誤
自 1.3 版起,JUnit Platform 提供選擇性加入支援,以擷取列印到 System.out 和 System.err 的輸出。若要啟用它,請將 junit.platform.output.capture.stdout 和/或 junit.platform.output.capture.stderr 組態參數 設定為 true。此外,您可以使用 junit.platform.output.capture.maxBuffer 設定每個執行的測試或容器要使用的最大緩衝位元組數。
如果啟用,JUnit Platform 會擷取相應的輸出,並在使用 stdout 或 stderr 鍵作為報告條目發佈到所有已註冊的 TestExecutionListener 實例,緊接在報告測試或容器已完成之前。
請注意,擷取的輸出將僅包含用於執行容器或測試的線程發出的輸出。其他線程的任何輸出都將被省略,因為特別是在並行執行測試時,將其歸因於特定測試或容器是不可能的。
4.9. 使用監聽器和攔截器
JUnit Platform 提供以下監聽器 API,允許 JUnit、第三方和自訂使用者程式碼對在 TestPlan 的探索和執行期間在各個點觸發的事件做出反應。
-
LauncherSessionListener:在LauncherSession開啟和關閉時接收事件。 -
LauncherInterceptor:在LauncherSession的上下文中攔截測試探索和執行。 -
LauncherDiscoveryListener:接收測試探索期間發生的事件。 -
TestExecutionListener:接收測試執行期間發生的事件。
LauncherSessionListener API 通常由建構工具或 IDE 實作,並自動為您註冊,以支援建構工具或 IDE 的某些功能。
LauncherDiscoveryListener 和 TestExecutionListener API 通常實作是為了產生某種形式的報告,或在 IDE 中顯示測試計劃的圖形化表示。此類監聽器可以由建構工具或 IDE 實作並自動註冊,或者它們可以包含在第三方程式庫中 – 可能會自動為您註冊。您也可以實作和註冊自己的監聽器。
有關註冊和組態監聽器的詳細資訊,請參閱本指南的以下章節。
JUnit Platform 提供以下監聽器,您可能希望將其與您的測試套件一起使用。
- JUnit Platform 報告
-
LegacyXmlReportGeneratingListener可以通過 Console Launcher 使用或手動註冊,以產生與基於 JUnit 4 的測試報告的事實標準相容的 XML 報告。OpenTestReportGeneratingListener以 Open Test Reporting 指定的基於事件的格式產生 XML 報告。它是自動註冊的,可以通過組態參數啟用和組態。有關詳細資訊,請參閱 JUnit Platform 報告。
- Flight Recorder 支援
-
FlightRecordingExecutionListener和FlightRecordingDiscoveryListener在測試探索和執行期間產生 Java Flight Recorder 事件。 LoggingListener-
TestExecutionListener通過BiConsumer記錄所有事件的資訊性訊息,BiConsumer使用Throwable和Supplier<String>。 SummaryGeneratingListener-
TestExecutionListener產生測試執行的摘要,可以通過PrintWriter列印。 UniqueIdTrackingListener-
TestExecutionListener追蹤在TestPlan執行期間跳過或執行的所有測試的唯一 ID,並在TestPlan執行完成後產生一個包含唯一 ID 的檔案。
4.9.1. Flight Recorder 支援
自 1.7 版起,JUnit Platform 提供選擇性加入支援,以產生 Flight Recorder 事件。JEP 328 將 Java Flight Recorder (JFR) 描述為
| Flight Recorder 記錄源自應用程式、JVM 和作業系統的事件。事件儲存在單個檔案中,該檔案可以附加到錯誤報告中,並由支援工程師檢查,以便對問題發生前一段時間內的問題進行事後分析。 |
為了記錄在運行測試時產生的 Flight Recorder 事件,您需要
-
確保您使用的是 Java 8 Update 262 或更高版本,或 Java 11 或更高版本。
-
在測試運行時在類別路徑或模組路徑上提供
org.junit.platform.jfr模組 (junit-platform-jfr-1.12.0.jar)。 -
在啟動測試運行時啟動 flight recording。Flight Recorder 可以通過 java 命令列選項啟動
-XX:StartFlightRecording:filename=...
請查閱建構工具的手冊以取得適當的命令。
要分析記錄的事件,請使用最近 JDK 附帶的 jfr 命令列工具,或使用 JDK Mission Control 開啟記錄檔案。
| Flight Recorder 支援目前是一項實驗性功能。歡迎您試用並向 JUnit 團隊提供意見回饋,以便他們可以改進並最終推廣此功能。 |
4.10. 堆疊追蹤修剪
自 1.10 版起,JUnit Platform 提供內建支援,用於修剪失敗測試產生的堆疊追蹤。此功能預設為啟用,但可以通過將 junit.platform.stacktrace.pruning.enabled 組態參數 設定為 false 來停用。
啟用後,除非呼叫發生在測試本身或其任何祖先之後,否則堆疊追蹤中將移除來自 org.junit、jdk.internal.reflect 和 sun.reflect 套件的所有呼叫。因此,永遠不會排除對 org.junit.jupiter.api.Assertions 或 org.junit.jupiter.api.Assumptions 的呼叫。
此外,將移除來自 JUnit Platform Launcher 的第一次呼叫之前和包含第一次呼叫的所有元素。
5. 擴充模型
5.1. 概述
與 JUnit 4 中競爭的 Runner、TestRule 和 MethodRule 擴充點相反,JUnit Jupiter 擴充模型由一個單一的、連貫的概念組成:Extension API。但是請注意,Extension 本身只是一個標記介面。
5.2. 註冊擴充功能
擴充功能可以通過 @ExtendWith 宣告式註冊、通過 @RegisterExtension 程式化註冊,或通過 Java 的 ServiceLoader 機制自動註冊。
5.2.1. 宣告式擴充註冊
開發人員可以通過使用 @ExtendWith(…) 註解測試介面、測試類別、測試方法或自訂組合註解,並提供要註冊的擴充功能的類別引用來宣告式註冊一個或多個擴充功能。從 JUnit Jupiter 5.8 開始,@ExtendWith 也可以在測試類別建構子、測試方法以及 @BeforeAll、@AfterAll、@BeforeEach 和 @AfterEach 生命周期方法中的欄位或參數上宣告。
例如,若要為特定測試方法註冊 WebServerExtension,您可以按如下所示註解測試方法。我們假設 WebServerExtension 啟動本機 Web 伺服器,並將伺服器的 URL 注入到使用 @WebServerUrl 註解的參數中。
@Test
@ExtendWith(WebServerExtension.class)
void getProductList(@WebServerUrl String serverUrl) {
    WebClient webClient = new WebClient();
    // Use WebClient to connect to web server using serverUrl and verify response
    assertEquals(200, webClient.get(serverUrl + "/products").getResponseStatus());
}
若要為特定類別及其子類別中的所有測試註冊 WebServerExtension,您可以按如下所示註解測試類別。
@ExtendWith(WebServerExtension.class)
class MyTests {
    // ...
}
多個擴充功能可以像這樣一起註冊
@ExtendWith({ DatabaseExtension.class, WebServerExtension.class })
class MyFirstTests {
    // ...
}
作為替代方案,多個擴充功能可以像這樣分開註冊
@ExtendWith(DatabaseExtension.class)
@ExtendWith(WebServerExtension.class)
class MySecondTests {
    // ...
}|
擴充功能註冊順序
透過 |
如果您希望以可重複使用的方式組合多個擴充功能,您可以定義一個自訂的*組合註解*,並使用 @ExtendWith 作為*meta-annotation*,如下面的程式碼清單所示。如此一來,@DatabaseAndWebServerExtension 就可以用來取代 @ExtendWith({ DatabaseExtension.class, WebServerExtension.class })。
@Target({ ElementType.TYPE, ElementType.METHOD })
@Retention(RetentionPolicy.RUNTIME)
@ExtendWith({ DatabaseExtension.class, WebServerExtension.class })
public @interface DatabaseAndWebServerExtension {
}
上述範例示範了如何在類別層級或方法層級應用 @ExtendWith;然而,在某些使用情境中,在欄位或參數層級以宣告方式註冊擴充功能也很有意義。考慮一個 RandomNumberExtension,它可以產生隨機數字,並注入到欄位中,或透過建構子、測試方法或生命週期方法中的參數注入。如果擴充功能提供了一個 @Random 註解,並使用 @ExtendWith(RandomNumberExtension.class) 作為 meta-annotation(請參閱下面的清單),則可以透明地使用該擴充功能,如下面的 RandomNumberDemo 範例所示。
@Target({ ElementType.FIELD, ElementType.PARAMETER })
@Retention(RetentionPolicy.RUNTIME)
@ExtendWith(RandomNumberExtension.class)
public @interface Random {
}
class RandomNumberDemo {
// Use static randomNumber0 field anywhere in the test class,
// including @BeforeAll or @AfterEach lifecycle methods.
@Random
private static Integer randomNumber0;
// Use randomNumber1 field in test methods and @BeforeEach
// or @AfterEach lifecycle methods.
@Random
private int randomNumber1;
RandomNumberDemo(@Random int randomNumber2) {
// Use randomNumber2 in constructor.
}
@BeforeEach
void beforeEach(@Random int randomNumber3) {
// Use randomNumber3 in @BeforeEach method.
}
@Test
void test(@Random int randomNumber4) {
// Use randomNumber4 in test method.
}
}下面的程式碼清單提供了一個範例,說明如何實作 RandomNumberExtension。此實作適用於 RandomNumberDemo 中的使用情境;然而,它可能不夠強大,無法涵蓋所有使用情境,例如,隨機數字產生支援僅限於整數;它使用 java.util.Random 而不是 java.security.SecureRandom;等等。在任何情況下,重要的是要注意實作了哪些擴充功能 API 以及原因。
具體來說,RandomNumberExtension 實作了以下擴充功能 API
-
BeforeAllCallback:支援靜態欄位注入 -
TestInstancePostProcessor:支援非靜態欄位注入 -
ParameterResolver:支援建構子和方法注入
import static org.junit.platform.commons.support.AnnotationSupport.findAnnotatedFields;

import java.lang.reflect.Field;
import java.util.function.Predicate;

import org.junit.jupiter.api.extension.BeforeAllCallback;
import org.junit.jupiter.api.extension.ExtensionContext;
import org.junit.jupiter.api.extension.ParameterContext;
import org.junit.jupiter.api.extension.ParameterResolver;
import org.junit.jupiter.api.extension.TestInstancePostProcessor;
import org.junit.platform.commons.support.ModifierSupport;

class RandomNumberExtension
        implements BeforeAllCallback, TestInstancePostProcessor, ParameterResolver {

    private final java.util.Random random = new java.util.Random(System.nanoTime());

    /**
     * Inject a random integer into static fields that are annotated with
     * {@code @Random} and can be assigned an integer value.
     */
    @Override
    public void beforeAll(ExtensionContext context) {
        Class<?> testClass = context.getRequiredTestClass();
        injectFields(testClass, null, ModifierSupport::isStatic);
    }

    /**
     * Inject a random integer into non-static fields that are annotated with
     * {@code @Random} and can be assigned an integer value.
     */
    @Override
    public void postProcessTestInstance(Object testInstance, ExtensionContext context) {
        Class<?> testClass = context.getRequiredTestClass();
        injectFields(testClass, testInstance, ModifierSupport::isNotStatic);
    }

    /**
     * Determine if the parameter is annotated with {@code @Random} and can be
     * assigned an integer value.
     */
    @Override
    public boolean supportsParameter(ParameterContext pc, ExtensionContext ec) {
        return pc.isAnnotated(Random.class) && isInteger(pc.getParameter().getType());
    }

    /**
     * Resolve a random integer.
     */
    @Override
    public Integer resolveParameter(ParameterContext pc, ExtensionContext ec) {
        return this.random.nextInt();
    }

    private void injectFields(Class<?> testClass, Object testInstance,
            Predicate<Field> predicate) {

        predicate = predicate.and(field -> isInteger(field.getType()));
        findAnnotatedFields(testClass, Random.class, predicate)
            .forEach(field -> {
                try {
                    field.setAccessible(true);
                    field.set(testInstance, this.random.nextInt());
                }
                catch (Exception ex) {
                    throw new RuntimeException(ex);
                }
            });
    }

    private static boolean isInteger(Class<?> type) {
        return type == Integer.class || type == int.class;
    }

}|
在欄位上使用
@ExtendWith 的擴充功能註冊順序透過 |
|
擴充功能繼承
透過 有關詳細資訊,請參閱擴充功能繼承。 |
5.2.2. 程式化擴充功能註冊
開發人員可以透過在測試類別的欄位上標註 @RegisterExtension 以*程式化*方式註冊擴充功能。
當擴充功能透過 @ExtendWith 以*宣告方式*註冊時,通常只能透過註解進行配置。相反地,當擴充功能透過 @RegisterExtension 註冊時,它可以*程式化*地配置,例如,為了將引數傳遞給擴充功能的建構子、靜態工廠方法或建構器 API。
|
擴充功能註冊順序
預設情況下,透過 任何未標註 |
|
擴充功能繼承
透過 有關詳細資訊,請參閱擴充功能繼承。 |
@RegisterExtension 欄位不得為 null(在評估時),但可以是 static 或非靜態的。 |
靜態欄位
如果 @RegisterExtension 欄位是 static,則該擴充功能將在透過 @ExtendWith 在類別層級註冊的擴充功能之後註冊。此類*靜態擴充功能*在可以實作哪些擴充功能 API 方面沒有限制。因此,透過靜態欄位註冊的擴充功能可以實作類別層級和實例層級的擴充功能 API,例如 BeforeAllCallback、AfterAllCallback、TestInstancePostProcessor 和 TestInstancePreDestroyCallback,以及方法層級的擴充功能 API,例如 BeforeEachCallback 等。
在以下範例中,測試類別中的 server 欄位是透過使用 WebServerExtension 支援的建構器模式以程式化方式初始化的。配置的 WebServerExtension 將自動註冊為類別層級的擴充功能,例如,為了在類別中的所有測試之前啟動伺服器,然後在類別中的所有測試完成後停止伺服器。此外,標註 @BeforeAll 或 @AfterAll 的靜態生命週期方法,以及 @BeforeEach、@AfterEach 和 @Test 方法,都可以在必要時透過 server 欄位存取擴充功能的實例。
class WebServerDemo {

    @RegisterExtension
    static WebServerExtension server = WebServerExtension.builder()
        .enableSecurity(false)
        .build();

    @Test
    void getProductList() {
        WebClient webClient = new WebClient();
        String serverUrl = server.getServerUrl();
        // Use WebClient to connect to web server using serverUrl and verify response
        assertEquals(200, webClient.get(serverUrl + "/products").getResponseStatus());
    }

}
Kotlin 中的靜態欄位
Kotlin 程式語言沒有 static 欄位的概念。但是,可以指示編譯器在 Kotlin 中使用 @JvmStatic 註解來產生一個 private static 欄位。如果您希望 Kotlin 編譯器產生一個 public static 欄位,則可以使用 @JvmField 註解。
以下範例是從前一節移植到 Kotlin 的 WebServerDemo 版本。
class KotlinWebServerDemo {
    companion object {
        @JvmField
        @RegisterExtension
        val server =
            WebServerExtension
                .builder()
                .enableSecurity(false)
                .build()!!
    }

    @Test
    fun getProductList() {
        // Use WebClient to connect to web server using serverUrl and verify response
        val webClient = WebClient()
        val serverUrl = server.serverUrl
        assertEquals(200, webClient.get("$serverUrl/products").responseStatus)
    }
}
實例欄位
如果 @RegisterExtension 欄位是非靜態的(即實例欄位),則該擴充功能將在測試類別實例化之後以及每個註冊的 TestInstancePostProcessor 有機會後處理測試實例之後註冊(可能會將要使用的擴充功能實例注入到標註的欄位中)。因此,如果此類*實例擴充功能*實作了類別層級或實例層級的擴充功能 API,例如 BeforeAllCallback、AfterAllCallback 或 TestInstancePostProcessor,則這些 API 將不會被採用。實例擴充功能將在透過 @ExtendWith 在方法層級註冊的擴充功能*之前*註冊。
在以下範例中,測試類別中的 docs 欄位是透過調用自訂的 lookUpDocsDir() 方法並將結果提供給 DocumentationExtension 中的靜態 forPath() 工廠方法以程式化方式初始化的。配置的 DocumentationExtension 將自動註冊為方法層級的擴充功能。此外,@BeforeEach、@AfterEach 和 @Test 方法都可以在必要時透過 docs 欄位存取擴充功能的實例。
class DocumentationDemo {

    static Path lookUpDocsDir() {
        // return path to docs dir
    }

    @RegisterExtension
    DocumentationExtension docs = DocumentationExtension.forPath(lookUpDocsDir());

    @Test
    void generateDocumentation() {
        // use this.docs ...
    }
}
5.2.3. 自動擴充功能註冊
除了使用註解的宣告式擴充功能註冊和程式化擴充功能註冊支援之外,JUnit Jupiter 也透過 Java 的 ServiceLoader 機制支援*全域擴充功能註冊*,允許根據 classpath 中可用的內容自動偵測和自動註冊第三方擴充功能。
具體來說,可以透過在其封閉 JAR 檔案的 /META-INF/services 資料夾中,名為 org.junit.jupiter.api.extension.Extension 的檔案中提供自訂擴充功能的完整類別名稱來註冊它。
啟用自動擴充功能偵測
自動偵測是一項進階功能,因此預設情況下未啟用。若要啟用它,請將 junit.jupiter.extensions.autodetection.enabled *組態參數*設定為 true。這可以作為 JVM 系統屬性、作為傳遞給 Launcher 的 LauncherDiscoveryRequest 中的*組態參數*,或透過 JUnit Platform 組態檔案提供(有關詳細資訊,請參閱組態參數)。
例如,若要啟用擴充功能的自動偵測,您可以使用以下系統屬性啟動 JVM。
-Djunit.jupiter.extensions.autodetection.enabled=true
啟用自動偵測後,透過 ServiceLoader 機制發現的擴充功能將在 JUnit Jupiter 的全域擴充功能(例如,對 TestInfo、TestReporter 等的支援)之後添加到擴充功能註冊表中。
篩選自動偵測到的擴充功能
可以透過以下組態參數,使用包含和排除模式來篩選自動偵測到的擴充功能列表
junit.jupiter.extensions.autodetection.include=<patterns>-
自動偵測到的擴充功能的以逗號分隔的*包含*模式列表。
junit.jupiter.extensions.autodetection.exclude=<patterns>-
自動偵測到的擴充功能的以逗號分隔的*排除*模式列表。
包含模式在排除模式*之前*應用。如果同時提供包含和排除模式,則只有符合至少一個包含模式且不符合任何排除模式的擴充功能才會被自動偵測到。
有關模式語法的詳細資訊,請參閱模式比對語法。
5.2.4. 擴充功能繼承
註冊的擴充功能在測試類別階層中以由上而下的語意繼承。同樣地,在類別層級註冊的擴充功能在方法層級繼承。這適用於所有擴充功能,無論它們是如何註冊的(宣告式或程式化)。
這表示透過 @ExtendWith 在父類別上以宣告方式註冊的擴充功能,將在透過 @ExtendWith 在子類別上以宣告方式註冊的擴充功能之前註冊。
同樣地,除非使用 @Order 來更改該行為(有關詳細資訊,請參閱擴充功能註冊順序),否則透過 @RegisterExtension 或 @ExtendWith 在父類別的欄位上以程式化方式註冊的擴充功能,將在透過 @RegisterExtension 或 @ExtendWith 在子類別的欄位上以程式化方式註冊的擴充功能之前註冊。
| 對於給定的擴充功能上下文及其父上下文,特定的擴充功能實作只能註冊一次。因此,任何嘗試註冊重複擴充功能實作的行為都將被忽略。 |
5.3. 條件式測試執行
ExecutionCondition 定義了用於程式化、*條件式測試執行*的 Extension API。
對於每個容器(例如,測試類別),都會*評估* ExecutionCondition,以根據提供的 ExtensionContext 判斷是否應執行其中包含的所有測試。同樣地,對於每個測試,都會*評估* ExecutionCondition,以根據提供的 ExtensionContext 判斷是否應執行給定的測試方法。
當註冊多個 ExecutionCondition 擴充功能時,只要其中一個條件返回 *disabled*,容器或測試就會被停用。因此,無法保證條件會被評估,因為另一個擴充功能可能已經導致容器或測試被停用。換句話說,評估的工作方式類似於短路布林 OR 運算子。
有關具體範例,請參閱 DisabledCondition 和 @Disabled 的原始碼。
5.3.1. 停用條件
有時,在*沒有*某些條件處於活動狀態的情況下執行測試套件可能很有用。例如,您可能希望即使測試標註了 @Disabled 也執行測試,以查看它們是否仍然*損壞*。為此,請為 junit.jupiter.conditions.deactivate *組態參數* 提供一個模式,以指定應為當前測試執行停用(即不評估)哪些條件。該模式可以作為 JVM 系統屬性、作為傳遞給 Launcher 的 LauncherDiscoveryRequest 中的*組態參數*,或透過 JUnit Platform 組態檔案提供(有關詳細資訊,請參閱組態參數)。
例如,若要停用 JUnit 的 @Disabled 條件,您可以使用以下系統屬性啟動 JVM。
-Djunit.jupiter.conditions.deactivate=org.junit.*DisabledCondition
模式比對語法
有關詳細資訊,請參閱模式比對語法。
5.4. 測試實例預先建構回呼
TestInstancePreConstructCallback 定義了 Extensions 的 API,這些 Extensions 希望在測試實例被建構*之前*(透過建構子呼叫或透過 TestInstanceFactory)調用。
此擴充功能提供對 TestInstancePreDestroyCallback 的對稱呼叫,並且與其他擴充功能結合使用,以準備建構子參數或追蹤測試實例及其生命週期非常有用。
|
存取測試範圍的
ExtensionContext您可以覆寫 |
5.5. 測試實例工廠
TestInstanceFactory 定義了 Extensions 的 API,這些 Extensions 希望*建立*測試類別實例。
常見的使用情境包括從依賴注入框架取得測試實例,或調用靜態工廠方法來建立測試類別實例。
如果未註冊 TestInstanceFactory,則框架將調用測試類別的*唯一*建構子來實例化它,並可能透過註冊的 ParameterResolver 擴充功能解析建構子引數。
實作 TestInstanceFactory 的擴充功能可以在測試介面、頂層測試類別或 @Nested 測試類別上註冊。
|
為任何單一類別註冊多個實作 |
|
存取測試範圍的
ExtensionContext您可以覆寫 |
5.6. 測試實例後處理
TestInstancePostProcessor 定義了 Extensions 的 API,這些 Extensions 希望*後處理*測試實例。
常見的使用情境包括將依賴注入測試實例、在測試實例上調用自訂初始化方法等等。
如需具體範例,請參閱 MockitoExtension 和 SpringExtension 的原始碼。
|
存取測試範圍的
ExtensionContext您可以覆寫 |
5.7. 測試實例預先銷毀回呼
TestInstancePreDestroyCallback 定義了 Extensions 的 API,以便在測試實例於測試中使用之後以及在銷毀之前進行處理。
常見的使用情境包括清理已注入測試實例的依賴、在測試實例上調用自訂反初始化方法等等。
5.8. 參數解析
ParameterResolver 定義了 Extension API,用於在運行時動態解析參數。
如果測試類別建構子、測試方法或生命週期方法(請參閱定義)宣告了參數,則必須在運行時由 ParameterResolver 解析該參數。ParameterResolver 可以是內建的(請參閱 TestInfoParameterResolver)或由使用者註冊。一般來說,參數可以通過名稱、類型、註解或它們的任意組合來解析。
如果您希望實作自訂的 ParameterResolver,該解析器僅基於參數的類型解析參數,您可能會發現擴展 TypeBasedParameterResolver 很方便,它作為此類用例的通用適配器。
如需具體範例,請參閱 CustomTypeParameterResolver、CustomAnnotationParameterResolver 和 MapOfListsTypeBasedParameterResolver 的原始碼。
|
由於 JDK 9 之前版本上的 因此,提供給
|
|
存取測試範圍的
ExtensionContext您可以覆寫 |
|
從擴展調用的方法的參數解析
其他擴展也可以利用已註冊的 |
5.8.1. 參數衝突
如果為測試註冊了多個支持相同類型的 ParameterResolver 實作,則會拋出 ParameterResolutionException,並帶有一條消息,指示已發現競爭的解析器。請參閱以下範例
public class ParameterResolverConflictDemo {

    @Test
    @ExtendWith({ FirstIntegerResolver.class, SecondIntegerResolver.class })
    void testInt(int i) {
        // Test will not run due to ParameterResolutionException
        assertEquals(1, i);
    }

    static class FirstIntegerResolver implements ParameterResolver {

        @Override
        public boolean supportsParameter(ParameterContext parameterContext, ExtensionContext extensionContext) {
            return parameterContext.getParameter().getType() == int.class;
        }

        @Override
        public Object resolveParameter(ParameterContext parameterContext, ExtensionContext extensionContext) {
            return 1;
        }
    }

    static class SecondIntegerResolver implements ParameterResolver {

        @Override
        public boolean supportsParameter(ParameterContext parameterContext, ExtensionContext extensionContext) {
            return parameterContext.getParameter().getType() == int.class;
        }

        @Override
        public Object resolveParameter(ParameterContext parameterContext, ExtensionContext extensionContext) {
            return 2;
        }
    }
}
如果衝突的 ParameterResolver 實作應用於不同的測試方法,如下例所示,則不會發生衝突。
public class ParameterResolverNoConflictDemo {

    @Test
    @ExtendWith(FirstIntegerResolver.class)
    void firstResolution(int i) {
        assertEquals(1, i);
    }

    @Test
    @ExtendWith(SecondIntegerResolver.class)
    void secondResolution(int i) {
        assertEquals(2, i);
    }

    static class FirstIntegerResolver implements ParameterResolver {

        @Override
        public boolean supportsParameter(ParameterContext parameterContext, ExtensionContext extensionContext) {
            return parameterContext.getParameter().getType() == int.class;
        }

        @Override
        public Object resolveParameter(ParameterContext parameterContext, ExtensionContext extensionContext) {
            return 1;
        }
    }

    static class SecondIntegerResolver implements ParameterResolver {

        @Override
        public boolean supportsParameter(ParameterContext parameterContext, ExtensionContext extensionContext) {
            return parameterContext.getParameter().getType() == int.class;
        }

        @Override
        public Object resolveParameter(ParameterContext parameterContext, ExtensionContext extensionContext) {
            return 2;
        }
    }
}
如果需要將衝突的 ParameterResolver 實作應用於相同的測試方法,您可以實作自訂類型或自訂註解,如 CustomTypeParameterResolver 和 CustomAnnotationParameterResolver 分別所示。
public class ParameterResolverCustomTypeDemo {

    @Test
    @ExtendWith({ FirstIntegerResolver.class, SecondIntegerResolver.class })
    void testInt(Integer i, WrappedInteger wrappedInteger) {
        assertEquals(1, i);
        assertEquals(2, wrappedInteger.value);
    }

    static class FirstIntegerResolver implements ParameterResolver {

        @Override
        public boolean supportsParameter(ParameterContext parameterContext, ExtensionContext extensionContext) {
            return parameterContext.getParameter().getType().equals(Integer.class);
        }

        @Override
        public Object resolveParameter(ParameterContext parameterContext, ExtensionContext extensionContext) {
            return 1;
        }
    }

    static class SecondIntegerResolver implements ParameterResolver {

        @Override
        public boolean supportsParameter(ParameterContext parameterContext, ExtensionContext extensionContext) {
            return parameterContext.getParameter().getType().equals(WrappedInteger.class);
        }

        @Override
        public Object resolveParameter(ParameterContext parameterContext, ExtensionContext extensionContext) {
            return new WrappedInteger(2);
        }
    }

    static class WrappedInteger {

        private final int value;

        public WrappedInteger(int value) {
            this.value = value;
        }

    }
}
自訂註解使重複類型與其對應類型區分開來
public class ParameterResolverCustomAnnotationDemo {

    @Test
    void testInt(@FirstInteger Integer first, @SecondInteger Integer second) {
        assertEquals(1, first);
        assertEquals(2, second);
    }

    @Target(ElementType.PARAMETER)
    @Retention(RetentionPolicy.RUNTIME)
    @ExtendWith(FirstInteger.Extension.class)
    public @interface FirstInteger {

        class Extension implements ParameterResolver {

            @Override
            public boolean supportsParameter(ParameterContext parameterContext, ExtensionContext extensionContext) {
                return parameterContext.getParameter().getType().equals(Integer.class)
                        && !parameterContext.isAnnotated(SecondInteger.class);
            }

            @Override
            public Object resolveParameter(ParameterContext parameterContext, ExtensionContext extensionContext) {
                return 1;
            }
        }
    }

    @Target(ElementType.PARAMETER)
    @Retention(RetentionPolicy.RUNTIME)
    @ExtendWith(SecondInteger.Extension.class)
    public @interface SecondInteger {

        class Extension implements ParameterResolver {

            @Override
            public boolean supportsParameter(ParameterContext parameterContext, ExtensionContext extensionContext) {
                return parameterContext.isAnnotated(SecondInteger.class);
            }

            @Override
            public Object resolveParameter(ParameterContext parameterContext, ExtensionContext extensionContext) {
                return 2;
            }
        }
    }
}
JUnit 包含一些內建的參數解析器,如果解析器嘗試聲稱支持它們的類型,則可能會導致衝突。例如,TestInfo 提供有關測試的元數據。請參閱建構子和方法的依賴注入以獲取詳細資訊。諸如 Spring 之類的第三方框架也可能定義參數解析器。應用本節中的一種技術來解決任何衝突。
參數化測試是另一個潛在的衝突來源。確保使用 @ParameterizedTest 註解的測試也未使用 @Test 註解,並參閱使用引數以獲取更多詳細資訊。
5.9. 測試結果處理
TestWatcher 定義了擴展的 API,這些擴展希望處理測試方法執行的結果。具體而言,將使用以下事件的上下文資訊調用 TestWatcher。
-
testDisabled:在已停用的測試方法被跳過後調用 -
testSuccessful:在測試方法成功完成後調用 -
testAborted:在測試方法中止後調用 -
testFailed:在測試方法失敗後調用
與定義中呈現的「測試方法」的定義相反,在此上下文中,測試方法是指任何 @Test 方法或 @TestTemplate 方法(例如,@RepeatedTest 或 @ParameterizedTest)。 |
實作此介面的擴展可以在類別級別、實例級別或方法級別註冊。在類別級別註冊時,將為任何包含的測試方法(包括 @Nested 類別中的方法)調用 TestWatcher。在方法級別註冊時,TestWatcher 將僅針對註冊它的測試方法調用。
|
如果通過非靜態(實例)欄位註冊 為了確保為給定類別中的所有測試方法調用 |
如果類別級別發生故障 — 例如,@BeforeAll 方法拋出異常 — 則不會報告任何測試結果。同樣,如果通過 ExecutionCondition 停用測試類別 — 例如,@Disabled — 則不會報告任何測試結果。
與其他擴展 API 相反,TestWatcher 不允許對測試的執行產生不利影響。因此,TestWatcher API 中的方法拋出的任何異常都將記錄在 WARNING 級別,並且不會允許傳播或導致測試執行失敗。
|
|
5.10. 測試生命週期回呼
以下介面定義了在測試執行生命週期的各個點擴展測試的 API。有關範例以及 org.junit.jupiter.api.extension 套件中每個介面的 Javadoc,請參閱以下各節以獲取更多詳細資訊。
|
實作多個擴展 API 擴展開發人員可以選擇在單個擴展中實作任意數量的這些介面。有關具體範例,請參閱 SpringExtension 的原始碼。 |
5.10.1. 測試執行前後回呼
BeforeTestExecutionCallback 和 AfterTestExecutionCallback 定義了 Extensions 的 API,這些擴展希望添加將在測試方法執行之前和之後立即執行的行為。因此,這些回呼非常適合用於計時、追蹤和類似的用例。如果您需要實作在 @BeforeEach 和 @AfterEach 方法周圍調用的回呼,請改為實作 BeforeEachCallback 和 AfterEachCallback。
以下範例顯示了如何使用這些回呼來計算和記錄測試方法的執行時間。TimingExtension 實作了 BeforeTestExecutionCallback 和 AfterTestExecutionCallback,以便計時和記錄測試執行。
import java.lang.reflect.Method;
import java.util.logging.Logger;

import org.junit.jupiter.api.extension.AfterTestExecutionCallback;
import org.junit.jupiter.api.extension.BeforeTestExecutionCallback;
import org.junit.jupiter.api.extension.ExtensionContext;
import org.junit.jupiter.api.extension.ExtensionContext.Namespace;
import org.junit.jupiter.api.extension.ExtensionContext.Store;

public class TimingExtension implements BeforeTestExecutionCallback, AfterTestExecutionCallback {

    private static final Logger logger = Logger.getLogger(TimingExtension.class.getName());

    private static final String START_TIME = "start time";

    @Override
    public void beforeTestExecution(ExtensionContext context) throws Exception {
        getStore(context).put(START_TIME, System.currentTimeMillis());
    }

    @Override
    public void afterTestExecution(ExtensionContext context) throws Exception {
        Method testMethod = context.getRequiredTestMethod();
        long startTime = getStore(context).remove(START_TIME, long.class);
        long duration = System.currentTimeMillis() - startTime;

        logger.info(() ->
            String.format("Method [%s] took %s ms.", testMethod.getName(), duration));
    }

    private Store getStore(ExtensionContext context) {
        return context.getStore(Namespace.create(getClass(), context.getRequiredTestMethod()));
    }

}
由於 TimingExtensionTests 類別通過 @ExtendWith 註冊了 TimingExtension,因此其測試在執行時將應用此計時。
@ExtendWith(TimingExtension.class)
class TimingExtensionTests {

    @Test
    void sleep20ms() throws Exception {
        Thread.sleep(20);
    }

    @Test
    void sleep50ms() throws Exception {
        Thread.sleep(50);
    }

}
以下是運行 TimingExtensionTests 時產生的日誌範例。
INFO: Method [sleep20ms] took 24 ms.
INFO: Method [sleep50ms] took 53 ms.
5.11. 異常處理
在測試執行期間拋出的異常可能會被攔截並相應地處理,然後再進一步傳播,以便可以在專門的 Extensions 中定義諸如錯誤記錄或資源釋放之類的操作。JUnit Jupiter 為希望通過 TestExecutionExceptionHandler 處理 @Test 方法期間拋出的異常的 Extensions,以及為那些在測試生命週期方法(@BeforeAll、@BeforeEach、@AfterEach 和 @AfterAll)期間拋出的異常的 Extensions 提供了 API,通過 LifecycleMethodExecutionExceptionHandler。
以下範例顯示了一個擴展,它將吞下所有 IOException 的實例,但會重新拋出任何其他類型的異常。
public class IgnoreIOExceptionExtension implements TestExecutionExceptionHandler {

    @Override
    public void handleTestExecutionException(ExtensionContext context, Throwable throwable)
            throws Throwable {

        if (throwable instanceof IOException) {
            return;
        }
        throw throwable;
    }
}
另一個範例顯示瞭如何在設定和清理期間在拋出意外異常的確切點記錄應用程式的狀態。請注意,與依賴於生命週期回呼(可能會或可能不會根據測試狀態執行)不同,此解決方案保證在 @BeforeAll、@BeforeEach、@AfterEach 或 @AfterAll 失敗後立即執行。
class RecordStateOnErrorExtension implements LifecycleMethodExecutionExceptionHandler {

    @Override
    public void handleBeforeAllMethodExecutionException(ExtensionContext context, Throwable ex)
            throws Throwable {
        memoryDumpForFurtherInvestigation("Failure recorded during class setup");
        throw ex;
    }

    @Override
    public void handleBeforeEachMethodExecutionException(ExtensionContext context, Throwable ex)
            throws Throwable {
        memoryDumpForFurtherInvestigation("Failure recorded during test setup");
        throw ex;
    }

    @Override
    public void handleAfterEachMethodExecutionException(ExtensionContext context, Throwable ex)
            throws Throwable {
        memoryDumpForFurtherInvestigation("Failure recorded during test cleanup");
        throw ex;
    }

    @Override
    public void handleAfterAllMethodExecutionException(ExtensionContext context, Throwable ex)
            throws Throwable {
        memoryDumpForFurtherInvestigation("Failure recorded during class cleanup");
        throw ex;
    }
}
可以按聲明順序為同一生命週期方法調用多個執行異常處理程序。如果其中一個處理程序吞下了處理的異常,則後續的處理程序將不會被執行,並且不會將故障傳播到 JUnit 引擎,就好像從未拋出異常一樣。處理程序也可以選擇重新拋出異常或拋出不同的異常,可能會包裝原始異常。
希望處理在 @BeforeAll 或 @AfterAll 期間拋出的異常的實作 LifecycleMethodExecutionExceptionHandler 的擴展需要在類別級別註冊,而 BeforeEach 和 AfterEach 的處理程序也可以為單個測試方法註冊。
// Register handlers for @Test, @BeforeEach, @AfterEach as well as @BeforeAll and @AfterAll
@ExtendWith(ThirdExecutedHandler.class)
class MultipleHandlersTestCase {

    // Register handlers for @Test, @BeforeEach, @AfterEach only
    @ExtendWith(SecondExecutedHandler.class)
    @ExtendWith(FirstExecutedHandler.class)
    @Test
    void testMethod() {
    }

}
5.12. 預先中斷回呼
PreInterruptCallback 定義了 Extensions 的 API,這些擴展希望在調用 Thread.interrupt() 之前對超時做出反應。
有關更多資訊,請參閱偵錯超時。
5.13. 攔截調用
InvocationInterceptor 定義了 Extensions 的 API,這些擴展希望攔截對測試程式碼的調用。
以下範例顯示了一個擴展,該擴展在 Swing 的事件派發線程中執行所有測試方法。
public class SwingEdtInterceptor implements InvocationInterceptor {

    @Override
    public void interceptTestMethod(Invocation<Void> invocation,
            ReflectiveInvocationContext<Method> invocationContext,
            ExtensionContext extensionContext) throws Throwable {

        AtomicReference<Throwable> throwable = new AtomicReference<>();

        SwingUtilities.invokeAndWait(() -> {
            try {
                invocation.proceed();
            }
            catch (Throwable t) {
                throwable.set(t);
            }
        });
        Throwable t = throwable.get();
        if (t != null) {
            throw t;
        }
    }
}|
存取測試範圍的
ExtensionContext您可以覆寫 |
5.14. 為測試模板提供調用上下文
只有在至少註冊一個 TestTemplateInvocationContextProvider 時,才能執行 @TestTemplate 方法。每個這樣的提供者都負責提供 TestTemplateInvocationContext 實例的 Stream。每個上下文都可以指定自訂顯示名稱和額外的擴展列表,這些擴展僅適用於下一次調用 @TestTemplate 方法。
以下範例顯示瞭如何編寫測試模板,以及如何註冊和實作 TestTemplateInvocationContextProvider。
final List<String> fruits = Arrays.asList("apple", "banana", "lemon");

@TestTemplate
@ExtendWith(MyTestTemplateInvocationContextProvider.class)
void testTemplate(String fruit) {
    assertTrue(fruits.contains(fruit));
}

public class MyTestTemplateInvocationContextProvider
        implements TestTemplateInvocationContextProvider {

    @Override
    public boolean supportsTestTemplate(ExtensionContext context) {
        return true;
    }

    @Override
    public Stream<TestTemplateInvocationContext> provideTestTemplateInvocationContexts(
            ExtensionContext context) {

        return Stream.of(invocationContext("apple"), invocationContext("banana"));
    }

    private TestTemplateInvocationContext invocationContext(String parameter) {
        return new TestTemplateInvocationContext() {
            @Override
            public String getDisplayName(int invocationIndex) {
                return parameter;
            }

            @Override
            public List<Extension> getAdditionalExtensions() {
                return Collections.singletonList(new ParameterResolver() {
                    @Override
                    public boolean supportsParameter(ParameterContext parameterContext,
                            ExtensionContext extensionContext) {
                        return parameterContext.getParameter().getType().equals(String.class);
                    }

                    @Override
                    public Object resolveParameter(ParameterContext parameterContext,
                            ExtensionContext extensionContext) {
                        return parameter;
                    }
                });
            }
        };
    }
}
在此範例中,測試範本將被調用兩次。調用的顯示名稱將為 apple 和 banana,如調用上下文所指定。每次調用都會註冊一個自訂的 ParameterResolver,用於解析方法參數。使用 ConsoleLauncher 時的輸出如下。
└─ testTemplate(String) ✔
   ├─ apple ✔
   └─ banana ✔
TestTemplateInvocationContextProvider 擴充功能 API 主要用於實作不同種類的測試,這些測試依賴於重複調用類似測試的方法,儘管在不同的上下文中 — 例如,使用不同的參數、以不同的方式準備測試類別實例,或多次調用但不修改上下文。請參考 重複測試 或 參數化測試 的實作,它們使用此擴充點來提供其功能。
5.15. 在擴充功能中保持狀態
通常,一個擴充功能只會實例化一次。因此,問題就變成:如何保持從一個擴充功能調用到下一個調用的狀態?ExtensionContext API 提供了一個 Store 正是為了這個目的。擴充功能可以將值放入 store 中以便稍後檢索。請參閱 TimingExtension,以查看將 Store 與方法級別範圍一起使用的範例。重要的是要記住,在測試執行期間儲存在 ExtensionContext 中的值將無法在周圍的 ExtensionContext 中使用。由於 ExtensionContexts 可能是巢狀的,因此內部上下文的範圍也可能受到限制。有關透過 Store 儲存和檢索值的可用方法的詳細資訊,請參閱相應的 Javadoc。
ExtensionContext.Store.CloseableResourceCloseableResource 的實例)都會收到通知,並以它們被加入的相反順序調用其 close() 方法。 |
下面顯示了 CloseableResource 的範例實作,使用 HttpServer 資源。
HttpServer 資源實作 CloseableResourceclass HttpServerResource implements CloseableResource {
private final HttpServer httpServer;
HttpServerResource(int port) throws IOException {
InetAddress loopbackAddress = InetAddress.getLoopbackAddress();
this.httpServer = HttpServer.create(new InetSocketAddress(loopbackAddress, port), 0);
}
HttpServer getHttpServer() {
return httpServer;
}
void start() {
// Example handler
httpServer.createContext("/example", exchange -> {
String body = "This is a test";
exchange.sendResponseHeaders(200, body.length());
try (OutputStream os = exchange.getResponseBody()) {
os.write(body.getBytes(UTF_8));
}
});
httpServer.setExecutor(null);
httpServer.start();
}
@Override
public void close() {
httpServer.stop(0);
}
}然後,此資源可以儲存在所需的 ExtensionContext 中。如果需要,它可以儲存在類別或方法級別,但這可能會為此類型的資源增加不必要的開銷。對於此範例,將其儲存在根級別並延遲實例化可能是明智之舉,以確保它在每次測試執行中僅創建一次,並在不同的測試類別和方法之間重複使用。
Store.getOrComputeIfAbsent 在根上下文中延遲儲存public class HttpServerExtension implements ParameterResolver {
@Override
public boolean supportsParameter(ParameterContext parameterContext, ExtensionContext extensionContext) {
return HttpServer.class.equals(parameterContext.getParameter().getType());
}
@Override
public Object resolveParameter(ParameterContext parameterContext, ExtensionContext extensionContext) {
ExtensionContext rootContext = extensionContext.getRoot();
ExtensionContext.Store store = rootContext.getStore(Namespace.GLOBAL);
String key = HttpServerResource.class.getName();
HttpServerResource resource = store.getOrComputeIfAbsent(key, __ -> {
try {
HttpServerResource serverResource = new HttpServerResource(0);
serverResource.start();
return serverResource;
}
catch (IOException e) {
throw new UncheckedIOException("Failed to create HttpServerResource", e);
}
}, HttpServerResource.class);
return resource.getHttpServer();
}
}HttpServerExtension 的測試案例@ExtendWith(HttpServerExtension.class)
public class HttpServerDemo {
@Test
void httpCall(HttpServer server) throws Exception {
String hostName = server.getAddress().getHostName();
int port = server.getAddress().getPort();
String rawUrl = String.format("http://%s:%d/example", hostName, port);
URL requestUrl = URI.create(rawUrl).toURL();
String responseBody = sendRequest(requestUrl);
assertEquals("This is a test", responseBody);
}
private static String sendRequest(URL url) throws IOException {
HttpURLConnection connection = (HttpURLConnection) url.openConnection();
int contentLength = connection.getContentLength();
try (InputStream response = url.openStream()) {
byte[] content = new byte[contentLength];
assertEquals(contentLength, response.read(content));
return new String(content, UTF_8);
}
}
}5.16. 擴充功能中支援的公用程式
junit-platform-commons 構件提供了維護的公用程式,用於處理註解、類別、反射、類別路徑掃描和轉換任務。這些公用程式可以在 org.junit.platform.commons.support 及其子套件中找到。建議 TestEngine 和 Extension 作者使用這些受支援的公用程式,以便與 JUnit Platform 和 JUnit Jupiter 的行為保持一致。
5.16.1. 註解支援
AnnotationSupport 提供了在註解元素(例如,套件、註解、類別、介面、建構子、方法和欄位)上運作的靜態公用方法。這些方法包括檢查元素是否使用特定註解或元註解進行註解、搜尋特定註解以及在類別或介面中尋找註解方法和欄位的方法。其中一些方法會在實作的介面和類別階層中搜尋以尋找註解。有關更多詳細資訊,請參閱 AnnotationSupport 的 Javadoc。
isAnnotated() 方法不會尋找可重複的註解。若要檢查可重複的註解,請使用 findRepeatableAnnotations() 方法之一,並驗證傳回的列表不是空的。 |
| 另請參閱:欄位與方法搜尋語意 |
5.16.2. 類別支援
ClassSupport 提供了用於處理類別(即 java.lang.Class 的實例)的靜態公用方法。有關更多詳細資訊,請參閱 ClassSupport 的 Javadoc。
5.16.3. 反射支援
ReflectionSupport 提供了增強標準 JDK 反射和類別載入機制的靜態公用方法。這些方法包括在類別路徑中搜尋符合指定述詞的類別、載入和建立類別的新實例,以及尋找和調用方法。其中一些方法會遍歷類別階層以尋找符合的方法。有關更多詳細資訊,請參閱 ReflectionSupport 的 Javadoc。
| 另請參閱:欄位與方法搜尋語意 |
5.16.4. 修飾符支援
ModifierSupport 提供了用於處理成員和類別修飾符的靜態公用方法 — 例如,判斷成員是否宣告為 public、private、abstract、static 等。有關更多詳細資訊,請參閱 ModifierSupport 的 Javadoc。
5.16.5. 轉換支援
ConversionSupport(在 org.junit.platform.commons.support.conversion 套件中)提供了將字串轉換為原始類型及其對應的封裝類型、來自 java.time 套件的日期和時間類型,以及一些額外的常見 Java 類型(例如 File、BigDecimal、BigInteger、Currency、Locale、URI、URL、UUID 等)的支援。有關更多詳細資訊,請參閱 ConversionSupport 的 Javadoc。
5.16.6. 欄位和方法搜尋語義
AnnotationSupport 和 ReflectionSupport 中的各種方法使用搜尋演算法,這些演算法會遍歷類型階層以尋找符合的欄位和方法 – 例如,AnnotationSupport.findAnnotatedFields(…)、ReflectionSupport.findMethods(…) 等。
從 JUnit 5.11 (JUnit Platform 1.11) 開始,欄位和方法搜尋演算法遵循標準 Java 語義,關於根據 Java 語言的規則,給定的欄位或方法是否可見或被覆寫。
在 JUnit 5.11 之前,欄位和方法搜尋演算法應用了我們現在稱為「舊版語義」的方法。舊版語義認為欄位和方法被超類型(超類別或介面)中的欄位和方法隱藏、遮蔽或取代,僅基於欄位的名稱或方法的簽名,而忽略了 Java 語言語義中關於可見性的實際規則以及判斷一個方法是否覆寫另一個方法的規則。
儘管 JUnit 團隊建議使用標準搜尋語義,但開發人員可以選擇透過 junit.platform.reflection.search.useLegacySemantics JVM 系統屬性還原為舊版語義。
例如,若要為欄位和方法啟用舊版搜尋語義,您可以使用以下系統屬性啟動 JVM。
-Djunit.platform.reflection.search.useLegacySemantics=true
由於此功能的底層性質,junit.platform.reflection.search.useLegacySemantics 標誌只能透過 JVM 系統屬性設定。它無法透過 組態參數 設定。 |
5.17. 使用者程式碼和擴充功能的相對執行順序
當執行包含一個或多個測試方法的測試類別時,除了使用者提供的測試和生命週期方法之外,還會調用許多擴充功能回呼。
| 另請參閱:測試執行順序 |
5.17.1. 使用者和擴充功能程式碼
下圖說明了使用者提供的程式碼和擴充功能程式碼的相對順序。使用者提供的測試和生命週期方法以橘色顯示,而擴充功能實作的回呼程式碼以藍色顯示。灰色框表示單個測試方法的執行,並且將針對測試類別中的每個測試方法重複執行。
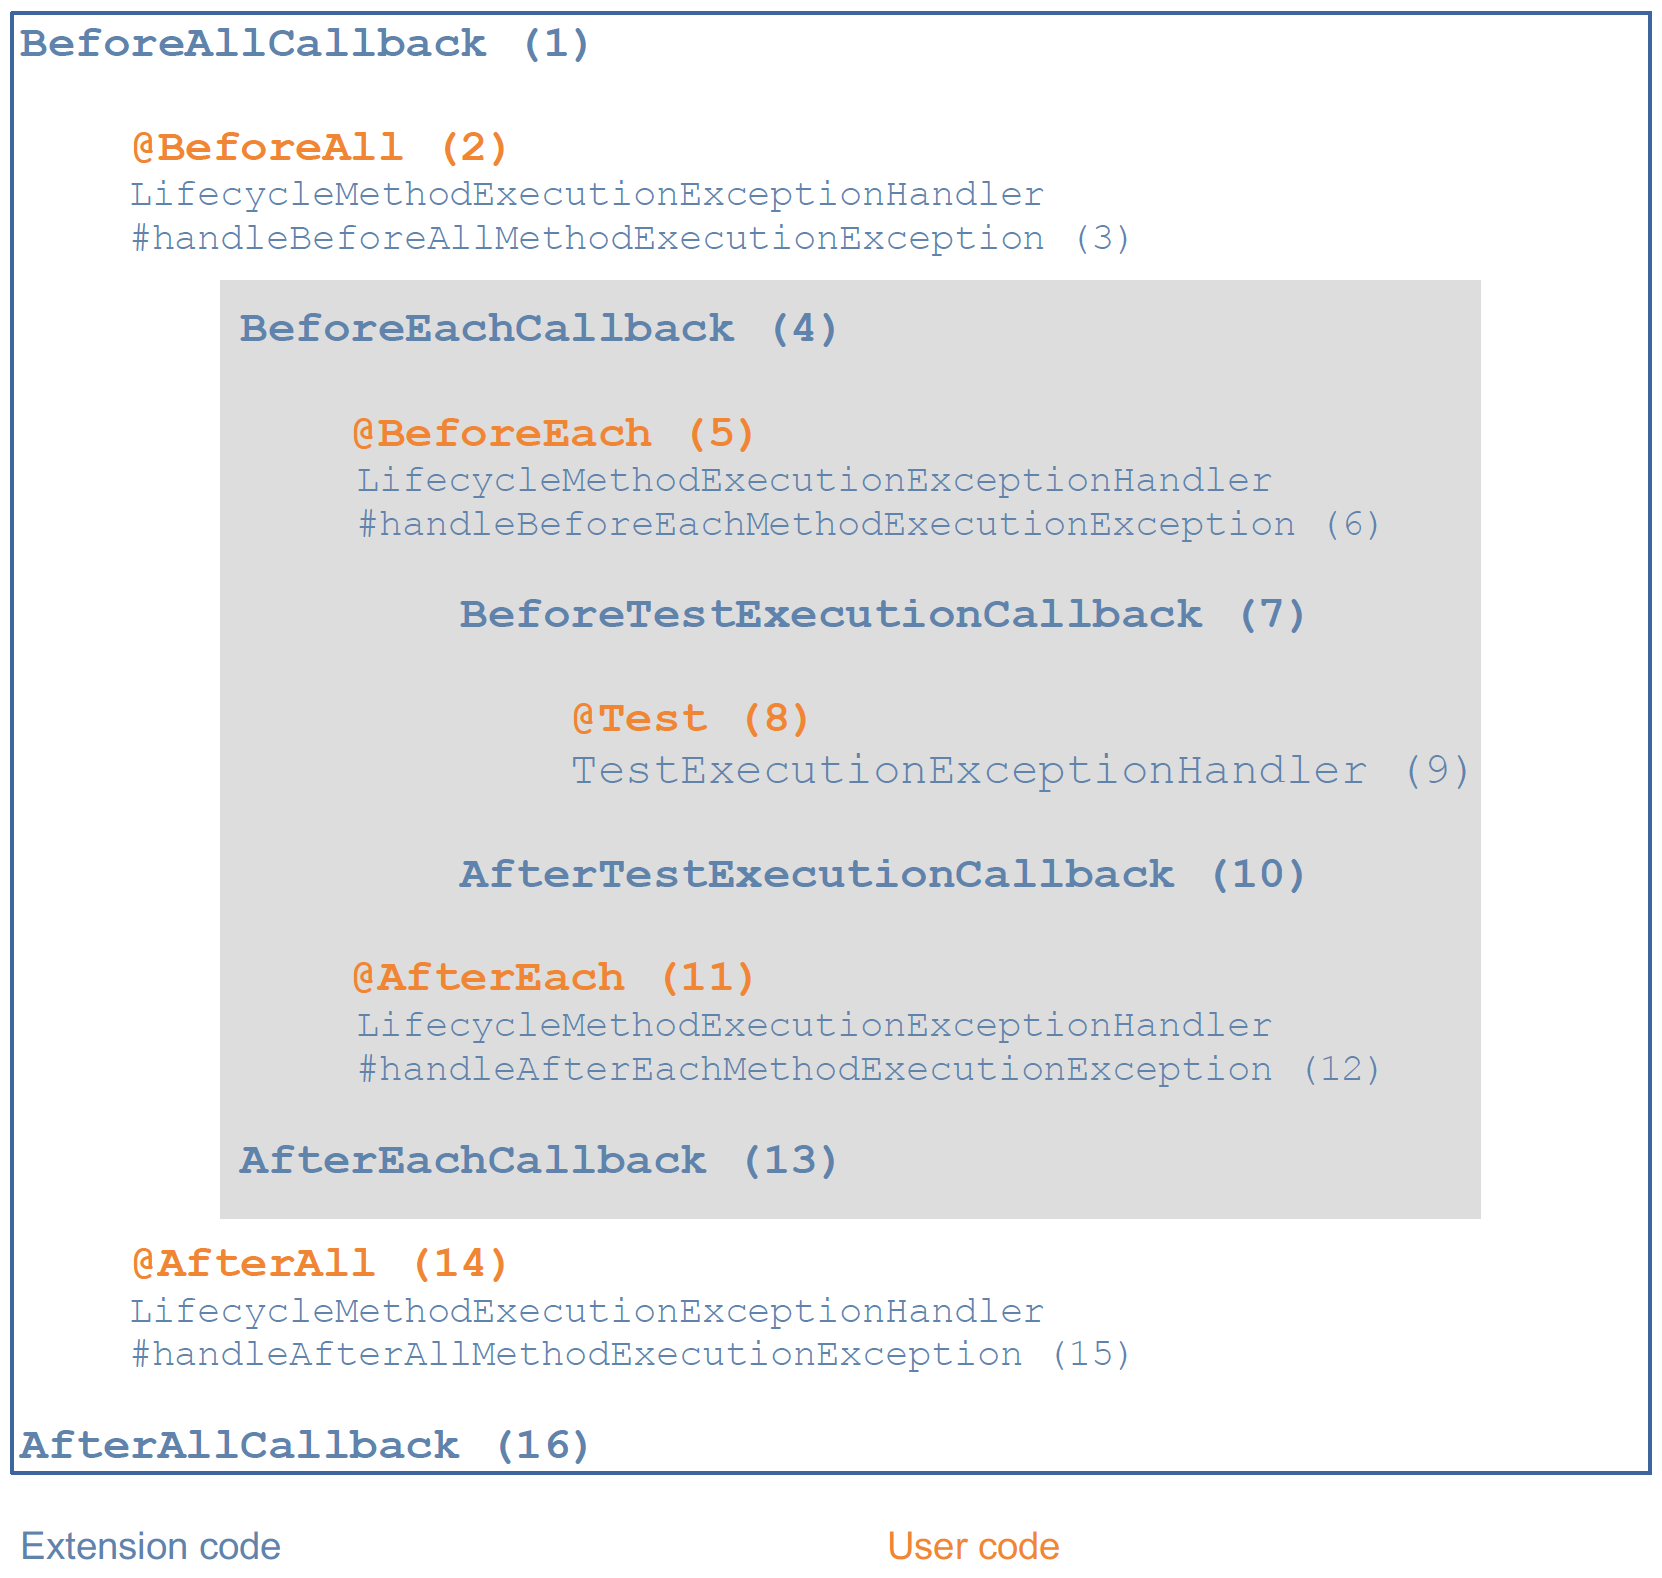
下表進一步解釋了使用者程式碼和擴充功能程式碼圖中的十六個步驟。
| 步驟 | 介面/註解 | 描述 |
|---|---|---|
1 |
介面 |
在執行容器的所有測試之前執行的擴充功能程式碼 |
2 |
註解 |
在執行容器的所有測試之前執行的使用者程式碼 |
3 |
介面 |
用於處理從 |
4 |
介面 |
在執行每個測試之前執行的擴充功能程式碼 |
5 |
註解 |
在執行每個測試之前執行的使用者程式碼 |
6 |
介面 |
用於處理從 |
7 |
介面 |
在執行測試之前立即執行的擴充功能程式碼 |
8 |
註解 |
實際測試方法的使用者程式碼 |
9 |
介面 |
用於處理測試期間拋出的異常的擴充功能程式碼 |
10 |
介面 |
在測試執行及其對應的異常處理程序之後立即執行的擴充功能程式碼 |
11 |
註解 |
在執行每個測試之後執行的使用者程式碼 |
12 |
介面 |
用於處理從 |
13 |
介面 |
在執行每個測試之後執行的擴充功能程式碼 |
14 |
註解 |
在執行容器的所有測試之後執行的使用者程式碼 |
15 |
介面 |
用於處理從 |
16 |
介面 |
在執行容器的所有測試之後執行的擴充功能程式碼 |
在最簡單的情況下,只會執行實際的測試方法(步驟 8);所有其他步驟都是可選的,具體取決於使用者程式碼或擴充功能是否支援相應的生命週期回呼。有關各種生命週期回呼的更多詳細資訊,請參閱每個註解和擴充功能的相應 Javadoc。
上表中使用者程式碼方法的所有調用都可以透過實作 InvocationInterceptor 進行額外攔截。
5.17.2. 回呼的包裝行為
JUnit Jupiter 始終保證針對實作生命週期回呼(例如 BeforeAllCallback、AfterAllCallback、BeforeEachCallback、AfterEachCallback、BeforeTestExecutionCallback 和 AfterTestExecutionCallback)的多個已註冊擴充功能具有包裝行為。
這表示,給定兩個擴充功能 Extension1 和 Extension2,其中 Extension1 在 Extension2 之前註冊,Extension1 實作的任何「before」回呼保證在 Extension2 實作的任何「before」回呼之前執行。同樣地,給定以相同順序註冊的相同兩個擴充功能,Extension1 實作的任何「after」回呼保證在 Extension2 實作的任何「after」回呼之後執行。因此,Extension1 被稱為包裝 Extension2。
JUnit Jupiter 也保證在類別和介面階層中,針對使用者提供的生命週期方法(請參閱定義)具有包裝行為。
-
@BeforeAll方法從超類別繼承,只要它們未被覆寫。此外,超類別中的@BeforeAll方法將在子類別中的@BeforeAll方法之前執行。-
同樣地,在介面中宣告的
@BeforeAll方法會被繼承,只要它們未被覆寫,並且來自介面的@BeforeAll方法將在實作該介面的類別中的@BeforeAll方法之前執行。
-
-
@AfterAll方法從超類別繼承,只要它們未被覆寫。此外,超類別中的@AfterAll方法將在子類別中的@AfterAll方法之後執行。-
同樣地,在介面中宣告的
@AfterAll方法會被繼承,只要它們未被覆寫,並且來自介面的@AfterAll方法將在實作該介面的類別中的@AfterAll方法之後執行。
-
-
@BeforeEach方法從超類別繼承,只要它們未被覆寫。此外,超類別中的@BeforeEach方法將在子類別中的@BeforeEach方法之前執行。-
同樣地,宣告為介面預設方法的
@BeforeEach方法會被繼承,只要它們未被覆寫,並且來自介面的@BeforeEach預設方法將在實作該介面的類別中的@BeforeEach方法之前執行。
-
-
@AfterEach方法從超類別繼承,只要它們未被覆寫。此外,超類別中的@AfterEach方法將在子類別中的@AfterEach方法之後執行。-
同樣地,宣告為介面預設方法的
@AfterEach方法會被繼承,只要它們未被覆寫,並且來自介面的@AfterEach預設方法將在實作該介面的類別中的@AfterEach方法之後執行。
-
以下範例示範了此行為。請注意,這些範例實際上並未執行任何實際操作。相反地,它們模擬了測試與資料庫互動的常見情境。所有從 Logger 類別靜態導入的方法都會記錄上下文資訊,以便幫助我們更好地了解使用者提供的回呼方法和擴充功能中的回呼方法的執行順序。
import static example.callbacks.Logger.afterEachCallback;
import static example.callbacks.Logger.beforeEachCallback;

import org.junit.jupiter.api.extension.AfterEachCallback;
import org.junit.jupiter.api.extension.BeforeEachCallback;
import org.junit.jupiter.api.extension.ExtensionContext;

public class Extension1 implements BeforeEachCallback, AfterEachCallback {

    @Override
    public void beforeEach(ExtensionContext context) {
        beforeEachCallback(this);
    }

    @Override
    public void afterEach(ExtensionContext context) {
        afterEachCallback(this);
    }

}import static example.callbacks.Logger.afterEachCallback;
import static example.callbacks.Logger.beforeEachCallback;
import org.junit.jupiter.api.extension.AfterEachCallback;
import org.junit.jupiter.api.extension.BeforeEachCallback;
import org.junit.jupiter.api.extension.ExtensionContext;
public class Extension2 implements BeforeEachCallback, AfterEachCallback {
@Override
public void beforeEach(ExtensionContext context) {
beforeEachCallback(this);
}
@Override
public void afterEach(ExtensionContext context) {
afterEachCallback(this);
}
}import static example.callbacks.Logger.afterAllMethod;
import static example.callbacks.Logger.afterEachMethod;
import static example.callbacks.Logger.beforeAllMethod;
import static example.callbacks.Logger.beforeEachMethod;
import org.junit.jupiter.api.AfterAll;
import org.junit.jupiter.api.AfterEach;
import org.junit.jupiter.api.BeforeAll;
import org.junit.jupiter.api.BeforeEach;
/**
* Abstract base class for tests that use the database.
*/
abstract class AbstractDatabaseTests {
@BeforeAll
static void createDatabase() {
beforeAllMethod(AbstractDatabaseTests.class.getSimpleName() + ".createDatabase()");
}
@BeforeEach
void connectToDatabase() {
beforeEachMethod(AbstractDatabaseTests.class.getSimpleName() + ".connectToDatabase()");
}
@AfterEach
void disconnectFromDatabase() {
afterEachMethod(AbstractDatabaseTests.class.getSimpleName() + ".disconnectFromDatabase()");
}
@AfterAll
static void destroyDatabase() {
afterAllMethod(AbstractDatabaseTests.class.getSimpleName() + ".destroyDatabase()");
}
}import static example.callbacks.Logger.afterEachMethod;
import static example.callbacks.Logger.beforeAllMethod;
import static example.callbacks.Logger.beforeEachMethod;
import static example.callbacks.Logger.testMethod;
import org.junit.jupiter.api.AfterAll;
import org.junit.jupiter.api.AfterEach;
import org.junit.jupiter.api.BeforeAll;
import org.junit.jupiter.api.BeforeEach;
import org.junit.jupiter.api.Test;
import org.junit.jupiter.api.extension.ExtendWith;
/**
* Extension of {@link AbstractDatabaseTests} that inserts test data
* into the database (after the database connection has been opened)
* and deletes test data (before the database connection is closed).
*/
@ExtendWith({ Extension1.class, Extension2.class })
class DatabaseTestsDemo extends AbstractDatabaseTests {
@BeforeAll
static void beforeAll() {
beforeAllMethod(DatabaseTestsDemo.class.getSimpleName() + ".beforeAll()");
}
@BeforeEach
void insertTestDataIntoDatabase() {
beforeEachMethod(getClass().getSimpleName() + ".insertTestDataIntoDatabase()");
}
@Test
void testDatabaseFunctionality() {
testMethod(getClass().getSimpleName() + ".testDatabaseFunctionality()");
}
@AfterEach
void deleteTestDataFromDatabase() {
afterEachMethod(getClass().getSimpleName() + ".deleteTestDataFromDatabase()");
}
@AfterAll
static void afterAll() {
beforeAllMethod(DatabaseTestsDemo.class.getSimpleName() + ".afterAll()");
}
}當執行 DatabaseTestsDemo 測試類別時,會記錄以下內容。
@BeforeAll AbstractDatabaseTests.createDatabase()
@BeforeAll DatabaseTestsDemo.beforeAll()
  Extension1.beforeEach()
  Extension2.beforeEach()
    @BeforeEach AbstractDatabaseTests.connectToDatabase()
    @BeforeEach DatabaseTestsDemo.insertTestDataIntoDatabase()
      @Test DatabaseTestsDemo.testDatabaseFunctionality()
    @AfterEach DatabaseTestsDemo.deleteTestDataFromDatabase()
    @AfterEach AbstractDatabaseTests.disconnectFromDatabase()
  Extension2.afterEach()
  Extension1.afterEach()
@BeforeAll DatabaseTestsDemo.afterAll()
@AfterAll AbstractDatabaseTests.destroyDatabase()
以下循序圖有助於進一步闡明在執行 DatabaseTestsDemo 測試類別時,JupiterTestEngine 內部實際發生的情況。
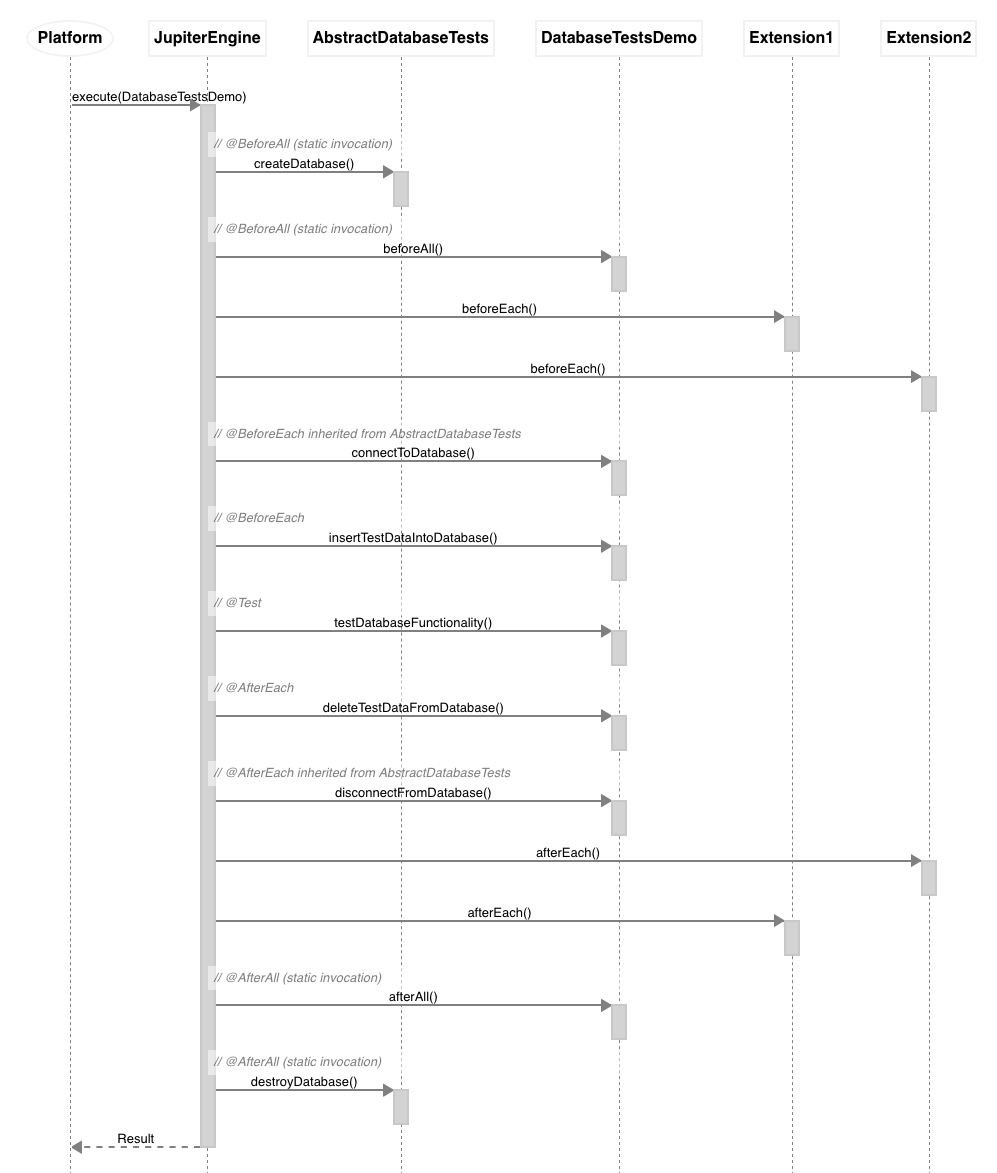
JUnit Jupiter 不保證在單個測試類別或測試介面中宣告的多個生命週期方法的執行順序。有時可能看起來 JUnit Jupiter 以字母順序調用這些方法。但是,這並不完全正確。排序方式類似於單個測試類別中 @Test 方法的排序方式。
|
在單一測試類別或測試介面中宣告的生命週期方法,將使用一種演算法排序,該演算法是確定性的,但刻意不明顯。這確保了測試套件的後續執行以相同的順序執行生命週期方法,從而允許可重複的建置。 |
此外,JUnit Jupiter不支援在單一測試類別或測試介面中宣告的多個生命週期方法的包裝行為。
以下範例示範了此行為。具體而言,由於在本機宣告的生命週期方法執行的順序,生命週期方法配置是損壞的。
-
測試資料在資料庫連線開啟之前插入,這導致連線到資料庫失敗。
-
資料庫連線在刪除測試資料之前關閉,這導致連線到資料庫失敗。
import static example.callbacks.Logger.afterEachMethod;
import static example.callbacks.Logger.beforeEachMethod;
import static example.callbacks.Logger.testMethod;

import org.junit.jupiter.api.AfterEach;
import org.junit.jupiter.api.BeforeEach;
import org.junit.jupiter.api.Test;
import org.junit.jupiter.api.extension.ExtendWith;

/**
 * Example of "broken" lifecycle method configuration.
 *
 * <p>Test data is inserted before the database connection has been opened.
 *
 * <p>Database connection is closed before deleting test data.
 */
@ExtendWith({ Extension1.class, Extension2.class })
class BrokenLifecycleMethodConfigDemo {

    @BeforeEach
    void connectToDatabase() {
        beforeEachMethod(getClass().getSimpleName() + ".connectToDatabase()");
    }

    @BeforeEach
    void insertTestDataIntoDatabase() {
        beforeEachMethod(getClass().getSimpleName() + ".insertTestDataIntoDatabase()");
    }

    @Test
    void testDatabaseFunctionality() {
        testMethod(getClass().getSimpleName() + ".testDatabaseFunctionality()");
    }

    @AfterEach
    void deleteTestDataFromDatabase() {
        afterEachMethod(getClass().getSimpleName() + ".deleteTestDataFromDatabase()");
    }

    @AfterEach
    void disconnectFromDatabase() {
        afterEachMethod(getClass().getSimpleName() + ".disconnectFromDatabase()");
    }

}
當執行 BrokenLifecycleMethodConfigDemo 測試類別時,會記錄以下內容。
Extension1.beforeEach()
Extension2.beforeEach()
  @BeforeEach BrokenLifecycleMethodConfigDemo.insertTestDataIntoDatabase()
  @BeforeEach BrokenLifecycleMethodConfigDemo.connectToDatabase()
    @Test BrokenLifecycleMethodConfigDemo.testDatabaseFunctionality()
  @AfterEach BrokenLifecycleMethodConfigDemo.disconnectFromDatabase()
  @AfterEach BrokenLifecycleMethodConfigDemo.deleteTestDataFromDatabase()
Extension2.afterEach()
Extension1.afterEach()
以下序列圖有助於進一步闡明當執行 BrokenLifecycleMethodConfigDemo 測試類別時,JupiterTestEngine 內實際發生的情況。
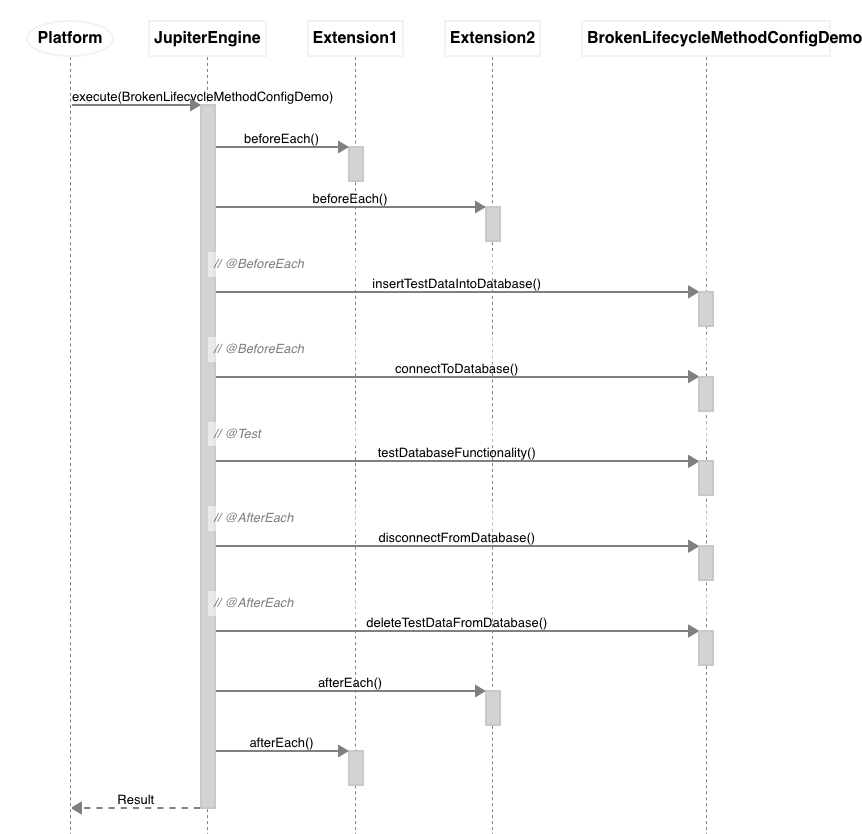
|
由於上述行為,JUnit 團隊建議開發人員在每個測試類別或測試介面中,最多宣告每種類型的生命週期方法各一個(請參閱定義),除非這些生命週期方法之間沒有相依性。 |
6. 進階主題
6.1. JUnit Platform 報告
junit-platform-reporting 構件包含 TestExecutionListener 實作,它們以兩種風格產生 XML 測試報告:開放測試報告和舊版。
該模組還包含其他 TestExecutionListener 實作,可用於建置自訂報告。有關詳細資訊,請參閱使用監聽器和攔截器。 |
6.1.1. 輸出目錄
JUnit Platform 透過 OutputDirectoryProvider、EngineDiscoveryRequest 和 TestPlan,分別為已註冊的測試引擎和監聽器提供 OutputDirectoryProvider。其根目錄可以透過以下組態參數進行配置
junit.platform.reporting.output.dir=<路徑>-
配置報告的輸出目錄。預設情況下,如果找到 Gradle 建置腳本,則使用
build,如果找到 Maven POM,則使用target;否則,使用目前的工作目錄。
若要為每次測試執行建立唯一的輸出目錄,您可以使用路徑中的 {uniqueNumber} 佔位符。例如,reports/junit-{uniqueNumber} 將建立類似 reports/junit-8803697269315188212 的目錄。當使用 Gradle 或 Maven 的平行執行功能(會建立多個同時運行的 JVM 分支)時,這可能很有用。
6.1.2. 開放測試報告
OpenTestReportGeneratingListener 以 開放測試報告指定的事件基礎格式,為整個執行過程寫入 XML 報告,該格式支援 JUnit Platform 的所有功能,例如階層式測試結構、顯示名稱、標籤等。
監聽器是自動註冊的,可以透過以下組態參數進行配置
junit.platform.reporting.open.xml.enabled=true|false-
啟用/停用寫入報告。
如果啟用,監聽器會在已配置的輸出目錄中建立一個名為 open-test-report.xml 的 XML 報告檔案。
如果啟用輸出捕獲,則寫入 System.out 和 System.err 的捕獲輸出也將包含在報告中。
| 開放測試報告 CLI 工具可用於將事件基礎格式轉換為更易於人類閱讀的階層式格式。 |
Gradle
對於 Gradle,可以透過系統屬性啟用和配置寫入與開放測試報告相容的 XML 報告。以下範例將其輸出目錄配置為與 Gradle 用於其自身 XML 報告的目錄相同。CommandLineArgumentProvider 用於保持任務在不同機器之間可重新定位,這在使用 Gradle 的建置快取時非常重要。
dependencies {
    testRuntimeOnly("org.junit.platform:junit-platform-reporting:1.12.0")
}
tasks.withType(Test).configureEach {
    def outputDir = reports.junitXml.outputLocation
    jvmArgumentProviders << ({
        [
            "-Djunit.platform.reporting.open.xml.enabled=true",
            "-Djunit.platform.reporting.output.dir=${outputDir.get().asFile.absolutePath}"
        ]
    } as CommandLineArgumentProvider)
}dependencies {
testRuntimeOnly("org.junit.platform:junit-platform-reporting:1.12.0")
}
tasks.withType<Test>().configureEach {
val outputDir = reports.junitXml.outputLocation
jvmArgumentProviders += CommandLineArgumentProvider {
listOf(
"-Djunit.platform.reporting.open.xml.enabled=true",
"-Djunit.platform.reporting.output.dir=${outputDir.get().asFile.absolutePath}"
)
}
}Maven
對於 Maven Surefire/Failsafe,您可以啟用開放測試報告輸出,並將產生的 XML 檔案配置為寫入與 Surefire/Failsafe 用於其自身 XML 報告的目錄相同的目錄,如下所示
<project>
    <!-- ... -->
    <dependencies>
        <dependency>
            <groupId>org.junit.platform</groupId>
            <artifactId>junit-platform-reporting</artifactId>
            <version>1.12.0</version>
            <scope>test</scope>
        </dependency>
    </dependencies>
    <build>
        <plugins>
            <plugin>
                <artifactId>maven-surefire-plugin</artifactId>
                <version>3.5.2</version>
                <configuration>
                    <properties>
                        <configurationParameters>
                            junit.platform.reporting.open.xml.enabled = true
                            junit.platform.reporting.output.dir = target/surefire-reports
                        </configurationParameters>
                    </properties>
                </configuration>
            </plugin>
        </plugins>
    </build>
    <!-- ... -->
</project>
Console Launcher
當使用 Console Launcher 時,您可以透過 --config 設定組態參數來啟用開放測試報告輸出
$ java -jar junit-platform-console-standalone-1.12.0.jar <OPTIONS> \
  --config=junit.platform.reporting.open.xml.enabled=true \
  --config=junit.platform.reporting.output.dir=reports
組態參數也可以在自訂屬性檔案中設定,該檔案作為類別路徑資源透過 --config-resource 選項提供
$ java -jar junit-platform-console-standalone-1.12.0.jar <OPTIONS> \
  --config-resource=configuration.properties
6.1.3. 舊版 XML 格式
LegacyXmlReportGeneratingListener 為 TestPlan 中的每個根目錄產生一個單獨的 XML 報告。請注意,產生的 XML 格式與基於 JUnit 4 的測試報告的事實標準相容,該標準由 Ant 建置系統普及。
LegacyXmlReportGeneratingListener 也被 Console Launcher 使用。
6.2. JUnit Platform Suite Engine
JUnit Platform 支援從使用 JUnit Platform 的任何測試引擎,宣告式地定義和執行測試套件。
6.2.1. 設定
除了 junit-platform-suite-api 和 junit-platform-suite-engine 構件之外,您還需要在類別路徑上至少一個其他測試引擎及其相依性。有關群組 ID、構件 ID 和版本的詳細資訊,請參閱相依性元數據。
6.2.2. @Suite 範例
透過使用 @Suite 註解類別,它在 JUnit Platform 上被標記為測試套件。如下列範例所示,然後可以使用選取器和篩選器註解來控制套件的內容。
import org.junit.platform.suite.api.IncludeClassNamePatterns;
import org.junit.platform.suite.api.SelectPackages;
import org.junit.platform.suite.api.Suite;
import org.junit.platform.suite.api.SuiteDisplayName;

@Suite
@SuiteDisplayName("JUnit Platform Suite Demo")
@SelectPackages("example")
@IncludeClassNamePatterns(".*Tests")
class SuiteDemo {
}|
其他組態選項 測試套件中有許多用於發現和篩選測試的組態選項。請查閱 org.junit.platform.suite.api 套件的 Javadoc,以取得支援的註解和更多詳細資訊的完整列表。 |
6.2.3. @BeforeSuite 和 @AfterSuite
@BeforeSuite 和 @AfterSuite 註解可以用在 @Suite 註解類別中的方法上。它們將分別在測試套件的所有測試之前和之後執行。
@Suite
@SelectPackages("example")
class BeforeAndAfterSuiteDemo {

    @BeforeSuite
    static void beforeSuite() {
        // executes before the test suite
    }

    @AfterSuite
    static void afterSuite() {
        // executes after the test suite
    }

}
6.3. JUnit Platform Test Kit
junit-platform-testkit 構件提供在 JUnit Platform 上執行測試計畫並驗證預期結果的支援。從 JUnit Platform 1.12.0 開始,此支援僅限於單個 TestEngine 的執行(請參閱引擎測試套件)。
6.3.1. 引擎測試套件
org.junit.platform.testkit.engine 套件提供支援,用於執行給定 TestEngine 的 TestPlan,該 TestEngine 在 JUnit Platform 上運行,然後透過流暢的 API 存取結果以驗證預期結果。此 API 的主要進入點是 EngineTestKit,它提供名為 engine() 和 execute() 的靜態工廠方法。建議您選擇其中一個 engine() 變體,以受益於用於建置 LauncherDiscoveryRequest 的流暢 API。
如果您更喜歡使用 Launcher API 中的 LauncherDiscoveryRequestBuilder 來建置您的 LauncherDiscoveryRequest,則必須使用 EngineTestKit 中的其中一個 execute() 變體。 |
以下使用 JUnit Jupiter 撰寫的測試類別將在後續範例中使用。
import static org.junit.jupiter.api.Assertions.assertEquals;
import static org.junit.jupiter.api.Assumptions.assumeTrue;
import example.util.Calculator;
import org.junit.jupiter.api.Disabled;
import org.junit.jupiter.api.MethodOrderer.OrderAnnotation;
import org.junit.jupiter.api.Order;
import org.junit.jupiter.api.Test;
import org.junit.jupiter.api.TestMethodOrder;
@TestMethodOrder(OrderAnnotation.class)
public class ExampleTestCase {
private final Calculator calculator = new Calculator();
@Test
@Disabled("for demonstration purposes")
@Order(1)
void skippedTest() {
// skipped ...
}
@Test
@Order(2)
void succeedingTest() {
assertEquals(42, calculator.multiply(6, 7));
}
@Test
@Order(3)
void abortedTest() {
assumeTrue("abc".contains("Z"), "abc does not contain Z");
// aborted ...
}
@Test
@Order(4)
void failingTest() {
// The following throws an ArithmeticException: "/ by zero"
calculator.divide(1, 0);
}
}為了簡潔起見,以下章節示範如何測試 JUnit 自己的 JupiterTestEngine,其唯一的引擎 ID 為 "junit-jupiter"。如果您想測試自己的 TestEngine 實作,則需要使用其唯一的引擎 ID。或者,您可以透過將其執行個體提供給 EngineTestKit.engine(TestEngine) 靜態工廠方法來測試自己的 TestEngine。
6.3.2. 斷言統計資訊
Test Kit 最常見的功能之一是能夠針對 TestPlan 執行期間觸發的事件斷言統計資訊。以下測試示範如何在 JUnit Jupiter TestEngine 中針對容器和測試斷言統計資訊。有關可用統計資訊的詳細資訊,請查閱 EventStatistics 的 Javadoc。
import static org.junit.platform.engine.discovery.DiscoverySelectors.selectClass;
import example.ExampleTestCase;
import org.junit.jupiter.api.Test;
import org.junit.platform.testkit.engine.EngineTestKit;
class EngineTestKitStatisticsDemo {
@Test
void verifyJupiterContainerStats() {
EngineTestKit
.engine("junit-jupiter") (1)
.selectors(selectClass(ExampleTestCase.class)) (2)
.execute() (3)
.containerEvents() (4)
.assertStatistics(stats -> stats.started(2).succeeded(2)); (5)
}
@Test
void verifyJupiterTestStats() {
EngineTestKit
.engine("junit-jupiter") (1)
.selectors(selectClass(ExampleTestCase.class)) (2)
.execute() (3)
.testEvents() (6)
.assertStatistics(stats ->
stats.skipped(1).started(3).succeeded(1).aborted(1).failed(1)); (7)
}
}| 1 | 選取 JUnit Jupiter TestEngine。 |
| 2 | 選取 ExampleTestCase 測試類別。 |
| 3 | 執行 TestPlan。 |
| 4 | 依容器事件篩選。 |
| 5 | 斷言容器事件的統計資訊。 |
| 6 | 依測試事件篩選。 |
| 7 | 斷言測試事件的統計資訊。 |
在 verifyJupiterContainerStats() 測試方法中,started 和 succeeded 統計資訊的計數為 2,因為 JupiterTestEngine 和 ExampleTestCase 類別都被視為容器。 |
6.3.3. 斷言事件
例如,如果您想驗證 ExampleTestCase 中的 skippedTest() 方法被跳過的原因,您可以執行以下操作。
|
以下範例中的 有關可用於針對事件進行 AssertJ 斷言的條件的詳細資訊,請查閱 |
import static org.junit.platform.engine.discovery.DiscoverySelectors.selectMethod;
import static org.junit.platform.testkit.engine.EventConditions.event;
import static org.junit.platform.testkit.engine.EventConditions.skippedWithReason;
import static org.junit.platform.testkit.engine.EventConditions.test;
import example.ExampleTestCase;
import org.junit.jupiter.api.Test;
import org.junit.platform.testkit.engine.EngineTestKit;
import org.junit.platform.testkit.engine.Events;
class EngineTestKitSkippedMethodDemo {
@Test
void verifyJupiterMethodWasSkipped() {
String methodName = "skippedTest";
Events testEvents = EngineTestKit (5)
.engine("junit-jupiter") (1)
.selectors(selectMethod(ExampleTestCase.class, methodName)) (2)
.execute() (3)
.testEvents(); (4)
testEvents.assertStatistics(stats -> stats.skipped(1)); (6)
testEvents.assertThatEvents() (7)
.haveExactly(1, event(test(methodName),
skippedWithReason("for demonstration purposes")));
}
}| 1 | 選取 JUnit Jupiter TestEngine。 |
| 2 | 選取 ExampleTestCase 測試類別中的 skippedTest() 方法。 |
| 3 | 執行 TestPlan。 |
| 4 | 依測試事件篩選。 |
| 5 | 將測試 Events 儲存到本機變數。 |
| 6 | 選擇性地斷言預期的統計資訊。 |
| 7 | 斷言記錄的測試事件正好包含一個名為 skippedTest 的跳過測試,其原因為 "for demonstration purposes"。 |
如果您想驗證 ExampleTestCase 中的 failingTest() 方法拋出的異常類型,您可以執行以下操作。
|
有關可用於針對事件和執行結果進行 AssertJ 斷言的條件的詳細資訊,請分別查閱 |
import static org.junit.platform.engine.discovery.DiscoverySelectors.selectClass;
import static org.junit.platform.testkit.engine.EventConditions.event;
import static org.junit.platform.testkit.engine.EventConditions.finishedWithFailure;
import static org.junit.platform.testkit.engine.EventConditions.test;
import static org.junit.platform.testkit.engine.TestExecutionResultConditions.instanceOf;
import static org.junit.platform.testkit.engine.TestExecutionResultConditions.message;
import example.ExampleTestCase;
import org.junit.jupiter.api.Test;
import org.junit.platform.testkit.engine.EngineTestKit;
class EngineTestKitFailedMethodDemo {
@Test
void verifyJupiterMethodFailed() {
EngineTestKit.engine("junit-jupiter") (1)
.selectors(selectClass(ExampleTestCase.class)) (2)
.execute() (3)
.testEvents() (4)
.assertThatEvents().haveExactly(1, (5)
event(test("failingTest"),
finishedWithFailure(
instanceOf(ArithmeticException.class), message(it -> it.endsWith("by zero")))));
}
}| 1 | 選取 JUnit Jupiter TestEngine。 |
| 2 | 選取 ExampleTestCase 測試類別。 |
| 3 | 執行 TestPlan。 |
| 4 | 依測試事件篩選。 |
| 5 | 斷言記錄的測試事件正好包含一個名為 failingTest 的失敗測試,其異常類型為 ArithmeticException,錯誤訊息以 "/ by zero" 結尾。 |
雖然通常不必要,但有時您需要驗證在 TestPlan 執行期間觸發的所有事件。以下測試示範如何透過 EngineTestKit API 中的 assertEventsMatchExactly() 方法實現此目的。
|
由於 |
如果您想部分比對,無論是否有排序要求,您都可以分別使用方法 assertEventsMatchLooselyInOrder() 和 assertEventsMatchLoosely()。
import static org.junit.platform.engine.discovery.DiscoverySelectors.selectClass;
import static org.junit.platform.testkit.engine.EventConditions.abortedWithReason;
import static org.junit.platform.testkit.engine.EventConditions.container;
import static org.junit.platform.testkit.engine.EventConditions.engine;
import static org.junit.platform.testkit.engine.EventConditions.event;
import static org.junit.platform.testkit.engine.EventConditions.finishedSuccessfully;
import static org.junit.platform.testkit.engine.EventConditions.finishedWithFailure;
import static org.junit.platform.testkit.engine.EventConditions.skippedWithReason;
import static org.junit.platform.testkit.engine.EventConditions.started;
import static org.junit.platform.testkit.engine.EventConditions.test;
import static org.junit.platform.testkit.engine.TestExecutionResultConditions.instanceOf;
import static org.junit.platform.testkit.engine.TestExecutionResultConditions.message;
import java.io.StringWriter;
import java.io.Writer;
import example.ExampleTestCase;
import org.junit.jupiter.api.Test;
import org.junit.platform.testkit.engine.EngineTestKit;
import org.opentest4j.TestAbortedException;
class EngineTestKitAllEventsDemo {
@Test
void verifyAllJupiterEvents() {
Writer writer = // create a java.io.Writer for debug output
EngineTestKit.engine("junit-jupiter") (1)
.selectors(selectClass(ExampleTestCase.class)) (2)
.execute() (3)
.allEvents() (4)
.debug(writer) (5)
.assertEventsMatchExactly( (6)
event(engine(), started()),
event(container(ExampleTestCase.class), started()),
event(test("skippedTest"), skippedWithReason("for demonstration purposes")),
event(test("succeedingTest"), started()),
event(test("succeedingTest"), finishedSuccessfully()),
event(test("abortedTest"), started()),
event(test("abortedTest"),
abortedWithReason(instanceOf(TestAbortedException.class),
message(m -> m.contains("abc does not contain Z")))),
event(test("failingTest"), started()),
event(test("failingTest"), finishedWithFailure(
instanceOf(ArithmeticException.class), message(it -> it.endsWith("by zero")))),
event(container(ExampleTestCase.class), finishedSuccessfully()),
event(engine(), finishedSuccessfully()));
}
}| 1 | 選取 JUnit Jupiter TestEngine。 |
| 2 | 選取 ExampleTestCase 測試類別。 |
| 3 | 執行 TestPlan。 |
| 4 | 依所有事件篩選。 |
| 5 | 將所有事件列印到提供的 writer 以進行偵錯。偵錯資訊也可以寫入到 OutputStream,例如 System.out 或 System.err。 |
| 6 | 完全按照測試引擎觸發事件的順序斷言所有事件。 |
前述範例中的 debug() 呼叫會產生類似於以下的輸出。
All Events:
Event [type = STARTED, testDescriptor = JupiterEngineDescriptor: [engine:junit-jupiter], timestamp = 2018-12-14T12:45:14.082280Z, payload = null]
Event [type = STARTED, testDescriptor = ClassTestDescriptor: [engine:junit-jupiter]/[class:example.ExampleTestCase], timestamp = 2018-12-14T12:45:14.089339Z, payload = null]
Event [type = SKIPPED, testDescriptor = TestMethodTestDescriptor: [engine:junit-jupiter]/[class:example.ExampleTestCase]/[method:skippedTest()], timestamp = 2018-12-14T12:45:14.094314Z, payload = 'for demonstration purposes']
Event [type = STARTED, testDescriptor = TestMethodTestDescriptor: [engine:junit-jupiter]/[class:example.ExampleTestCase]/[method:succeedingTest()], timestamp = 2018-12-14T12:45:14.095182Z, payload = null]
Event [type = FINISHED, testDescriptor = TestMethodTestDescriptor: [engine:junit-jupiter]/[class:example.ExampleTestCase]/[method:succeedingTest()], timestamp = 2018-12-14T12:45:14.104922Z, payload = TestExecutionResult [status = SUCCESSFUL, throwable = null]]
Event [type = STARTED, testDescriptor = TestMethodTestDescriptor: [engine:junit-jupiter]/[class:example.ExampleTestCase]/[method:abortedTest()], timestamp = 2018-12-14T12:45:14.106121Z, payload = null]
Event [type = FINISHED, testDescriptor = TestMethodTestDescriptor: [engine:junit-jupiter]/[class:example.ExampleTestCase]/[method:abortedTest()], timestamp = 2018-12-14T12:45:14.109956Z, payload = TestExecutionResult [status = ABORTED, throwable = org.opentest4j.TestAbortedException: Assumption failed: abc does not contain Z]]
Event [type = STARTED, testDescriptor = TestMethodTestDescriptor: [engine:junit-jupiter]/[class:example.ExampleTestCase]/[method:failingTest()], timestamp = 2018-12-14T12:45:14.110680Z, payload = null]
Event [type = FINISHED, testDescriptor = TestMethodTestDescriptor: [engine:junit-jupiter]/[class:example.ExampleTestCase]/[method:failingTest()], timestamp = 2018-12-14T12:45:14.111217Z, payload = TestExecutionResult [status = FAILED, throwable = java.lang.ArithmeticException: / by zero]]
Event [type = FINISHED, testDescriptor = ClassTestDescriptor: [engine:junit-jupiter]/[class:example.ExampleTestCase], timestamp = 2018-12-14T12:45:14.113731Z, payload = TestExecutionResult [status = SUCCESSFUL, throwable = null]]
Event [type = FINISHED, testDescriptor = JupiterEngineDescriptor: [engine:junit-jupiter], timestamp = 2018-12-14T12:45:14.113806Z, payload = TestExecutionResult [status = SUCCESSFUL, throwable = null]]6.4. JUnit Platform Launcher API
JUnit 5 的主要目標之一是使 JUnit 與其程式化用戶端(建置工具和 IDE)之間的介面更強大且更穩定。目的是將發現和執行測試的內部機制,與從外部所需的所有篩選和組態分離開來。
JUnit 5 引入了 Launcher 的概念,可用於發現、篩選和執行測試。此外,第三方測試庫(例如 Spock、Cucumber 和 FitNesse)可以透過提供自訂的測試引擎來插入 JUnit Platform 的啟動基礎架構。
啟動器 API 位於 junit-platform-launcher 模組中。
ConsoleLauncher 是啟動器 API 的一個範例消費者,它位於 junit-platform-console 專案中。
6.4.1. 探索測試
將測試探索作為平台本身的一項專用功能,使 IDE 和建置工具從先前 JUnit 版本中識別測試類別和測試方法的大部分困難中解放出來。
使用範例
import static org.junit.platform.engine.discovery.ClassNameFilter.includeClassNamePatterns;
import static org.junit.platform.engine.discovery.DiscoverySelectors.selectClass;
import static org.junit.platform.engine.discovery.DiscoverySelectors.selectPackage;
import java.io.PrintWriter;
import java.nio.file.Path;
import java.nio.file.Paths;
import org.junit.platform.engine.FilterResult;
import org.junit.platform.engine.TestDescriptor;
import org.junit.platform.launcher.Launcher;
import org.junit.platform.launcher.LauncherDiscoveryListener;
import org.junit.platform.launcher.LauncherDiscoveryRequest;
import org.junit.platform.launcher.LauncherSession;
import org.junit.platform.launcher.LauncherSessionListener;
import org.junit.platform.launcher.PostDiscoveryFilter;
import org.junit.platform.launcher.TestExecutionListener;
import org.junit.platform.launcher.TestPlan;
import org.junit.platform.launcher.core.LauncherConfig;
import org.junit.platform.launcher.core.LauncherDiscoveryRequestBuilder;
import org.junit.platform.launcher.core.LauncherFactory;
import org.junit.platform.launcher.listeners.SummaryGeneratingListener;
import org.junit.platform.launcher.listeners.TestExecutionSummary;
import org.junit.platform.reporting.legacy.xml.LegacyXmlReportGeneratingListener;LauncherDiscoveryRequest request = LauncherDiscoveryRequestBuilder.request()
.selectors(
selectPackage("com.example.mytests"),
selectClass(MyTestClass.class)
)
.filters(
includeClassNamePatterns(".*Tests")
)
.build();
try (LauncherSession session = LauncherFactory.openSession()) {
TestPlan testPlan = session.getLauncher().discover(request);
// ... discover additional test plans or execute tests
}您可以選擇類別、方法和套件中的所有類別,甚至搜尋類別路徑或模組路徑中的所有測試。探索會在所有參與的測試引擎中進行。
產生的 TestPlan 是符合 LauncherDiscoveryRequest 的所有引擎、類別和測試方法的階層式(且唯讀)描述。用戶端可以遍歷樹狀結構、檢索關於節點的詳細資訊,並取得原始來源的連結(例如類別、方法或檔案位置)。測試計畫中的每個節點都有一個唯一 ID,可用於調用特定的測試或測試群組。
用戶端可以透過 LauncherDiscoveryRequestBuilder 註冊一個或多個 LauncherDiscoveryListener 實作,以深入了解測試探索期間發生的事件。預設情況下,建構器會註冊一個「失敗時中止」監聽器,該監聽器會在遇到第一個探索失敗後中止測試探索。預設的 LauncherDiscoveryListener 可以透過 junit.platform.discovery.listener.default 組態參數 進行變更。
6.4.2. 執行測試
若要執行測試,用戶端可以使用與探索階段相同的 LauncherDiscoveryRequest,或建立新的請求。測試進度和報告可以透過向 Launcher 註冊一個或多個 TestExecutionListener 實作來實現,如下列範例所示。
LauncherDiscoveryRequest request = LauncherDiscoveryRequestBuilder.request()
.selectors(
selectPackage("com.example.mytests"),
selectClass(MyTestClass.class)
)
.filters(
includeClassNamePatterns(".*Tests")
)
.build();
SummaryGeneratingListener listener = new SummaryGeneratingListener();
try (LauncherSession session = LauncherFactory.openSession()) {
Launcher launcher = session.getLauncher();
// Register a listener of your choice
launcher.registerTestExecutionListeners(listener);
// Discover tests and build a test plan
TestPlan testPlan = launcher.discover(request);
// Execute test plan
launcher.execute(testPlan);
// Alternatively, execute the request directly
launcher.execute(request);
}
TestExecutionSummary summary = listener.getSummary();
// Do something with the summary...execute() 方法沒有回傳值,但您可以使用 TestExecutionListener 來彙總結果。範例請參閱 SummaryGeneratingListener、LegacyXmlReportGeneratingListener 和 UniqueIdTrackingListener。
所有 TestExecutionListener 方法都會依序呼叫。啟動事件的方法會依註冊順序呼叫,而完成事件的方法則會以相反的順序呼叫。在所有 executionStarted 呼叫返回之前,測試案例執行不會開始。 |
6.4.3. 註冊 TestEngine
有關詳細資訊,請參閱關於 TestEngine 註冊的專門章節。
6.4.4. 註冊 PostDiscoveryFilter
除了將後探索篩選器指定為傳遞至 Launcher API 的 LauncherDiscoveryRequest 的一部分之外,PostDiscoveryFilter 實作將在執行時期透過 Java 的 ServiceLoader 機制發現,並由 Launcher 自動應用,此外還包括請求中的篩選器。
例如,實作 PostDiscoveryFilter 且在 /META-INF/services/org.junit.platform.launcher.PostDiscoveryFilter 檔案中宣告的 example.CustomTagFilter 類別會自動載入和應用。
6.4.5. 註冊 LauncherSessionListener
當 LauncherSession 開啟(在 Launcher 首次探索和執行測試之前)和關閉(當不再探索或執行測試時)時,會通知 LauncherSessionListener 的已註冊實作。它們可以透過傳遞給 LauncherFactory 的 LauncherConfig 以程式方式註冊,或者它們可以在執行時期透過 Java 的 ServiceLoader 機制發現,並自動向 LauncherSession 註冊(除非停用自動註冊)。
工具支援
已知下列建置工具和 IDE 提供對 LauncherSession 的完整支援
-
Gradle 4.6 及更新版本
-
Maven Surefire/Failsafe 3.0.0-M6 及更新版本
-
IntelliJ IDEA 2017.3 及更新版本
其他工具也可能有效,但尚未經過明確測試。
使用範例
LauncherSessionListener 非常適合實作每個 JVM 一次的設定/拆卸行為,因為它會在啟動器工作階段中的第一個測試之前和最後一個測試之後分別被呼叫。啟動器工作階段的範圍取決於使用的 IDE 或建置工具,但通常對應於測試 JVM 的生命週期。一個自訂監聽器,在執行第一個測試之前啟動 HTTP 伺服器,並在執行最後一個測試後停止它,可能如下所示
package example.session;
import static java.net.InetAddress.getLoopbackAddress;
import java.io.IOException;
import java.io.UncheckedIOException;
import java.net.InetSocketAddress;
import java.util.concurrent.ExecutorService;
import java.util.concurrent.Executors;
import com.sun.net.httpserver.HttpServer;
import org.junit.platform.launcher.LauncherSession;
import org.junit.platform.launcher.LauncherSessionListener;
import org.junit.platform.launcher.TestExecutionListener;
import org.junit.platform.launcher.TestPlan;
public class GlobalSetupTeardownListener implements LauncherSessionListener {
private Fixture fixture;
@Override
public void launcherSessionOpened(LauncherSession session) {
// Avoid setup for test discovery by delaying it until tests are about to be executed
session.getLauncher().registerTestExecutionListeners(new TestExecutionListener() {
@Override
public void testPlanExecutionStarted(TestPlan testPlan) {
if (fixture == null) {
fixture = new Fixture();
fixture.setUp();
}
}
});
}
@Override
public void launcherSessionClosed(LauncherSession session) {
if (fixture != null) {
fixture.tearDown();
fixture = null;
}
}
static class Fixture {
private HttpServer server;
private ExecutorService executorService;
void setUp() {
try {
server = HttpServer.create(new InetSocketAddress(getLoopbackAddress(), 0), 0);
}
catch (IOException e) {
throw new UncheckedIOException("Failed to start HTTP server", e);
}
server.createContext("/test", exchange -> {
exchange.sendResponseHeaders(204, -1);
exchange.close();
});
executorService = Executors.newCachedThreadPool();
server.setExecutor(executorService);
server.start(); (1)
int port = server.getAddress().getPort();
System.setProperty("http.server.host", getLoopbackAddress().getHostAddress()); (2)
System.setProperty("http.server.port", String.valueOf(port)); (3)
}
void tearDown() {
server.stop(0); (4)
executorService.shutdownNow();
}
}
}| 1 | 啟動 HTTP 伺服器 |
| 2 | 將其主機位址匯出為系統屬性,供測試使用 |
| 3 | 將其埠號匯出為系統屬性,供測試使用 |
| 4 | 停止 HTTP 伺服器 |
此範例使用 JDK 隨附的 jdk.httpserver 模組中的 HTTP 伺服器實作,但與任何其他伺服器或資源的工作方式類似。為了讓 JUnit Platform 拾取監聽器,您需要將其註冊為服務,方法是將具有以下名稱和內容的資源檔案新增至您的測試執行時期類別路徑(例如,將檔案新增至 src/test/resources)
example.session.GlobalSetupTeardownListener您現在可以從測試中使用資源
package example.session;
import static org.junit.jupiter.api.Assertions.assertEquals;
import java.net.HttpURLConnection;
import java.net.URI;
import java.net.URL;
import org.junit.jupiter.api.Test;
class HttpTests {
@Test
void respondsWith204() throws Exception {
String host = System.getProperty("http.server.host"); (1)
String port = System.getProperty("http.server.port"); (2)
URL url = URI.create("http://" + host + ":" + port + "/test").toURL();
HttpURLConnection connection = (HttpURLConnection) url.openConnection();
connection.setRequestMethod("GET");
int responseCode = connection.getResponseCode(); (3)
assertEquals(204, responseCode); (4)
}
}| 1 | 從監聽器設定的系統屬性中讀取伺服器的主機位址 |
| 2 | 從監聽器設定的系統屬性中讀取伺服器的埠號 |
| 3 | 向伺服器傳送請求 |
| 4 | 檢查回應的狀態碼 |
6.4.6. 註冊 LauncherInterceptor
為了攔截 Launcher 和 LauncherSessionListener 實例的建立,以及對前者的 discover 和 execute 方法的呼叫,用戶端可以透過 Java 的 ServiceLoader 機制註冊 LauncherInterceptor 的自訂實作,方法是將 junit.platform.launcher.interceptors.enabled 組態參數 設定為 true。
一個典型的用例是建立一個自訂攔截器,以取代 JUnit Platform 用於載入測試類別和引擎實作的 ClassLoader。
import java.io.IOException;
import java.io.UncheckedIOException;
import java.net.URI;
import java.net.URL;
import java.net.URLClassLoader;
import org.junit.platform.launcher.LauncherInterceptor;
public class CustomLauncherInterceptor implements LauncherInterceptor {
private final URLClassLoader customClassLoader;
public CustomLauncherInterceptor() throws Exception {
ClassLoader parent = Thread.currentThread().getContextClassLoader();
customClassLoader = new URLClassLoader(new URL[] { URI.create("some.jar").toURL() }, parent);
}
@Override
public <T> T intercept(Invocation<T> invocation) {
Thread currentThread = Thread.currentThread();
ClassLoader originalClassLoader = currentThread.getContextClassLoader();
currentThread.setContextClassLoader(customClassLoader);
try {
return invocation.proceed();
}
finally {
currentThread.setContextClassLoader(originalClassLoader);
}
}
@Override
public void close() {
try {
customClassLoader.close();
}
catch (IOException e) {
throw new UncheckedIOException("Failed to close custom class loader", e);
}
}
}6.4.7. 註冊 LauncherDiscoveryListener
除了將探索監聽器指定為 LauncherDiscoveryRequest 的一部分,或透過 Launcher API 以程式方式註冊它們之外,自訂 LauncherDiscoveryListener 實作可以在執行時期透過 Java 的 ServiceLoader 機制發現,並自動向透過 LauncherFactory 建立的 Launcher 註冊。
例如,實作 LauncherDiscoveryListener 且在 /META-INF/services/org.junit.platform.launcher.LauncherDiscoveryListener 檔案中宣告的 example.CustomLauncherDiscoveryListener 類別會自動載入和註冊。
6.4.8. 註冊 TestExecutionListener
除了以程式方式註冊測試執行監聽器的公開 Launcher API 方法之外,自訂 TestExecutionListener 實作將在執行時期透過 Java 的 ServiceLoader 機制發現,並自動向透過 LauncherFactory 建立的 Launcher 註冊。
例如,實作 TestExecutionListener 且在 /META-INF/services/org.junit.platform.launcher.TestExecutionListener 檔案中宣告的 example.CustomTestExecutionListener 類別會自動載入和註冊。
6.4.9. 設定 TestExecutionListener
當 TestExecutionListener 透過 Launcher API 以程式方式註冊時,監聽器可能會提供程式方式來進行設定 — 例如,透過其建構子、設定方法等。但是,當 TestExecutionListener 透過 Java 的 ServiceLoader 機制自動註冊時(請參閱 註冊 TestExecutionListener),使用者無法直接設定監聽器。在這種情況下,TestExecutionListener 的作者可能會選擇透過 組態參數 使監聽器可設定。然後,監聽器可以透過提供給 testPlanExecutionStarted(TestPlan) 和 testPlanExecutionFinished(TestPlan) 回呼方法的 TestPlan 存取組態參數。有關範例,請參閱 UniqueIdTrackingListener。
6.4.10. 停用 TestExecutionListener
有時,在不啟用某些執行監聽器的情況下執行測試套件可能會很有用。例如,您可能有自訂的 TestExecutionListener,它會將測試結果傳送到外部系統以進行報告,而在偵錯時,您可能不希望報告這些偵錯結果。若要執行此操作,請為 junit.platform.execution.listeners.deactivate 組態參數提供一個模式,以指定應停用(即未註冊)哪些執行監聽器以用於目前的測試執行。
|
只有透過 |
模式比對語法
有關詳細資訊,請參閱模式比對語法。
6.4.11. 設定啟動器
如果您需要對測試引擎和監聽器的自動偵測和註冊進行細緻的控制,您可以建立 LauncherConfig 的實例,並將其提供給 LauncherFactory。通常,LauncherConfig 的實例是透過內建的流暢建構器 API 建立的,如下列範例所示。
LauncherConfig launcherConfig = LauncherConfig.builder()
.enableTestEngineAutoRegistration(false)
.enableLauncherSessionListenerAutoRegistration(false)
.enableLauncherDiscoveryListenerAutoRegistration(false)
.enablePostDiscoveryFilterAutoRegistration(false)
.enableTestExecutionListenerAutoRegistration(false)
.addTestEngines(new CustomTestEngine())
.addLauncherSessionListeners(new CustomLauncherSessionListener())
.addLauncherDiscoveryListeners(new CustomLauncherDiscoveryListener())
.addPostDiscoveryFilters(new CustomPostDiscoveryFilter())
.addTestExecutionListeners(new LegacyXmlReportGeneratingListener(reportsDir, out))
.addTestExecutionListeners(new CustomTestExecutionListener())
.build();
LauncherDiscoveryRequest request = LauncherDiscoveryRequestBuilder.request()
.selectors(selectPackage("com.example.mytests"))
.build();
try (LauncherSession session = LauncherFactory.openSession(launcherConfig)) {
session.getLauncher().execute(request);
}6.4.12. 模擬執行模式
透過 Launcher API 執行測試時,您可以將 junit.platform.execution.dryRun.enabled 組態參數 設定為 true 來啟用模擬執行模式。在此模式下,Launcher 實際上不會執行任何測試,但會通知已註冊的 TestExecutionListener 實例,就好像所有測試都已跳過且其容器已成功一樣。這可用於測試建置組態中的變更,或驗證監聽器是否按預期呼叫,而無需等待所有測試執行完畢。
6.5. 測試引擎
TestEngine 有助於特定程式設計模型的測試探索和執行。
6.5.1. JUnit 測試引擎
JUnit 提供了三個 TestEngine 實作。
-
junit-jupiter-engine:JUnit Jupiter 的核心。 -
junit-vintage-engine:JUnit 4 之上的薄層,允許使用 JUnit Platform 啟動器基礎架構執行傳統測試(基於 JUnit 3.8 和 JUnit 4)。 -
junit-platform-suite-engine:使用 JUnit Platform 啟動器基礎架構執行宣告式測試套件。
6.5.2. 自訂測試引擎
您可以透過實作 junit-platform-engine 模組中的介面並註冊您的引擎,來貢獻您自己的自訂 TestEngine。
每個 TestEngine 都必須提供自己的唯一 ID,從 EngineDiscoveryRequest 中探索測試,並根據 ExecutionRequest 執行這些測試。
junit- 唯一 ID 字首保留給 JUnit 團隊的 TestEngineJUnit Platform
|
為了促進在啟動 JUnit Platform 之前在 IDE 和工具中進行測試探索,鼓勵 TestEngine 實作使用 @Testable 註解。例如,JUnit Jupiter 中的 @Test 和 @TestFactory 註解使用 @Testable 進行了元註解。有關更多詳細資訊,請查閱 @Testable 的 Javadoc。
如果您自訂的 TestEngine 需要設定,請考慮允許使用者透過組態參數提供設定。然而,請注意,我們強烈建議您為您的測試引擎支援的所有組態參數使用唯一的前綴。這樣做將確保您的組態參數名稱與其他測試引擎的參數名稱之間沒有衝突。此外,由於組態參數可以作為 JVM 系統屬性提供,因此明智之舉是避免與其他系統屬性的名稱衝突。例如,JUnit Jupiter 對其所有支援的組態參數使用 junit.jupiter. 作為前綴。此外,如同上述關於 TestEngine ID 的 junit- 前綴的警告,您不應使用 junit. 作為您自己的組態參數名稱的前綴。
雖然目前沒有關於如何實作自訂 TestEngine 的官方指南,但您可以參考 JUnit 測試引擎的實作,或是在 JUnit 5 wiki 中列出的第三方測試引擎的實作。您也可以在網路上找到各種教學和部落格文章,示範如何編寫自訂 TestEngine。
HierarchicalTestEngine 是 TestEngine SPI(由 junit-jupiter-engine 使用)的便利抽象基礎實作,僅要求實作者提供測試探索的邏輯。它實作了 TestDescriptors 的執行,後者實作了 Node 介面,包括對並行執行的支援。 |
6.5.3. 註冊 TestEngine
TestEngine 註冊透過 Java 的 ServiceLoader 機制支援。
例如,junit-jupiter-engine 模組在其 JAR 中的 /META-INF/services 資料夾內的 org.junit.platform.engine.TestEngine 檔案中註冊了其 org.junit.jupiter.engine.JupiterTestEngine。
6.5.4. 需求
| 本節中的「must」(必須)、「must not」(不得)、「required」(必要)、「shall」(應)、「shall not」(不應)、「should」(應該)、「should not」(不應該)、「recommended」(建議)、「may」(可以)和「optional」(可選)等詞語應按照 RFC 2119 中的描述進行解釋。 |
強制性需求
為了與建置工具和 IDE 互通操作,TestEngine 實作必須遵守以下需求
-
從
TestEngine.discover()返回的TestDescriptor必須 是TestDescriptor實例樹狀結構的根節點。這表示在節點及其後代之間不得存在任何循環。 -
TestEngine必須 能夠為其先前從TestEngine.discover()產生並返回的任何唯一 ID 探索UniqueIdSelectors。這使得可以選擇要執行或重新執行的測試子集。 -
傳遞給
TestEngine.execute()的EngineExecutionListener的executionSkipped、executionStarted和executionFinished方法,對於從TestEngine.discover()返回的樹狀結構中的每個TestDescriptor節點,必須 最多調用一次。父節點必須在其子節點之前報告為已開始,並在其子節點之後報告為已完成。如果節點報告為已跳過,則不得為其後代報告任何事件。
增強的相容性
遵守以下需求是可選的,但建議用於增強與建置工具和 IDE 的相容性
-
除非為了指示空的探索結果,否則從
TestEngine.discover()返回的TestDescriptor應該 具有子節點,而不是完全動態的。這允許工具顯示測試的結構並選擇要執行的測試子集。 -
當解析
UniqueIdSelectors時,TestEngine應該 只返回具有相符唯一 ID(包括其祖先)的TestDescriptor實例,但可以返回執行選定測試所需的其他同級節點或其他節點。 -
TestEngines應該 支援 標記 測試和容器,以便在探索測試時可以應用標籤篩選器。
7. API 演進
JUnit 5 的主要目標之一是提高維護者演進 JUnit 的能力,儘管它已在許多專案中使用。在 JUnit 4 中,許多最初作為內部結構添加的東西,最終被外部擴充功能作者和工具建置者使用。這使得更改 JUnit 4 特別困難,有時甚至不可能。
這就是 JUnit 5 為所有公開可用的介面、類別和方法引入定義生命週期的原因。
7.1. API 版本和狀態
每個發布的工件都有一個版本號 <major>.<minor>.<patch>,並且所有公開可用的介面、類別和方法都使用來自 @API Guardian 專案的 @API 進行註解。註解的 status 屬性可以分配以下值之一。
| 狀態 | 描述 |
|---|---|
|
不得被 JUnit 自身以外的任何程式碼使用。可能會在沒有事先通知的情況下移除。 |
|
不應再使用;可能會在下一個次要版本中消失。 |
|
適用於我們正在尋求回饋的新實驗性功能。 |
|
適用於在當前主要版本的至少下一個次要版本中,不會以向後不相容的方式更改的功能。如果排定移除,它將首先降級為 |
|
適用於在當前主要版本 ( |
如果 @API 註解存在於類型上,則認為它也適用於該類型的所有公共成員。允許成員宣告穩定性較低的不同的 status 值。
7.2. 實驗性 API
下表列出了目前透過 @API(status = EXPERIMENTAL) 指定為實驗性的 API。依賴此類 API 時應謹慎。
| 套件名稱 | 名稱 | 自 |
|---|---|---|
|
|
|
|
|
|
|
|
|
|
|
|
|
|
|
|
|
|
|
|
|
|
|
|
|
|
|
|
|
|
|
|
|
|
|
|
|
|
|
|
|
|
|
|
|
|
|
|
|
|
|
|
|
|
|
|
|
|
|
|
|
|
|
|
|
|
|
|
|
|
|
|
|
|
|
|
|
|
|
|
|
|
|
|
|
|
|
|
|
|
|
|
|
|
|
|
|
|
|
|
|
|
|
|
|
|
|
|
|
|
|
|
|
|
|
|
|
|
|
|
|
|
|
|
|
|
|
|
|
|
|
|
|
|
|
|
|
|
|
|
|
|
|
|
|
|
|
|
|
|
|
|
|
|
|
|
|
|
|
|
|
|
|
|
|
|
|
|
|
|
|
|
|
|
|
|
|
|
|
|
|
|
|
|
|
|
|
|
|
|
|
|
|
|
|
|
|
|
|
|
|
|
|
|
|
|
|
|
|
|
|
|
|
|
|
|
|
|
|
|
|
|
|
|
|
|
|
|
|
|
|
|
|
|
|
|
|
|
|
|
|
|
|
|
|
|
|
|
|
|
|
|
|
|
|
|
|
|
|
|
|
|
|
|
|
|
|
|
|
|
|
|
|
|
|
|
|
|
|
|
|
|
|
|
|
|
|
|
|
|
|
|
|
|
|
|
|
|
|
|
|
|
|
|
|
|
|
|
|
|
|
|
|
|
|
|
|
|
|
|
|
|
|
|
|
|
|
|
|
|
|
|
|
|
|
|
|
|
|
|
|
|
|
|
|
|
|
|
|
|
|
|
|
|
|
|
|
|
|
|
|
|
|
|
|
|
|
|
|
|
|
|
|
|
|
|
|
|
|
|
|
|
|
|
|
|
|
|
|
|
|
|
|
|
|
|
|
|
|
|
|
|
|
|
|
|
|
|
|
|
|
|
|
|
|
|
|
|
|
|
|
|
|
|
|
|
|
|
|
|
|
|
|
|
|
|
|
|
|
|
|
|
|
|
|
|
|
|
|
|
|
|
|
|
|
|
|
|
|
|
|
|
|
|
|
|
|
|
|
|
|
|
|
|
|
|
|
|
|
|
|
|
|
|
|
|
|
|
|
|
|
|
|
|
|
|
|
|
|
|
|
|
|
|
|
|
|
|
|
|
|
|
|
|
|
|
|
|
|
|
|
|
|
|
|
|
|
|
|
|
|
|
|
|
|
|
|
|
|
|
|
|
|
|
|
|
|
|
|
|
|
|
|
|
|
|
|
|
|
|
|
|
|
|
7.3. 已棄用的 API
下表列出了目前透過 @API(status = DEPRECATED) 指定為已棄用的 API。您應盡可能避免使用已棄用的 API,因為這些 API 很可能會在即將發行的版本中移除。
| 套件名稱 | 名稱 | 自 |
|---|---|---|
|
|
|
|
|
|
|
|
|
|
|
|
|
|
|
|
|
|
|
|
|
|
|
|
|
|
|
|
|
|
|
|
|
|
|
|
|
|
|
|
|
|
|
|
|
|
|
|
|
|
|
|
|
|
|
|
|
|
|
|
|
|
|
|
|
|
|
|
|
|
|
|
|
|
|
|
|
|
|
|
|
|
|
|
|
|
|
|
|
|
|
|
|
|
|
|
|
|
|
7.4. @API 工具支援
@API Guardian 專案計劃為使用 @API 註解的 API 的發布者和消費者提供工具支援。例如,工具支援可能會提供一種方法來檢查 JUnit API 的使用是否符合 @API 註解宣告。
8. 貢獻者
直接在 GitHub 上瀏覽 目前的貢獻者列表。
9. 發行說明
發行說明可在此處取得:這裡。
10. 附錄
10.1. 可重現的建置
從 5.7 版開始,JUnit 5 的目標是使其非 javadoc JAR 成為可重現的。
在相同的建置條件下,例如 Java 版本,重複建置應提供相同的逐位元組輸出。
這表示任何人都可以重現 Maven Central/Sonatype 上構件的建置條件,並在本機產生相同的輸出構件,從而確認儲存庫中的構件實際上是從此原始碼產生的。
10.2. 相依性元數據
最終版本和里程碑的構件部署到 Maven Central,快照構件部署到 Sonatype 的 快照儲存庫,位於 /org/junit 下。
以下章節列出了三個群組的所有構件及其版本:平台、Jupiter 和 Vintage。材料清單 (BOM) 包含上述所有構件及其版本的列表。
|
對齊依賴版本
為確保所有 JUnit 構件彼此相容,其版本應對齊。如果您依賴 Spring Boot 進行相依性管理,請參閱相應章節。否則,建議您套用 BOM 到您的專案,而不是管理 JUnit 構件的個別版本。請參閱 Maven 或 Gradle 的相應章節。 |
10.2.1. JUnit 平台
-
群組 ID:
org.junit.platform -
版本:
1.12.0 -
Artifact IDs:
junit-platform-commons-
JUnit 平台的通用 API 和支援公用程式。任何使用
@API(status = INTERNAL)註解的 API 僅供 JUnit 框架本身內部使用。不支援外部方使用任何內部 API! junit-platform-console-
支援從主控台探索和執行 JUnit 平台上的測試。有關詳細資訊,請參閱主控台啟動器。
junit-platform-console-standalone-
Maven Central 的 junit-platform-console-standalone 目錄中提供了包含所有相依性的可執行胖 JAR。有關詳細資訊,請參閱主控台啟動器。
junit-platform-engine-
測試引擎的公用 API。有關詳細資訊,請參閱註冊測試引擎。
junit-platform-jfr-
為 JUnit 平台上的 Java Flight Recorder 事件提供
LauncherDiscoveryListener和TestExecutionListener。有關詳細資訊,請參閱Flight Recorder 支援。 junit-platform-launcher-
用於配置和啟動測試計劃的公用 API — 通常由 IDE 和建置工具使用。有關詳細資訊,請參閱JUnit 平台啟動器 API。
junit-platform-reporting-
產生測試報告的
TestExecutionListener實作 — 通常由 IDE 和建置工具使用。有關詳細資訊,請參閱JUnit 平台報告。 junit-platform-runner-
用於在 JUnit 4 環境中執行 JUnit 平台上的測試和測試套件的執行器。有關詳細資訊,請參閱使用 JUnit 4 執行 JUnit 平台。
junit-platform-suite-
JUnit 平台套件構件,可轉換地引入
junit-platform-suite-api和junit-platform-suite-engine的相依性,以簡化 Gradle 和 Maven 等建置工具中的相依性管理。 junit-platform-suite-api-
用於在 JUnit 平台上配置測試套件的註解。JUnit 平台套件引擎和JUnitPlatform 執行器支援此功能。
junit-platform-suite-commons-
用於在 JUnit 平台上執行測試套件的通用支援公用程式。
junit-platform-suite-engine-
在 JUnit 平台上執行測試套件的引擎;僅在執行階段需要。有關詳細資訊,請參閱JUnit 平台套件引擎。
junit-platform-testkit-
提供支援以執行給定
TestEngine的測試計劃,然後透過流暢的 API 存取結果以驗證預期結果。
10.2.2. JUnit Jupiter
-
群組 ID:
org.junit.jupiter -
版本:
5.12.0 -
Artifact IDs:
junit-jupiter-
JUnit Jupiter 聚合器構件,可轉換地引入
junit-jupiter-api、junit-jupiter-params和junit-jupiter-engine的相依性,以簡化 Gradle 和 Maven 等建置工具中的相依性管理。 junit-jupiter-apijunit-jupiter-engine-
JUnit Jupiter 測試引擎實作;僅在執行階段需要。
junit-jupiter-params-
支援 JUnit Jupiter 中的參數化測試。
junit-jupiter-migrationsupport-
支援從 JUnit 4 遷移到 JUnit Jupiter;僅在支援 JUnit 4 的
@Ignore註解以及執行選定的 JUnit 4 規則時才需要。
10.2.3. JUnit Vintage
-
群組 ID:
org.junit.vintage -
版本:
5.12.0 -
Artifact ID:
junit-vintage-engine-
JUnit Vintage 測試引擎實作,允許使用者在 JUnit 平台上執行傳統 JUnit 測試。傳統測試包括使用 JUnit 3 或 JUnit 4 API 編寫的測試,或使用基於這些 API 建置的測試框架編寫的測試。
